Share

Loveuary How-To's

Pearl Belts
1 of 96
Pearl Belts

MATERIALS:

  • Flat back faux pearls in various sizes
  • Belt with large buckle that has a flat surface
  • E6000
  • Gem picker or bamboo skewer

OPTIONAL:

  • Paint

INSTRUCTIONS:

1. You are going to apply the pearls in rows from the outer edge inward. Apply a short line of e6000 along the outer edge of the belt buckle. If you don’t like the color of the belt buckle, paint it before you start since you will see it a little regardless of how many pearls you add.

PRO TIP: make sure all the pearls you buy are the same tone, they come in many different shades like ivory or iridescent.

2. Use the gem picker to apply the pearls. Set the flat side into the glue. Continue to apply glue and pearls along the outer edge in short increments until you’ve added an entire row around the edge.

PRO TIP: If you don’t have a gem picker, a bamboo skewer with a dab of e6000 on the end will do the trick!

3. Continue adding pearls to the belt buckle in rows toward the center until finished.

PRO TIP: E6000 takes 24 hours to dry so if you need to move, adjust and add pearls as you get to the end it’s no problem!

4. Lay the belt buckle flat and allow the glue to dry for 24 hours. Enjoy!

DIY Ruffle Tote Bag
2 of 96
DIY Ruffle Tote Bag

MATERIALS:

  • Canvas tote bags
  • Ruffled or pleated trim
  • Fabric hot glue sticks and hot glue gun or Fabri-tac
  • Fabric scissors
  • Soft tape measure
  • Fray check

OPTIONAL TO CREATE THE HEART SHAPED RUFFLE BAG:

  • Pleather
  • Cording

INSTRUCTIONS:

TO CREATE THE RUFFLE EDGED TOTE

1. To determine the length of trim you will need, measure around the bag from 1” in on the inside down the front, around the bottom, up the back side and 1” into the other side of the bag.

2. Cut two pieces of the trim to size.

PRO TIP: If you have trim that is made of a material that frays, use fray check on the edges.

3. Begin gluing the trim onto the bag by gluing 1” of trim to the inside, down the front of the bag, around the bottom, up the back and 1” onto the inside.

PRO TIP: Fabric hot glue has a milky color, if using dark or sheer trim, use Fabri-tac which dried

4. Repeat step 3 on the other side, allow the glue to dry and enjoy!

TO CREATE THE LAYERED RUFFLE TOTE

1. To determine the length of trim you will need, measure around the bag and add about 2” for overlap of your material.

2. From the bottom up, glue the trim on in horizontal rows.

PRO TIP: The more layers you do the more “ruffle-y” the bag will look!

3. Continue adding layers until your reach the top. Allow the glue to dry. Enjoy!

TO CREATE THE HEART SHAPED RUFFLE BAG

1. To roughly measure out how long you need each piece of trim to be, make a heart shape on the bag without gluing it down, cut the trim to necessary length to work.

2. Glue the trim for each side of the heart in place. Make sure the edges of the trim are completely vertical at the bottom to create the point of the heart, and the trim curves at the top so the trim edges are horizontal in the center.

3. Cut a piece of pleather to create the heart in the center.

4. Glue the heart on top.

5. Use Fabri-tac to add cording around the edges of the heart to create a crisp outline of the heart.

Get more from this episode >>

Rug Tapestry
3 of 96
Rug Tapestry

MATERIALS:

    TO CREATE THE CURTAIN ROD HUNG RUG TAPESTRY

    • Rug
    • Curtain rod and brackets
    • Drapery hooks
    • Curtain rings
    • Drill
    • Level
    • Screws if hardware isn’t provided for brackets
    • Pencil

    TO CREATE THE SEAMLESS RUG TAPESTRY

    • 1” x 4” wooden plank cut to the width of your rug
    • Staple gun and staples
    • French cleat
    • Drill
    • Screws
    • Stud finder
    • Level
    • Pencil

    INSTRUCTIONS:

    TO CREATE THE CURTAIN ROD HUNG RUG TAPESTRY

    1. Hang the curtain brackets in desired spot at desired height. Use the level to make sure the curtain rod will sit level.

    2. Hook the drapery hooks through the backing of the rug, be careful not to go through the front of the rug.

    3. Hook the drapery hooks onto the curtain rings.

    4. Slide all the rings onto the curtain rod.

    5. Set the rod in the brackets to hang and enjoy!

    TO CREATE THE SEAMLESS RUG TAPESTRY WALL HANG

    1. Cut or have the 1” x 4” cut down to the width of your rug.

    2. Lay the rug on top of the wood with about 3” going past the top edge of the wood.

    3. Staple about every 10” inches through the front of the rug into the wood.

    PRO TIP: If you have a low pile rug and are concerned about seeing the staples, you can use Velcro tabs to attach decorative buttons to cover them.

    4. Attach one piece of the French cleat to the center of the back side of the wood and the other part of the cleat to the wall where you want the tapestry to hang.

    PRO TIP: Make sure you screw into some studs, so the weight of the rug is supported.

    5. Hang and enjoy!

    Get more from this episode >>

    Get more Valentine's Day ideas from the Home & Family Love Ever After DIY & Cookbook >>

    DIY Clay Kindness Pins
    4 of 96
    DIY Clay Kindness Pins

    MATERIALS:

    • Oven-bake clay
    • Card stock, free template (thinkmakeshareblog.com)
    • Paintbrushes
    • Acrylic Craft paint
    • Paint pens
    • Rolling pin
    • Craft knife
    • Scissors
    • Toothpicks
    • Hot glue/glue gun
    • 1” brooch pin backs
    • Twine
    DIY Clay Kindness Pins - Home & Family

    Download the free template from Think.Make.Share here.

    INSTRUCTIONS:

    1. Download and print templates onto card stock or use your own design.

    2. Preheat the oven to the temperature suggested on the label of your clay.

    3. Knead the clay as directed to get it ready, then roll it out on a clean surface, 1/4″ thick.

    4. Place your card stock designs on the clay to use as a template, cut out with a craft knife.

    5. Follow package instructions for baking the clay.

    6. If you’re going to tie your designs with string, make holes with a toothpick before baking.

    7. Let clay cool completely before painting.

    8. Paint your clay shapes; adding extra flare with paint pens.

    9. Using hot glue, attach a 1” brooch pin to the back of your design. Let dry.

    10. Attach pin to gifts.

    Get more from this episode >>

    Get more Valentine's Day ideas from the Home & Family Love Ever After DIY & Cookbook >>

    Heart Shape Vertical Display of Flowers
    5 of 96
    Heart Shape Vertical Display of Flowers
    Valentine's Day Grocery Store Flower Arrangement - Home & Family

    INSTRUCTIONS:

    1. Take 2 pussy willow stems and wrap wire around one of them

    2. Take the wired stems and join them at bottom using rubber bands and bend the stems in heart shape. Wire together.

    FOR DECORATIVE DISPLAY:

    1. Puts a dab of floral sticky clay to the bottom of a small vase filled with flowers and places it into the box, next to the container filled with wet foam.

    2. Insert heart into wet foam at bottom of vase

    3. Insert heart shaped chocolate lollipops into the foam.

    4. add moss, a miniature chair, and teapot on top of the wet foam and insert pre-cut flowers to the perimeter of wet foam

    5. Place 2 potted plants in box and fill the crevices with moss.

    Get more from this episode >>

    DIY Rosewater
    6 of 96
    DIY Rosewater

    MATERIALS:

    • Fresh Cut Roses (organic and fragrant work best)
    • Distilled Water
    • Stovetop
    • Stock pot with lid

    INSTRUCTIONS:

    1. Pull the petals off of your fresh cut roses and lightly wash them in lukewarm water (this will help rid the petals of any pesticides or bugs if they are freshly cut from the garden).

    2. Line the bottom of your stock pot with rose petals.

    3. Pour distilled water to the level of the roses, but do not add any more than that. Too much water will dilute the rosewater.

    4. Simmer on the lowest setting of your oven for about 20 minutes, or until your roses lose their color.

    5. Strain the roses out of the rose water and store in a jar or airtight container and store in a cool place. Use this on your face, body, hair, lotion, or anywhere!

    Get more from this episode >>

    DIY Photo Boxes
    7 of 96
    DIY Photo Boxes
    DIY Photo Boxes - Home & Family

    MATERIALS:

    • Wooden craft box with hinges
    • Photos printed to 1 ½” smaller than the interior or the box
    • Paint in desired color
    • Clear spray sealant
    • 220 grit sandpaper
    • Ribbon or clear tape
    • Hot glue gun and glue sticks
    • Double stick tape
    • Ruler
    • Scissors
    • Pencil

    OPTIONAL:

    • X-Acto knife and cutting mat
    • Large square or circle punch

    INSTRUCTIONS:

    1. First you need to give the craft box that nice lacquer finish, in a well-ventilated area sand the craft box until smooth and coat it with the spray sealant. Allow it to dry.

    2. Add another coat of clear sealant. Allow to dry completely. Sand lightly.

    3. Repeat steps 1 and 2 around four times until you have a smooth coating on the box.

    4. Allow the box to dry completely.

    5. Paint the box the desired color and allow it to dry. Add the final coat of clear sealant.

    6. Set aside to dry.

    TO CREATE THE ACCORDION PHOTO BOX:

    1. Cut the cardstock into rectangles ½” narrower than the interior of the box.

    PRO TIP: Using an X-Acto knife and ruler will give you cleaner edges than scissors.

    2. Fold them into even squares then use tape to attach as many strips of accordioned cardstock as you need for photos.

    3. Cut the photos down photos to 1” smaller than the squares of the accordion.

    4. Use double stick tape to attach a photo to the center of each square except the last one.

    5. Glue the face of the last square to the bottom of the box, fold the photo accordion in, close and enjoy!

    TO CREATE THE RIBBON PHOTO BOX:

    1. Cut circles or squares out of cardstock that are ½” smaller than the interior of the box. PRO TIP: If you’re going to be making a lot of these it’s easier to use a paper punch in the desired shape and size. You can get two sizes one for the cardstock and one for the photos.

    2. Cut the photos out to 1” smaller than the cardstock shapes.

    3. Use double stick tape to attach a photo to the center of each piece of cardstock.

    4. Space out the photos face down and glue a ribbon to the back using hot glue.

    5. Glue the bottom of the ribbon to the bottom of the box, fold the photo ribbon in, close and enjoy!

    Get more from this episode >>

    DIY Cake Toppers
    8 of 96
    DIY Cake Toppers

    TO CREATE THE XOXO HEARTS AND KISSES CAKE TOPPERS:

    • Silicone molds in the shape of “X”, “O”, hearts and lips
    • Candy melts also known as candy-coating chocolate
    • Heatproof bowl
    • Spatula

    TO CREATE THE CRAZY HEART CAKE TOPPER:

    • Food safe floral wire, often found in the baking section of craft store
    • Wire cutters
    • Felt
    • Fabric scissors
    • Hot glue stick and gun

    OPTIONAL:

    • Additional decorations like sprinkles and pom-poms

    INSTRUCTIONS:

    TO CREATE THE XOXO HEARTS AND KISSES CAKE TOPPERS:

    1. Melt the candy melts in the microwave in 30 second increments, mix with a spatula in between each increment until melted. Take your time, doing this so it doesn’t melt.

    2. Pour the melted chocolate into to the desired molds.

    3. Allow to cool completely.

    PRO TIP: You can let them cool at room temperature or put them in the fridge to speed up the process!

    4. Once cooled, remove from the molds, decorate your cake and enjoy!

    TO CREATE THE CRAZY HEART CAKE TOPPER:

    1. Cut heart shapes out of the felt in various sizes. Cut two of each heart size as you will be sandwiching the wire between them!

    PRO TIP: Fold the felt in half and cut from the fold to create a symmetrical heart.

    2. Cut pieces of wire to various lengths.

    3. Glue the hearts onto the wire, add a small dot of hot glue onto one of the felt hearts. Place the wire into the hot glue.

    4. Place another heart of the same size over top of the wire so that the piece of wire is sandwiched between the two hearts.

    5. Repeat with a variety of heart shapes and wire lengths.

    6. Place the wires into the cake or cupcakes to display.

    Get more Valentine's Day ideas from the Home & Family Love Ever After DIY & Cookbook >>

    Get more from this episode >>

    DIY Tree Stump Art
    9 of 96
    DIY Tree Stump Art

    MATERIALS:

    • Tree stump
    • Chisel
    • Hammer
    • Bar clamps and a sturdy worktable
    • Work gloves
    • Safety goggles
    • Wood burning tools or letter stickers
    • Chalk
    • Pencil
    • Sandpaper
    • Air duster can or damp rag
    DIY Tree Stump Art - Home & Family

    INSTRUCTIONS:

    1. Draw the heart onto the tree stump with chalk.

    2. Securely clamp the stump to your worktable.

    3. Chisel the heart out. Put your gloves and safety goggles on, place the tip of the chisel at the edge of the heart facing inward with the flat side of the chisel down, hold the chisel at a slightly downward angle with your non-dominant hand and hit the back of the chisel with the hammer to cut away material. Continue chiseling inward from around the edge of the heart until you’ve removed all the material desired.

    PRO TIP: ALWAYS chisel away from yourself and others while wearing proper safety gear.

    4. Sand down any uneven spots or edges of the heart.

    PRO TIP: Use a can of air duster to remove all the wood particles and clean up the surface before adding initials. A wiping with a damp cloth can also suffice.

    5. Now it’s time to add you and your sweetheart’s initials! If you’re using the wood burning tool, draw them in pencil first, then go over with the wood burning tool. If using stickers, just arrange and place!

    6. Add to your décor and enjoy!

    Get more Valentine's Day ideas from the Home & Family Love Ever After DIY & Cookbook >>

    Get more from this episode >>

    DIY Dog Treat Jars
    10 of 96
    DIY Dog Treat Jars

    MATERIALS:

    • Ceramic jars of various sizes with lids
    • Painters tape
    • Small heart hole punch
    • Medium heart hole punch
    • Metallic paint in desired valentine’s day colors
    • Artist paintbrush
    • X-Acto knife

    OPTIONAL:

    • Acetone and Q-tips

    INSTRUCTIONS:

    1. Use painters to tape off lines around the jars in a pattern that you like.

    2. You can have lines cross over one another, just make sure that the first line is completely dry before painting the second line.

    3. Add the paint with an artist’s brush. Set aside to dry.

    4. Remove the tape.

    5. Use your X-Acto knife to clean up any lines that might have gotten blurred from the tape.

    PRO TIP: If the X-Acto doesn’t work, try some acetone with a Q-tip to clean.

    6. To add a second line, repeat the process with a different color.

    7. If you want to add shapes, you can use your painter’s tape to create the shapes. I’m using a heart hole punch in small and medium.

    8. Put the tape in the hole punch and cut out a heart.

    9. Put the tape on the jar wherever you would like the hearts.

    10. Fill in the hearts with the paint and set them aside to dry.

    11. Remove the tape and clean up around the edges just as you would with any other lines or shapes.

    12. Fill with dog treats and enjoy!

    Get more from this episode >>

    DIY Heart Table Runner
    11 of 96
    DIY Heart Table Runner

    MATERIALS:

    • Wooden craft hearts
    • 4” wide ribbon
    • Gold oil-based paint pen
    • Acrylic paint in desired Valentine’s colors
    • Cups to mix paint in
    • Water
    • Paintbrush
    • Gorilla glue hot glue and hot glue gun or Fabri-Tac
    • Scissors


    INSTRUCTIONS:

    1. Determine the number of hearts you will need for the length of your runner by placing the hearts on the table you plan on using it on. You don’t want them to hang over the edge because they’re heavy.

    2. Create a wash out of your paint, this will act like a stain. Add water until you’re satisfied with the consistency, the runnier the paint, the less color will come through.

    3. Paint all of the craft hearts. Allow them to dry.

    PRO TIP: If you add too much paint or it’s too watery, use a rag to wipe away any excess.

    4. Use the paint pen to coat the edge of each craft heart. Allow to dry.

    5. Space the hearts evenly to the length of the runner face down on your work surface.

    6. Cut a length of ribbon just shorter than the length of the hearts.

    7. Attach the ribbon to down the center of the back side of the hearts. The hot glue will dry fast, but Fabri-Tac will adhere just as well as the heavy-duty glue hot glue sticks.

    PRO TIP: If using hot glue, make sure to use a heavy-duty glue.

    8. Place the runner on the table and enjoy!

    Get more from this episode >>

    How To Make Kids’ Valentine Boxes
    12 of 96
    How To Make Kids’ Valentine Boxes
    How To Make Kids Valentine Boxes - Home & Family

    MATERIALS:

    • Acrylic Paint
    • Tissue Paper
    • Iridescent Cellophane Wrap
    • Glitter Paper
    • Ribbon
    • Cardstock or Construction Paper
    • Cardboard Boxes (tissue boxes work great) and gift boxes
    • Cereal Boxes (for building structures)
    • Single face cardboard
    • Craft Paper
    • Craft Knife
    • Cutting mat
    • Scissors
    • Hot glue gun
    • Gluestick
    • Masking tape
    • Pencil
    • Random supplies around the house

    Art projects can be easier to start if you limit your color palette. We used different shades of red, pink and purple, with a light, bright blue thrown in for fun. Oh—plus some shiny stuff.

    FREE VALENTINE MAILBOX DOWNLOADS

    We asked our artists to give us instructions and tips for their kids’ valentine box ideas. In a few cases, we’ve simplified things a little.

    Thanks to our friends at Hallmark.com.

    TIPS FOR KIDS’ VALENTINE BOX IDEAS:

    • A few of our artists were part of our piñata-making workshops and used those tips to make their valentine boxes. Start with a box big enough to hold lots of valentines and go from there. Our dino, camera and koala are built around basic cardboard boxes and gift boxes.

    • If your design doesn’t start with a square or rectangle, build your own box. Regular, rigid cardboard and paperboard (like cereal boxes) are perfect for flat surfaces. To go around curves, try single face cardboard—it’s available in rolls on Amazon.com.

    • So the printing on your box won’t show through your design, cover it a coat of primer or cover your box in craft paper before you start painting.

    • By all means, add heart shapes wherever you can.

    • Our easiest valentine box idea was this cute koala. Zip over to Hallmark.com for full instructions and the gift box and pom-poms bows we used.

    • And again we say: Why should kids have all the fun? Why not suggest a Valentine’s Day card exchange at work?

    We’d love to see your kids’ valentine box ideas. Share a pic with us on Facebook or Instagram @think.make.share!

    Get more from this episode >>

    Orly’s Wine Tote
    13 of 96
    Orly’s Wine Tote

    MATERIALS:

    • Ribbon with wire
    • Wine Bottle
    • Jump ring (size is roughly equal to the size of your bottle’s neck)

    OPTIONAL:

    • Contrasting colored ribbon
    Family Favorite Valentine's Day Gifts - Home & Family


    DIRECTIONS:

    1. Measure your ribbon to fit up both sides, lengthwise of your bottle (much like you would wrap a gift. Ours was about 36 inches long) then add a couple of inches. Do this twice.

    2. Criss cross the two ribbons from the bottom of the bottle to the top.

    3. Feed the ribbons through the jump ring and fit it over the neck of the bottle. It should fit snuggly onto the bottle. (Ours was a 1.5 inch ring).

    4. (Optional) If you don’t want to use a jump ring, you can use a contrasting ribbon to tie around the base of the bottle’s neck.

    5. Fluff up the ribbons at the top of the wine bottle and present to your loved ones!

    Get more from this episode >>

    Order Hallmark Channel Wines >>

    Check out the Love Ever After Gift Guide

    Kym’s Lipstick Heart
    14 of 96
    Kym’s Lipstick Heart

    MATERIALS:

    • Lipsticks (you’ll want at least 3 or 4 different colors)
    • Pencil
    • Paper
    • Frame


    DIRECTIONS:

    1. Lightly draw out the shape of your heart on the paper in pencil, leaving room around the outside to fit the paper within the frame.

    2. Alternating between lipstick colors, start drawing lines from one side of the heart to the other.

    3. Frame your beautiful artwork and gift it to your valentine!

    Get more from this episode >>

    DIY Ring Cones
    15 of 96
    DIY Ring Cones

    MATERIALS:

    • Oven bake polymer clay
    • Clay or craft knife
    • Small mirror or other flat object to roll clay
    • Wax or parchment paper
    • Masking tape
    • Baking sheet
    • DuraClear iridescent varnish in turquoise
    • Flat paintbrush

    OPTIONAL TO CREATE THE EARRING HOLDER CONE:

    • Brass rod
    • Wire snips
    • Sandpaper
    • E6000

    INSTRUCTIONS:

    1. Roll some clay into a 1 ½” ball in your hands. To create a marbled effect, mix two colors of clay together into a ball.
    PRO TIP: If you want to make a larger cone, use two balls of clay.

    2. Put some wax paper down on your work surface then roll out the ball into a coneshape. Hold a flat surfaced object like a craft mirror in your hand and roll it back and forth over the ball applying more pressure to one side than the other.
    PRO TIP: Use your fingers to form the tip. Cut off any excess at the tip necessary.

    3. Flatten the bottom of the cone. Cut any extreme excess off with a knife, stand it up and use your fingers to gently apply pressure downward into the work surface until the cone sits flat.

    4. Bake in the oven according to the clay instructions. Remove from oven and allow to cool.
    PRO TIP: Make sure all of the clay you purchased needs to be baked at the sametemperature and time.

    5.Use a flat paintbrush to apply the iridescent varnish. Allow to dry between coats and allow to dry for 24-48 hours before use, touch with your fingers to test for tackiness.

    6. Organize your jewelry and enjoy!

    TO CREATE THE EARRING HOLDER CONE:

    1. Place the unbaked cone on its’ side, use the brass rod to pierce a hole through it at least 1” down from the tip.
    PRO TIP: Make that the rod goes straight through without an angle, so the bar sits level in the cone once it’s dry. Check all of your angles before actually piercing.

    2. Bake the cones according to the clay instructions.

    3. While the cones bake, use wire snips to cut the rod down to a good size, about 4” lengths should work.

    4. Sand the cut edge of the rod down by rubbing it back and forth across a piece of sandpaper lying on a flat surface.
    PRO TIP: Do NOT skip this step, the raw cut metal edge can hurt you.

    5.Take the cones out of the oven and allow them to cool.

    6.Coat them with the varnish if desired. Allow to dry.

    7. Feed the rod into the hole at the top of the cone until it’s centered, add a dab of E6000 for security if desired.

    8. Organize your jewelry and enjoy!

    Get more from this episode >>

    Get more Valentine's Day ideas from the Home & Family Love Ever After DIY & Cookbook

    Maria’s Cupid Crunch
    16 of 96
    Maria’s Cupid Crunch

    MATERIALS:

    • Snack Mix
    • Heart shaped or red candies
    • Glass Jar w/ Lid
    • Tulle
    • Kabob Skewer
    • Decorative Paper/Hot Glue
    • Label Paper
    Family Favorite Valentine's Day Gifts - Home & Family


    DIRECTIONS:

    1. Create your snack mix as desired. I just combined snack mix and cute valentine’s candy. Put that inside of the jar and close it.

    2. Wrap the lid of your jar with tulle and tie it into a bow.

    3. Feed your kabob skewer through the ribbon and add the “feathers” and “arrowhead” on either end.

    4. Add a label to the jar and give your sweet treat to your sweet friend!

    Get more from this episode >>

    Christina Stembel - DIY Succulent Heart
    17 of 96
    Christina Stembel - DIY Succulent Heart

    MATERIALS:

    • Heart shaped planter
    • An assortment of succulents
    • Succulent soil
    • Gloves

    OPTIONAL:

    • Small gardening shovel

    INSTRUCTIONS:

    1. Fill your vessel approximately ½ full of potting soil and spread it evenly across the bottom. You’ll want to add enough to ensure that the base of each succulent reaches just to the top of the planter. Add as much as needed for your planter.

    2. Start with two or three of your Echeveria varieties. Pick the ones you love the most -these will be your focal points! Plan for a spot for each in the planter, taking care to put some distance between them.

    3. Gently loosen each from the plastic vessel you purchased them in. Next, use your fingers to loosen any roots that were gathered at the bottom. Nestle the plant into the soil, pushing some loose dirt up around the roots.

    4. Next, remove all of your 2” succulents from their plastic vessels and, again, loosen their roots. Plant each of these smaller heads around the larger succulents. This will help to frame the larger, focal plants and add texture.

    PRO TIP: At this point, we usually find the planter to need a little more dirt. Using your hand to gently part the foliage of the succulents, fill in any low spots with more succulent potting mix.

    5. To finish the design, we like to piece the larger succulents into the just right sized puzzle pieces! To part, gently pull apart the succulent, starting from the leaves and then working down to the roots.

    PRO TIP: Larger headed succulents, like Echeveria, cannot be broken down into smaller parts. Save the varieties such as the hen and chick or sedum for this part!

    6. Once you’ve broken down your succulents into smaller parts, gently work their roots into the remaining holes in the planter. Take care to handle these pieces carefully as they tend to be more fragile once they’ve been broken down! Press down gently on their tops once in the planter to ensure the roots are firmly connected into the soil.

    7. Use a damp paper towel to clean any dirt that got stuck on or in the succulents during planting and enjoy!

    Get more from this episode >>

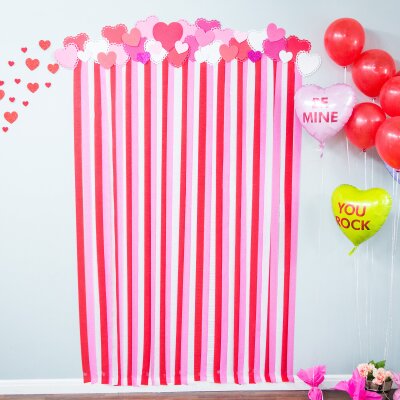
    DIY Valentine’s Photo Op
    18 of 96
    DIY Valentine’s Photo Op
    DIY Valentine's Photo Op
    Level:
    Beginners
    How-To:
    Wall Decor, Party Decor
    Seasonal Event:
    Valentine's Day, Galentine's Day

    MATERIALS:

      FOR THE PHOTO OP BACKDROP:

      • Yarn in various Valentine’s colors, textures and thicknesses
      • Foam core or cardboard
      • X-ACTO knife and cutting mat
      • Pencil
      • Hot glue gun and glue sticks
      • Butcher paper for template
      • Scissors
      • Command strips

      OPTIONAL:

      • Pre-existing hearts forms
      • Masking tape

      FOR THE ARROW PHOTO PROP:

      • ½” Wooden dowel
      • Cardstock in silver and pink
      • Scissors
      • Pencil or marker
      • Arrow template

      OPTIONAL:

      • Saw

      FOR THE BOW PHOTO PROP:

      • Balsa wood 3/16” thick 1” x 36”
      • Drill
      • Small drill bit
      • Yarn
      • Scissors

      Download the Arrow Tail template here.

      Download the Arrowhead template here.

      INSTRUCTIONS:

      FOR PHOTO OP BACKDROP:

      1. Make heart templates by folding a large piece of paper in half, drawing a half heart on the fold and cut them out. PRO TIP: If you don’t have the time to create your own heart forms, you can order them online or find them at craft stores, the sizes are just more limited.
      2. Create the large hearts first. Trace the largest template onto out of either foam core or cardboard if you want them to have structure, but you can also just use poster board or craft paper!
      3. Trace and cut a bunch of small and medium sized hearts out of cardboard or foam core.
      4. Arrange or hang the large plain hearts first, so you can see how many wrapped hearts you will need. If you can’t hang as you work, lay blue masking tape on the floor to the size and shape of the space your photo op will be in to arrange everything.
      5. Grab a piece of yarn and hot glue it to the center of a heart form, this is the back. Wrap the yarn around until the form covered to your liking. You can also layer thicknesses and colors of yarn for a funky look! Tie the yarn off in the back to secure. PRO TIP: The thicker the yarn, the less wrapping you have to do!
      6. Hang the hearts with command strips, push pins or nails and enjoy!

      FOR. THE ARROW PHOTO PROP:

      1. Print and cut out the arrow templates and use them to create the arrowhead and tail out of cardstock. Cut out two arrowheads and the three pieces of the tail.
      2. Crease all of the pieces in half.
      3. Cut your dowel down to size if needed.
      4. Use hot glue to attach the two sides of the arrowhead together, leave the bottom open.
      5. Glue the arrowhead onto one end of the dowel and the three pieces of the tail on the other end.

      TO CREATE THE BOW PHOTO PROP:

      1. About 1” inset from each end of the balsa wood, drill a hole.
      2. Cut a strand of yarn to about 2/3 the length of the wood. The yarn being shorter will create tension, causing the straight piece of balsa to curve like a real bow!
      3. String the bow by feeding each end of the yarn into a hole on each end of the balsa wood and tie it off to secure.
      DIY Suit of Hearts Card Table
      19 of 96
      DIY Suit of Hearts Card Table

      MATERIALS:

      • ½” Plywood cut to 16” x 24” x5
      • 2” Hinges x4
      • 1 ¼” Wood screws
      • Two small mending brackets about 2”
      • White paint
      • Paintbrushes
      • Spray adhesive
      • X-ACTO knife and cutting mat
      • Small plate or bowl
      • Drill
      • Philips head bit
      • Small drill bit for pilot holes
      • Jigsaw
      • Sandpaper

      OPTIONAL:

      • Clear spray sealant
      • Circular saw

      Download the card templates here.

      INSTRUCTIONS:

      1. Download the graphics and send them off to your local print shop, pick them up when ready. You will need to print 5 card backs and 1 of each of the card faces. If you want the underside of the table-top to have a graphic, print out two of your card face of choice.

      2. Cut the plywood down to 16” x 24” rectangles. This can also be done for you at the hardware store since they’re straight cuts.

      PRO TIP: A circular saw can get you more fast and accurate cuts when cutting straight.

      3. Use a bowl or plate as template to round the corners, take a pencil and trace the edge of the plate in each corner. Cut each curve using your jigsaw.

      4. Sand then paint the edges white. Allow to dry.

      5. Now it’s time to apply the graphics to the cards, spray adhesive to apply the graphics to one face of each card. Pay attention to which graphic you want on the top of the table; this will be applied after the table has been assembled.

      PRO TIP: For more accurate, easy graphic application spray half of the back, smooth that onto the surface, then from underneath, spray the other half and smooth the rest down.

      6. Trim the excess paper away from the edge of the card using an X-Acto knife on your cutting mat with the card graphic side down.

      7. Repeat steps 5-6 on the opposite side of each card except the tabletop card.

      8. To create the “legs” of the side table lay the four “leg” cards out in pairs of two top to top and attach them with hinges using the provided hardware.

      9. To stabilize the legs, stand them up and attach the mending bracket on the backside, at the top of each “A” frame. Mark and drill pilot holes before screwing in.

      10. Place the tabletop card on top of the two sets of “legs”, mark and drill pilot holes through the top into the top of each of the “legs” in two places.

      11. Screw through the pilot holes into the legs to secure the tabletop to the legs.

      12. Use spray adhesive to attach the final graphic to the tabletop over the screws.

      13. Trim the excess paper away from the edge with an X-Acto knife.

      14. Add a clear coat of spray sealant with multiple light coats in a well-ventilated area if desired. Allow to dry thoroughly.

      15. Place in your home and enjoy!

      Get more from this episode >>

      Statement Pillowcases
      20 of 96
      Statement Pillowcases

      Materials

      • Pillowcases
      • Contrasting fabric or set of pillowcases
      • Cording
      • Fabri-tac
      • Fabric scissors
      • Paper for template
      • Scissors
      • Materials for lettering like:
      • Cricut, iron on paper
      • Iron on letters
      • Stencil and fabric paint
      • Optional:
      • Fray check

      Instructions:

      1. Create a half heart template out of paper.
      Pro tip:
      Make your heart at least two inches shorter than the pillowcase so that the image shows once it’s stuffed with the pillow.

      2. On the contrasting pillowcase, trace the template on the closed end. If you’re just using fabric, fold it and trace the template on the fold.

      3. Use fabric scissors to cut out the two hearts.

      4. Apply fray check to the raw edges of the hearts. Allow to dry.

      5. Place each heart on each pillowcase, apply a thin line of fabri-tac around the edges and gently pat with your fingers to bond.

      6. In small increments, apply a thin line of glue around the edge of the heart and lay the satin cording all the way around the edge of each heart.

      7. Apply the wording with desired method.
      Pro tip:
      Measure the heart first to make sure the lettering fits. A statement with even letters on both sides of the heart like “xo” “xo” or “true” “love” creates a more symmetrical look.

      8. Insert the pillows and enjoy!

      Get more from the Episode >>

      Heart Shaped Valentine’s Chair Back
      21 of 96
      Heart Shaped Valentine’s Chair Back

      MATERIALS:

      • Felt in red and black
      • Stiff felt in white
      • Foam core
      • White cording
      • Spray adhesive
      • X-acto knife
      • Cutting mat
      • Fabri-tac
      • Hot glue gun and glue sticks
      • Velcro tabs
      • Ribbon
      • Chalk

      INSTRUCTIONS:

      1. Create a heart shaped template that is about 12” wide. You want it to be big enough to hold all your kid’s valentines!

      2. Trace the template onto foam core twice and cut out two hearts.

      3. Spray adhesive red felt to one side of each heart.

      4. Use a x-acto knife on a cutting mat to trim the felt to the edge of the heart.

      5. Spray adhesive red felt to the other side of each heart. Trim to the edge of the foam core with an x-acto knife.

      6. Use hot glue to attach cording around each heart to cover the exposed edge of foam core.

      7. To turn the hearts into a pouch, cut two 3” wide strips of red felt long enough for one side of each “v” of the heart and glue them onto the face of one heart along the edge of the “v” of the heart. Attach the other heart on top with hot glue.

      8. Cut eyes, a smile and arms out of black felt.

      9. To create the envelope, cut a small rectangle out of stiff white felt and two triangles to the width of the rectangle. Use Fabri-tac to adhere the “envelope” together.

      10. Cut a small heart out of felt and glue it over the tip of the “flap” of the “envelope”.

      11. Use Fabri-tac to attach the face details.

      12. Hot glue the arms to the sides of the heart then the envelope to the “hands” so it appears like it’s being held.

      13. Add the velcro tabs and ribbon to the back of the heart, use hot glue for extra securing.

      14. Send your kid off with their chairback and enjoy!

      Get more Valentine's Day ideas from the Home & Family Love Ever After DIY & Cookbook >>

      Get more from this episode >>

      Matching Heart Aprons
      22 of 96
      Matching Heart Aprons

      MATERIALS:

      • Aprons
      • Fabric in various valentine’s colors and patterns
      • Fabri-tac
      • Fray check
      • Fabric scissors
      • Chalk
      • Paper and pencil

      INSTRUCTIONS:

      1. Either print out a few heart templates off the internet and cut them out or create your own by folding a piece of paper in half, drawing half a heart and cutting it out. Repeat until you have enough heart templates in the sizes you like.

      2. Trace the hearts onto the fabric and cut out with fabric scissors.

      3. Use fray check around the edge of each heart to prevent fraying. Allow to dry.

      4. Attach the hearts to the apron as desired! Get creative here! You can use two medium sized hearts as pockets by gluing all around the edges besides the top. Place hearts on the chest or on existing pockets.

      5. Allow the glue to dry and enjoy!

      Get more from this episode >>

      Anne-Marie Faiola - DIY Heart Lotion Bars
      23 of 96
      Anne-Marie Faiola - DIY Heart Lotion Bars
      DIY Heart Lotion Bars - Home & Family

      INGREDIENTS:

      • 6 cavity heart silicone mold
      • Pink rose petals
      • 6.4 oz. Sweet almond oil
      • 4.8 oz. White beeswax
      • 4.8 oz. Cocoa butter wafers
      • 4 ml vanilla select fragrance oil
      • Dropper

      DIRECTIONS:

      1. In a heat-safe container, add 4.8 ounces of white beeswax and 6.4 ounces of sweet almond oil. Melt in the microwave using 60 second bursts.

      2. Add 4.8 ounces of cocoa butter wafers to the hot wax and oil mixture. Stir until the cocoa butter melts. If there are small pieces that won’t melt, place the container back in the microwave and heat using 10 second bursts.

      3. Add 4 ml of vanilla select fragrance oil and stir thoroughly.

      4. Place a small pinch of rose petals into each mold cavity. Use a spoon to cover the petals with a bit of the oil mixture to help them stay in place. Allow to cool and harden for about 1 minute.

      5. Carefully pour the remaining oil mixture into each cavity. Place the mold in the freezer so it cools quickly and prevents crystallization.

      6. Remove from the freezer after 30-60 minutes and enjoy!

      Get more from this episode >>

      Love Note Pockets
      24 of 96
      Love Note Pockets

      MATERIALS:

      • 36” x 36” piece of white felt
      • Red, pink, white felt sheets
      • Fabri-tac
      • Iron-on numbers
      • Irons
      • Yarn
      • Yarn needle
      • Fabric scissors
      • Ruler
      • Chalk

      OPTIONAL:

      • Foam core
      • X-acto knife
      • Cutting mat

      INSTRUCTIONS:

      1. Cut the white felt into a large rectangle to about 10” x 36”.

      2. Use the ruler and chalk to create a border about one inch inset from the edge. The side with the chalk will be the back. If you want, mark the spacing of your stitches now too.

      3. Thread the yarn through the needle and sew a running stitch along the chalk line to create the border. Tie a knot to secure at the end.

      4. Cut the 14 pocket hearts to the desired size out of felt and whatever extra hearts you want in various colors and sizes.

      5. Attach the iron on numbers to the pockets according to the instructions.

      6. Arrange all the hearts on the rectangle to make sure you like the placement with accent hearts and all.

      7. Adhere the hearts with fabri-tac making sure to leave to top of each pocket unglued so it’s open.

      PRO TIP: If the rectangle is wonky from the stitching, you can glue a small rectangle of foam core to the top and bottom of the back and it will hang flatter.

      8. Attach two pieces of yarn at the top to tie and hang the pockets from.

      9. Hang as desired and enjoy!

      Get more from this episode >>

      Shirley Bovshow "Ranunculus Care"
      25 of 96
      Shirley Bovshow "Ranunculus Care"

      Ranunculus actually flourish in cold, but not freezing temperatures! They love it cool and sunny!

      • In mild winter climates (like ours), ranunculus are planted in the ground or in containers during the fall months and they bloom in late winter and early spring for 4 to 6 weeks!

      • In cold winter climates, ranunculus can be started indoors in late winter or early spring and replanted outdoors in springtime to continue growing. They will flower in late summer!

      TIP: Plant the bulbs outdoors in mild climates & indoors in cold areas.

      • Select the largest bulbs, (tubers) you can find for maximum flowers

      • They look like dried claws

      • Soak them in water for 3-4 hours before planting to "awaken them" from dormancy

      • Fill a planter with well-draining soil and place the bulb/tuber "claw-side" down

      • Space the bulbs 3 to 4 inches apart

      • Cover with an inch or two of soil

      • Water gently, only enough to wet soil but not saturate it or the tuber will rot

      • Don't water again until you see sprouts (15 to 20 days)

      TIP: Soak for 3-4hrs to awaken them from dormancy.

      TIP: Overwatering can cause the tuber to rot.

      In order for ranunculus to germinate and begin growing, they need temperatures in the 50-degree range. Place them in an unheated room with bright lighting or use a plant light.

      TIP: Bulbs need cooler temperatures to germinate.

      In cold climates, if you want to transfer to your garden, plant after the last thaw of winter. Start by acclimating your potted ranunculus to outdoor conditions by taking them outside during the day and bringing them indoors at night for the first week. After the first week, plant them in a sunny location outdoors so the stems and flower buds can begin growing! Gorgeous flowers will follow.

      Get more from Shirley at:

      EDENMAKERS BLOG

      FOODIE GARDENER

      Follow Shirley on Instagram, YouTube and Twitter.

      Get more from this episode >>

      Candy Heart Hair Accessories
      26 of 96
      Candy Heart Hair Accessories

      MATERIALS:

      • Conversation heart ring cupcake toppers
      • Wire cutters or heavy-duty scissors
      • Safety glasses
      • Hot glue gun and glue sticks or E6000

      HAIR ACCESSORY BLANKS LIKE:

      • Metal headbands
      • Barrettes with a wide flat surface
      • Hairpins

      OPTIONAL:

      • Tape
      • Soft Tape Measure

      INSTRUCTIONS:

      1. Cut the ring off of the back of each heart using a really strong pair of scissors or wire cutters. Be sure to wear eye protection.

      2. Use either hot glue or E6000 to attach the hearts to your desired hair accessory. If making a headband, you can use a soft tape measure to space out the hearts evenly. The headband should be attached above the ring nub.

      PRO TIP: Using hot glue will be fast, but E6000 will last longer, in order to hold things in place until the e6000 can set use tape or add some hot glue around the E6000.

      3. Add a dollop of hot glue to cover the ring nubs.

      4. Wear and enjoy!

      Get more from this episode >>

      Love Letter Blanket
      27 of 96
      Love Letter Blanket

      MATERIALS:

      • Gel bleach pen
      • Denim fabric, the darker the better
      • Backing fabric for blanket like faux fur or plush fleece
      • Sewing machine and thread
      • Chalk
      • Yardstick or another large ruler
      • Fabric scissors
      • Blow dryer
      • Needle and thread

      OPTIONAL:

      • White paint pen
      • Quilting square
      DIY Love Letter Blanket - Home & Family

      INSTRUCTIONS:

      1. Cut each of the fabrics down to the desired size for your blanket with a minimum of ½” seam allowance accounted for.

      2. Draw out the guidelines on the face of your denim in chalk using a ruler.

      If you want keep the lines so that it looks like ruled paper, go over the chalk lines with a paint pen now or the bleach pen later.

      PRO TIP: A quilting square can make this process faster and more accurate!

      3. Write out your message in chalk.

      4. Go over the message with the gel bleach pen and the guidelines now if desired.

      5. Use a blow dryer to dry the gel.

      PRO TIP: Not only does this prevent the gel from bleeding, it helps accelerate the process ensuring maximum color change.

      6. Once the bleach is completely dry, scrape off all the hardened gel.

      7. Wash the fabric with the message to remove the bleach.

      8. Pin the fabric with the message and the backing fabric face to face.

      9. Sew all around the edges except about a 10” opening.

      10. Flip the blanket right side out and use an invisible or ladder stitch to close up the opening with a needle and thread.

      11. Enjoy!

      Get more from this episode >>

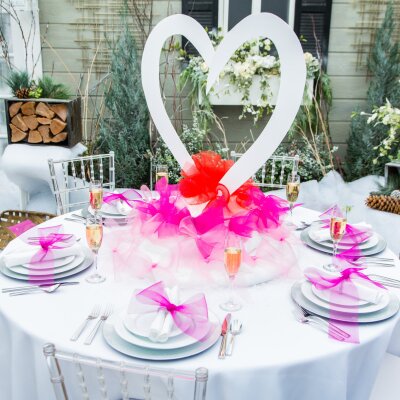
      Galentine’s Day Tablescape
      28 of 96
      Galentine’s Day Tablescape
      Galentine's Day Tablescape
      Level:
      Intermediate
      How-To:
      Home Decor, Party Decor
      Seasonal Event:
      Valentine's Day, Galentine's Day

      MATERIALS:

      HEART CENTERPIECE:

      • Foam core
      • X-acto knife
      • Poster board
      • Scissors
      • Hot glue gun and glue sticks
      • Pencil
      • Ruler
      • Cutting mat

      BOWS AND POUFS:

      • Horsehair webbing in desired colors
      • Fabric scissors

      DÉCOR:

      • White tablecloth
      • Cake stand
      • Faux fur throw
      • Loose faux snow
      • Napkin rings
      • Dashes gel adhesive stickers
      • Silver chargers
      • Flatware
      • Champagne glasses

      INSTRUCTIONS:

      HEART CENTERPIECE

      1. First you need to create the template. Fold your poster board in half and draw half of a heart. Cut it out then cut the heart in half.
      2. Use your ruler to measure 3” inset from the edge of the heart all around and draw out the line, connect the point at the top and cut the bottom edge flat. Now you have your template!
      3. Place the template onto the foam core, trace and cut out two halves of the heart.
      4. To create the brace for each half of the heart cut a 3” wide foam core rectangle out with a slit cut halfway through the middle that is the width of your foam core. PRO TIP: Cut the top corners off of each rectangle so it’s easier to cover if just using snow.
      5. Cut a slit out of the flat cut bottom of each heart half that is the width of your foam core and to the height of the slit in the other brace.
      6. Slide a brace onto the bottom of each half heart and secure the intersection with hot glue.
      7. Cut a piece of foam core for the base, ours was about 7” x 7”.
      8. Secure one brace to the base with hot glue, position the other half heart about 2-3” in front of the other facing the opposite direction to create a full heart. Mark it before gluing to assure they line up properly.
      9. Place in the center of the table.

      BOWS AND POUFS

      1. To create the poufs cut about 20” sections of the webbing and pull the thread in one edge of the webbing to gather one side. Tie a knot to secure. Repeat to create as many as desired.
      2. To create the bows, tie the webbing into a bow and pull taut, trim the excess. Pull and twist the webbing to add volume.

      DÉCOR

      1. Place tablecloth and put the cake stand in the middle of the table. Place the heart on the cake stand. Secure the heart to the stand with dashes. PRO TIP: dashes are a removable gel adhesive that won’t ruin surfaces they stick to so they’re ideal for temporary set ups!
      2. Lay the faux fur throw around the stand to create a mound shape.
      3. Sprinkle the snow around and on the throw, especially where you need to disguise the base.
      4. Place the bows all around the mound, if you created multiple colors cascade them from dark to light or vice versa to create an ombré effect.
      5. Attach bows to the napkin rings with a dash or two.
      6. Set the table.
      7. Enjoy!
      Ombré Glitter Clutch
      29 of 96
      Ombré Glitter Clutch

      MATERIALS:

      • Fine glitter in dark, mid-tone and light color we used red, hot pink and light pink
      • Chunky glitter in the dark color and light color
      • Mod podge
      • Foam brush
      • Masking tape
      • Mod podge super hi-shine acrylic sealer
      • Magazine
      • Cups for extra glitter

      INSTRUCTIONS:

      1. Tape off the areas of the bag you don’t want covered in glitter.

      2. Apply a thick base coat of mod podge with a brush to the surfaces you want glittered.

      3. You are going to add the fine glitter in sections to achieve the ombré effect. On top of an open magazine, apply a section of the dark glitter, then apply half of a section of the mid-tone glitter.

      4. Funnel the mixed glitter excess into a cup for later use.

      5. Open the magazine to a new page and sprinkle the second half of the mid-tone glitter section on, then sprinkle the light glitter to complete the last section.

      6. Funnel the mixed glitter into a cup for later use.

      7. Outdoors or in a well-ventilated area, gently spray the clutch with a generous amount of the sealing spray until it has a foamy-white appearance.

      PRO TIP: Multiple light passes with the sealant is the best way to do this without disrupting the glitter.

      8. While the sealant is wet, sprinkle the mixed glitter between the appropriate colors, the dark and mid-tone mixture between the dark and mid-tone section and the light and mid-tone between the light and mid-tone sections. This will soften the difference in colors creating the ombré effect.

      9. Spray with the sealant again and while it’s still wet sprinkle the dark chunky glitter onto the dark half of the bag and the light chunky glitter onto the light half.

      10. Allow the sealant to dry thoroughly and enjoy!

      Get more from this episode >>

      DIY Valentine's Day Mail Carrier
      30 of 96
      DIY Valentine's Day Mail Carrier

      Materials

      • Cardboard Shipping Box
      • Canvas
      • Felt
      • Spray Adhesive
      • Awl
      • Yarn or Thread
      • Iron-On Letters
      • Iron
      • Buttons
      DIY Valentine’s Day Mail Carrier - Home & Family

      Directions

      1. Pick the size shipping box you’d like to use. You’re ideally looking for a thinner rectangular one.

      2. On the top end, find where the middle of the width is and cut a triangle out of the top of your box, giving it an “envelope” look.

      3. Using spray adhesive cover your box with the canvas. I wrapped it like a present so that I could create neat lines. Cut away any excess, and the top that hangs over the triangular cut leaving a little bit extra to fold inside the box.

      4. Using an awl, poke holes through the canvas and cardboard around the perimeter of your box to give a pattern for the “stitching.”

      5. Using a large needle and thread, weave your yarn in and out of the holes you created, making it look like a stitch pattern. Glue the ends of the yarn to the inside of the box.

      6. Cut the end of a felt rectangle to give it the pointed envelope look. Leave it long enough to let it hang over the opening of the box, and glue the top/back of the box. Add a button and piece of yarn if you want the envelope to “shut” completely.

      7. Add little details to the outside of your box to personalize it. I added a little felt square with a heart on it to make it look like a stamp! You can also use iron on letters and felt to label it with a name!

      8. To hang, cut two long strips of felt and glue the ends to the back of the box, making it look like a backpack. You can use these straps to hang it off your chair!

      Get more information about this episode >>

      DIY Conversation Heart Accessories
      31 of 96
      DIY Conversation Heart Accessories

      Materials

      • Glue Gun sticks
      • Silicone Heart Mold
      • Nail Polish or Craft Paint
      • Precision Point Pen
      • Accessory
      DIY Conversation Heart Accessories - Home & Family

      Directions

      1. The first thing you’re going to do is to chop up your glue gun sticks.
      2. After that start placing equal amounts of sticks into the molds.
      3. Place molds into the oven at 375, and keep checking in on the molds every couple of minutes until they are completely melted.
      4. Once melted, pull out & let dry completely.
      5. Pop them out of the molds. If there are a lot of air bubbles use an x-acto knife & chop about a quarter of the heart off. This will get rid of the air bubbles & give you a nice flat surface .
      6. Time to paint them. Either use nail polish, or a brush & craft paint.
      7. Once dry, write your message using a precision point pen.
      8. Glue onto any accessory you want. IF you want to make a necklace, screw in a hook & then loop through a necklace.

      Get more information about this episode >>

      DIY Faux Floral Heart
      32 of 96
      DIY Faux Floral Heart

      Materials

      • Foam core
      • X-acto knife
      • Hot glue
      • Faux florals
      • Scissors
      • Dowel
      • Gold paint
      • Paint brush
      • Glitter
      • Fishing Wire
      • Foam Sheet
      • (*Optional) Embroidery Hoop
      DIY Faux Floral Heart - Home & Family

      Directions

      1. Trace heart shape on foam core.

      (Tip: use an embroidery hoop to help create the perfect shape arches)

      2. Cut out heart shape using X-acto knife.

      3. Remove faux florals from stems.

      4. Trim the leftover stem piece, be careful not to cut it too close or the petals will fall apart.

      5. Using hot glue, add flowers to foam core heart.

      6. Paint two dowels with gold paint and add glitter. Let dry.

      7. Cut out arrow pieces from foam core and attach to dowel with hot glue.

      8. Hot glue arrow piece to each side of heart.

      9. Use an X-acto knife or another sharp object and cut two holes.

      10. Use fishing wire or decorative ribbon and hang floral heart.

      11. Enjoy!

      Get more information about this episode >>

      DIY Heart Wine Rack
      33 of 96
      DIY Heart Wine Rack

      Materials

      • Wooden Heart Shaped Sign (with at least ¾ inch thickness)
      • 1 x 4 Wooden Plank
      • Jig Saw
      • Drill with Forstner Bit
      • Wood Glue
      • (8) 1 ⅝ Drywall screws
      • Pencil
      DIY Heart Wine Rack - Home & Family

      Directions

      Cut 3 pieces of wood from your 1x4 inch board:
      1. Cut one to 10 inches in length
      2. Cut another to 4 inches in length
      3. Cut your last to 8 inches

      Creating the Wine Bottle Shelf:
      1. Stand the 10 in board on top of the 4 inch board creating an uppercase “L” shape. Attach them together using wood glue and drywall screws.
      2. Hold the wine bottle in place onto the “L” shaped shelf, with the bottle neck facing the 4 inch side. Use a pencil to mark where the bottle hits the 4 inch board. Use a drill with a 1 ½ inch forstner bit to drill a hole through the mark you made. This should be roughly in the center of the board.

      Creating the Wine Glass Shelf:
      1. Take the 8 inch board and mark with a pencil a line at 2 inches and 6 inches of the length.
      2. Hold the bottom of the wine glass against the 8 inch board to determine how deep you’d like it to sit on the wood. Ours was at least 1 ½ inch deep. Using a ⅝ inch forstner bit, drill a hole where you would like the wine glasses to sit. Use a jigsaw to extend the hole to the end of the board.

      Attaching Shelves:
      1. Place the wood on your heart, wherever you would like it to go. Make sure the wine glass shelf is below the wine bottle shelf so that the wine glasses can hang.
      2. Outline the shelves in pencil. Inside of the outline, mark X’s where you are going to screw the pieces on.
      3. Pre-drill a hole through the X’s all the way through the board.
      4. Using wood glue and the drywall screws, attach your shelves onto the board. Screw in through the back.

      To Hang
      1. Attach two sawtooth hangers on the back of the heart sign. These will usually hold a good amount of weight, so two of them should hold the weight of your wine bottle.

      Get more information about this episode >>

      Cupid’s Quiver and Arrow
      34 of 96
      Cupid’s Quiver and Arrow

      Materials

      • Leather
      • Ribbon
      • 18” Dowels
      • Card Stock
      • Feathers
      • Leather Punch
      • Twine
      • Paint
      • Glitter
      DIY Cupid’s Quiver and Arrow - Home & Family

      Directions

      1. Use pattern to cut out hide
      2. Use pattern to cut out embellishments
      3. Use punch to create holes down two edges
      4. Use ribbon to lace quiver closed
      5. Glue on leather adornments
      6. Braid ribbon and twine to create strap
      7. Attach strap to ribbon lacing using knots
      8. Tie bow
      9. Attach leather hearts to bow ends
      10. Paint dowels gold
      11. Cut out arrow shape from cardstock using downloaded pattern
      12. Fold and glue arrow along lines
      13. Spray glue arrow and add glitter
      14. Glue onto end of dowel
      15. Trim feathers from one half of quill
      16. Cut feather to 3”
      17. Attach 3 feathers to end of each

      Download the Cupid Quiver PatternGet more information about this episode >>

      DIY Love Letters Three Ways
      35 of 96
      DIY Love Letters Three Ways

      Materials

      • Wooden Letters
      • Spray Paint
      • Glitter
      • Vintage Ladder
      • Brass Hooks
      • L Brackets
      • Glass Table Top (3/8-inch-thick)
      • Nails
      • Mod Podge
      DIY Love Letters: Three Ways - Home & Family

      Directions

      Ombre Look:

      1. Paint the letters white.

      2. Begin spray paint in middle of letters(lighter shade pink)misting down (spray approx one foot away from letters).

      3. Spray paint in bottom of sign (darker shade / red )misting up.

      4. Use L Brackets to attach letters.

      Vintage Ladder Look

      1. Use a screw or nail to attach letters.

      2. Add accessories as desired.

      Table Top Look:

      1. Apply Mod Podge to letters.

      2. Add glitter.

      3. Allow to dry.

      Get more information about this episode >>

      DIY Lip Print Tablecloth
      36 of 96
      DIY Lip Print Tablecloth

      Materials

      • Cricut Iron on Material in Pink, Blush, Red and Raspberry
      • Cricut Maker Cutting Machine (I will bring this with me, Cricut is providing the tool and shipping it to my hotel).
      • Cricut Easy Press 2 Heat Tool (I will bring this with me, Cricut is providing the tool and shipping it to my hotel).
      • Cricut Easy Press 2 Mat (I will bring this with me, Cricut is providing the tool and shipping it to my hotel).
      • White Cotton Tablecloth - the size and dimension of this will depend on the table we're using during the segment

      Directions

      1. First, you'll use the free online Cricut Design software to pick an image you like and then click "Make" in order to "send" your online project to the machine and tell it to "cut."
      2. Now, you're ready to place the iron-on material onto the Cricut cutting mat, which is included in the box when you purchase the machine.
      3. Load the cutting mat into the Cricut cutting machine by pressing the arrow button
      4. Next press the flashing "C" button and the machine will start cutting out the kissy lips shapes. Continue cutting out the lip shapes until you have enough to cover the entire tablecloth.
      5. Now you're ready to use the Cricut Easy Press2 (or an iron) to adhere all the kissy lips to the cotton tablecloth!
      6. Place one of the kissy lip shapes onto the table cloth, with the shiny side facing up.
      7. Place the hot Easy Press 2 on top. Wait 30 seconds then remove the Easy Press 2 Tool. Now peel back the shiny backing of the lip shape and you'll see that your kissy lip is perfectly adhered to the table cloth!
      Repeat steps 6 and 7 until you've covered your table cloth!

      Get more information about this episode >>

      Graphic Love Sweatshirts
      37 of 96
      Graphic Love Sweatshirts

      Materials

      • Blank Sweatshirt
      • Glue Gun
      • Fabric Spray Paint
      • Poster Board
      • Paper Bag
      DIY Graphic Love Sweatshirts - Home & Family

      Directions

      1. Select your sweatshirt
      2. Write out the word you want
      3. Trace word with glue gun over parchment paper
      4. Let dry
      5. Pull off word (hot glue doesn’t stick)
      6. Create heart stencil with card stock
      7. Lay stencil & Hot glue word on shirt
      8. Use fabric spray paint
      9. Pull off word and stencil!

      Get more information about this epsiode >>

      DIY Galentine’s Day Party
      38 of 96
      DIY Galentine’s Day Party
      DIY Galentine's Day Party
      Level:
      Intermediate
      How-To:
      Party Decor
      Seasonal Event:
      Galentine's Day, Valentine's Day

      MATERIALS:

      For Tree Photo Backdrop

      • Foam Core
      • X-Acto Blade
      • Marker
      • Paint Sticks
      • Tape

      For Tic Tac Toe Photo Backdrop

      • Foam Core or Wood, Xs & Os
      • Foam Core Sheets
      • X-acto blade
      • Velcro Tape
      • Ribbon
      • Two Sided Tape

      DIRECTIONS:

      For Tree Photo Backdrop

      1. Lay your foam core out in the size of a tree. (With all pieces oriented vertically, place two side by side on the first row, one on the second, and one on the third row for the trunk.)
      2. Tape all the seams together.
      3. Lay a paint stick over each of the seams and tape them down. (this will give the tree support)
      4. Sketch out your tree on the back of the foam core. Since you are doing it on the back, feel free to keep trying to draw the tree out until you are happy with the shape.
      5. Using the x-acto blade, cut out your tree shape.
      6. Tape a scrap piece of foam core to the top of your tree to give it “dimension” against the wall.
      7. Stand your tree up for photos!


      For Tic Tac Toe Photo Backdrop

      1. Place one of your letters onto your foam core sheet. Measure and mark a square around your letter, leaving a bit of gap between the letter and edge of the sheet.
      2. Cut out the foam core square. Do this 9 times total.
      3. Line your 9 squares up in a larger square, 3 in each row. Use the double sided tape to attach this to the wall.
      4. Tape your ribbon over the lines of the foam core, creating the tic tac toe board.
      5. Add velcro to your squares and the letters so you can stick the letters on!
      6. Play a game!
      DIY Pet Valentines
      39 of 96
      DIY Pet Valentines

      Materials for Braided Chew Toy

      • Fabric Scissors
      • Red fleece (1 yard)
      • White fleece (1 yard)
      • Pink fleece (1 yard) - or desired colors

      Materials for Catnip Kicker Cat Toy

      • Valentine fleece fabric (1 yard) Or any fabric of your choosing
      • Polyfill (1 bag)
      • Velcro self-adhesive strips or squares
      • Fabric Scissors
      • Catnip

      Ingredients for Cranberry Hearts Dog Treats

      • 2 Free Range Eggs
      • 1 and 1/2 Cups Flour
      • 1 Tablespoon Coconut Oil
      • 3-4 Tablespoons of additional Flour
      • 1/2 Cup Dried Cranberries

      Directions for Braided Chew Toy

      1. Cut three long strips out- one from each color of fleece.

      2. Tie all three together, leaving about 2 inches of fabric hanging.

      3. With the three loose strips, start braiding loosely. Create about a 2 foot braid and tie off the ends with the same amount of loose strips at the bottom.
      Tip:

      1. Avoid using satin or silk.

      2. Width of strips should be smaller for smaller dogs, and wider for bigger dogs.

      Directions for Catnip Kicker Cat Toy

      1. Cut your fleece in a rectangle shape, about 30” long by 8” wide.
      2. Lay your fleece out with the colored side facing down.
      3. Grab your polyfill and create a cylinder-like shape about 12” long by 3” wide.
      4. Wrap your fleece over the polyfill and being to wrap like a present.
      5. When you have 3 sides done, add catnip to the entire length of the polyfill inside the fleece.
      6. For the final wrapped piece, add your Velcro strips and Velcro the remaining side to the toy. Make sure it is nice and secure.
      7. Give it to your kitty and watch them enjoy (and kick) for hours!

      TIP:
      1. When making kitty and puppy toys, make sure not to use any glues or adhesives that are not safe for children. I’m using Velcro instead of fashion glue because the glue can be VERY harmful to animals (and humans).
      2. Because you are using Velcro on the kitty toy, when your kitty needs a little more catnip, you can just pull back the fabric and add some more!

      Directions for Dog Treats

      1. Preheat oven to 165°C.

      2. Beat 2 eggs and set aside.

      3. Combine your flour, coconut oil and dried cranberries together in a bowl.

      4. Once combined, pour in the eggs and mix together with your hands. The dough will be very wet.

      5. Begin adding in your additional flour one TBSP at a time, mixing in each one after added. You want to achieve a consistency that is easy to roll and not super sticky. This will require between 3-4 TBSP depending on your brand of flour and size of your eggs. The dough should easily form a ball.

      6. Rollout your dough and cut out the treats using bite sized cookie cutters. Hearts are perfect for Valentine’s Day!

      7. Place your treats on a cookie sheet lined with parchment paper.

      8. Bake in the oven for 15-18 minutes or until crisp.

      9. Makes approx. 20 treats (dependent on size of cutter). Let cool before giving to your pooch – Enjoy!

      Get more information about this episode >>

      DIY Styrofoam Chocolates
      40 of 96
      DIY Styrofoam Chocolates

      Materials

      • 12” Heart Shaped Boxes
      • 12” x 12” Valentine's Day Themed Scrapbook Paper
      • 2″ Smooth Foam Styrofoam Balls (6-8 Per Box)
      • Smooth Styrofoam Block (for Square Chocolates)
      • Electric Styrofoam Cutter (or Serrated Knife)
      • Craft Paint (For Paper Mache Box)
      • Acrylic Paint (In Chocolate Colors - Light and Dark Browns)
      • Fabric Dimensional Paint (aka Puffy Paint) Suggested Colors: Brown, Hot Chocolate, Winter White, True Pink and Raspberry (For Chocolate Decorations)
      • Craft Flowers (to Decorate the top of Boxes)
      • White Cardstock
      • 2" Circle Paper Punch
      • Black Pen
      • Mini Cupcake Baking Cups
      • Shredded Paper
      • Toothpicks or Wood Skewers
      • Scissors
      • Hot Glue Gun
      • 1" Foam Brushes - For Paint and Glue
      DIY Styrofoam Chocolates - Home & Family

      HOW TO MAKE THE BOX FOR STYROFOAM CHOCOLATES:

      1. Paint the paper maché box your favorite color with craft paint. Only need to paint the sides and bottom since you’re covering the top. Set aside to dry.

      2. Trace the top of the box onto the backside of a piece of 12″ valentine’s themed patterned paper and cut out.

      3. Squeeze craft glue onto the top of the box and use the 1” foam brush to spread the craft glue to the entire surface of the paper maché heart

      4. Adhere the patterned paper to the top of the box. This will give you the basic heart shaped box for your chocolates.

      5. Adhere faux flowers to top with glue gun.

      HOW TO MAKE STYROFOAM CHOCOLATES:

      1. Cut the 2″ smooth foam balls in half using an Electric Styrofoam Cutter or a serrated knife works great for doing this.

      2. For rectangular chocolates, use a block of Smooth Foam and cut it into small rectangle shapes, then follow the same process.

      3. Paint the halves using chocolate colored acrylic paint. Set aside to dry. Tip: Use a wooden skewer or toothpick to prop up Styrofoam to be able to paint all sides easily.

      4. Once dry, use the dimensional fabric paint to channel your inner chocolatier and pain on patterns.

      5. out a few 2″ circles with paper punch (or freehand) from cardstock (or paper) and write love notes on each one. Glue the love note to the bottom of each faux truffle with glue gun.

      6. Fill paper maché box with shredded paper and arrange faux chocolates inside.

      Get more information about this episode >>

      DIY Bookends
      41 of 96
      DIY Bookends

      Materials

      • Plain Bookends
      • Dowels
      • Hot Glue
      • Spray Paint
      • Scrapbook Paper
      • Ribbon/twine
      • Drill
      DIY Valentine’s Day Bookends - Home & Family

      Directions

      1. The first thing you want to do is decide on the length you prefer your dowels to be as the arrows. Cut them to the length you prefer
      2. Take your bookends & using a pencil draw an X. Then mark the middle with a little dot
      3. On the dot take your drill & drill a little indent where the dot was marked. This way you have a little indent to set your dowel in
      4. It’s now time to paint. You can spray paint the whole thing as one whole. Or if you prefer to have the dowels a different color, use a little craft paint & brush to color
      5. Let dry
      6. It’s time to make your arrow designs. Use the shape provided by Ken’s Quiver & Arrow to create arrow head.
      7. Use modge podge to glitter, or just glitter scrapbook paper
      8. Attach arrowhead to dowel with hot glue
      9. To create feathers, fold paper in half & cut out with a curved edge
      10. Unfold & chop some fringe around the sides
      11. Glue on feathers for the back end of the dowel
      12. Put your books in!

      Get more information about this episode >>

      DIY Ombre Heart Candles
      42 of 96
      DIY Ombre Heart Candles
      DIY Ombre Heart Candles
      Level:
      Intermediate
      Seasonal Event:
      Valentine's Day

      MATERIALS:

      • Heart shaped cookie cutters (3-4 different sizes)
      • Soy wax flakes/chips
      • Dye chips
      • Wicks with metal tabs
      • Toothpick
      • Pouring Pot
      • Spatula
      • Cookie Sheet
      • Wax or parchment paper
      • Scissors

      DIRECTIONS:

      1. Boil a few inches of water in a pot.
      2. Put wax chips/flakes into pour pot and place on top of boiling water.
      3. Melt all the way down and then add wax dye chip and stir. Mix well.
      4. Pour mixture on rimmed cookie sheet lined with parchment or wax paper.
      5. Let the wax set. The wax should be soft but not jiggly.
      6. Run cookie cutter under warm water to help cut shape more easily.
      7. Cut out shapes and while the wax is still soft, poke a hole in the center with a toothpick where the wick will go.
      8. Set dyed wax scraps aside and save for later.
      9. Repeat process of melting white wax and instead of using a dye chip use scraps of the dyed wax. Add a small amount to start and then continue to add until desired color shade is reached.
      10. Repeat pouring, setting, and cutting out shape. Poke hole in center with toothpick.
      11. Use metal tabbed wick and begin stacking hearts with the largest and darkest color on bottom. Gradually go smaller and lighter.
      12. Trim wick with scissors if necessary.
      13. Place on dish or plate and enjoy!
      DIY Heart-Shaped Tote Bag
      43 of 96
      DIY Heart-Shaped Tote Bag

      Materials

      • Clothespins (Or Pins)
      • Fabric Spray Adhesive (Optional)
      • Sewing Machine (Or Needle And Thread)
      • White Thread
      • Fabric Scissors And/Or Rotary Blade
      • 2 X Heart Cutouts For Faux Leather Shell (Or Other Low-no Fray Fabrics)
      • 2 X Heart Cutouts For Felt Lining, Same Size As Shell (Or Other Similar Weighted Fabric)
      • 2 X Straps (Same As Shell and Liner Material, Or Other Material Of Choice)
      DIY Heart-Shaped Tote Bags - Home & Family

      Directions

      1. Cut out two hearts in faux leather and two in felt lining fabric.
      NOTE: Hearts should be the same size.
      NOTE: For other fabrics, shell and lining should be similar in weight.
      2. Sandwich and pin together shell to lining using clothespins. You will have two separate hearts.
      3. OPTIONAL: Spray adhesive onto the back of felt lining material and lay on to back side of faux leather.
      NOTE: If using lighter fabric material, you may lay face to face so you can flip inside out once sewn. (when you flip it inside out, the side of the fabric you desire on the exterior of bag, will be facing outside).
      4. Cut straps out of faux leather and felt using fabric scissors or rotary blade.
      5. Using sewing machine, sew two seams down the sides using white thread in a zigzag decorative pattern.
      NOTE: Leave enough allowance to rotary trim any unaligned edges.
      6. Take strap material and sandwich it in between the two layers about a half inch down in the center of each top heart round. Pin with clothespin.
      7. Lay two halves of bag together. Pin all four layers together with clothespins.
      8. Using sewing machine, sew decorative stitch around the edge of each heart panel, bonding both linings to the shell and each other and and securing the straps in place. The seam should start from three inches on the outside of each handle to give enough room for opening, but continue the decorative stitch on each side of the top of the bag for continuity.
      NOTE: If flipping inside out, sew each heart first, then combine together. straps must be facing inside (so when you flip it inside out they will be on the outside). Leave a small opening on the straight side so you can flip it. Then, using sewing machine, sew them together using a zigzag stitch on the outside, leaving space at the top for opening while continuing the stitch on each side of the top of the bag for continuity.
      Clean up any misaligned edges with rotary cutter and/or a good pair of fabric scissors.

      Get more information about this episode >>

      Sweet Pea Flowers
      44 of 96
      Sweet Pea Flowers

      Materials

      • Seeds
      • Soil
      • Root Trainer pot
      • Sandpaper
      • Nail clippers
      • String

      Directions for Seeds

      1. Seeds need to lose their shell
      2. Either soak the seeds in water for 24 hours or chip away with sandpaper
      3. Drop 2-3 seeds in “Root Containers”
      4. Once ready to transfer (at least one month)
      5. Pinch plant to allow for more stems
      6. Add bamboo stakes into container in a triangle “tee pee” shape
      7. Attach the stems to the bamboo with soft string (stems are very tender, do not use wire)

      Get more from Shirley at EdenMakers.com

      Get more information about this episode >>

      Valentine’s Day Floral Arrangement
      45 of 96
      Valentine’s Day Floral Arrangement
      Valentine's Day Floral Arrangement
      Level:
      Beginner
      How-To:
      Home Decor, Floral Decor
      Seasonal Event:
      Valentine's Day

      MATERIALS:

      • Vase
      • Oasis
      • Roses
      • Greenery
      • Cymbidium orchids
      • Flax Leaves
      • Stapler

      DIRECTIONS:

      1. Place oasis in bottom of vase.
      2. Place roses in oasis at an angel.
      3. Place greenery in oasis.
      4. Add cymbidium orchids to other side of vase.
      5. Fold flax leaves in two loops. Staple loops together at the bottom to look like a heart. Place in vase.
      DIY Love Letter Pillows
      46 of 96
      DIY Love Letter Pillows

      Materials

      • Blank Pillows
      • Sew in Fabric Sheets
      • Scissors
      • Fabric Pens
      • Needle & Thread
      DIY Love Letter Pillows - Home & Family

      Directions

      1. Select your photos & pillows
      2. Print photos onto fabric sheet (sew in, NOT iron on)*
      3. Cut picture into shape of heart
      4. Use scrap fabric to line the photo
      5. Sew just bottom of heart (so it remains a pocket)
      6. Accessorize as desired!
      *To add photos to the pillows, okay to use an iron on transfer

      Get more information about this episode >>

      DIY XO Post
      47 of 96
      DIY XO Post

      Materials

      • Two grapevine wreaths
      • Two sticks
      • Faux florals
      • Faux berries
      • Hand saw
      • Drill
      • Screws
      • Newel Post
      • Paint (desired color)
      • Floral Wire
      DIY XO Post - Home & Family

      Directions

      1. Take 1st wreath (this will be the “X” wreath) and cut through it with a hand saw.

      2. Straighten out wreath and get it into a single line.

      3. Cut wreath into two length the width of the other (“O”) wreath.

      4. Take two sticks and cut the same length as your two straightened wreaths.

      5. Pre-drill sticks and use screws to attach them together into the shape of an X.

      6. Use floral wire to attach grapevine links to the wooden X. Wrap securely.

      7. Cut berries and attach to grapevine X using floral wire.

      8. Attach newel to wooden plaque so that it will stand up-right.

      9. Paint newel desired color.

      10. Attach grapevine X and “O” wreath to the newel.

      11. Display in your home.

      Get more information about this episode >>

      DIY Valentine’s Day Makeup Bag
      48 of 96
      DIY Valentine’s Day Makeup Bag
      DIY Valentine's Day Makeup Bag
      Level:
      Beginner
      How-To:
      Beauty, DIY Gifts
      Seasonal Event:
      Valentine's Day

      MATERIALS:

      For a Heart Bag

      • Tissue paper
      • Craft glue (Mod Podge)
      • Heart-shaped hole punch; optional
      • Small canvas makeup Bag
      • Paper
      • Paint brush
      • Scissors
      • Wax paper

      For a Glitter Bag

      • Small canvas makeup bag
      • Glitter
      • Mod podge
      • Iron-on letters or stencil
      • Painters tape
      • Wax paper

      INSTRUCTIONS:
      For a Heart Bag

      1. Cut heart shapes out of tissue paper; for easy and clean looking hearts, use a heart hole punch; you can cut heart shapes with scissors as well
      2. Place a few sheets of wax paper into the middle of the canvas bag to protect the inside and other side of the bag from the mod podge
      3. Pre-plan where you want to place your hearts
      4. Use the paint brush to apply a generous amount of mod podge to the canvas and press your hearts on to the bag in the preplanned area
      5. After all the hearts are in place, apply another layer of mod podge over the top of the hearts on the bag to secure them on
      6. Allow to dry for a few hours minimum

      TIPS:

      *To make your tissue paper hearts, place the tissue paper inside a folded piece of regular paper. This ensures you’ll get an even, clean cut.

      *If you do not have a heart hole punch, fold the tissue paper in half to create an even heart shape

      For a Glitter Bag

      Place the painter’s tape into the bag above the area where glitter is desired
      Place a piece of wax paper inside the bag to prevent the glue from soaking through
      Apply the mod podge where you would like the glitter
      Pour a heavy coat of glitter over the mod podge
      Shake off excess glitter and allow to dry completely
      Once dry, apply another layer of mod podge over the bag and allow it to dry completely
      Add additional working details of method of choice, as you see fit!

      TIPS:

      *Use painter’s tape to create a clean line for the glitter*

      *You can also add glitter into the mod podge for extra coverage*

      Chocolate Mailbox and Valentines Necklace Kits
      49 of 96
      Chocolate Mailbox and Valentines Necklace Kits

      Materials for Chocolate Mailbox

      • scrapbook paper or cardstock
      • scissors
      • glue gun
      • rectangle shape chocolate
      • tape
      • mini rubber band; optional

      Materials for Valentines Necklace Kits

      • Glass bottle
      • Beads
      • Waxed Cotton Cord Thread
      • Tag

      Directions for Chocolate Mailbox

      1. Attach two or three of the chocolates together either with tape or the mini rubber band.
      2. Measure out the bottom piece of paper so that it fits the size of the chocolate and about an inch longer on one end.
      3. Round the edges on one end to create the mailbox look.
      4. Fold the paper where the length of the chocolate ends; this will create the look of the mailbox being open.
      5. Cut a piece of paper into a rectangle that fits over the chocolate to create the top of the mailbox secure this with hot glue.
      6. Cut a piece of paper to fit the size of the back of the mailbox and attach with hot glue.
      7. Add fun details to make it extra special like hearts, another layer of paper on the top, a piece of paper on the side to make it look like the flag on the mailbox.
      Tip: Tape helps to hold the paper in place if you are having problems with it moving

      Download the Valentine Necklace DesignDirections for Necklace Kits

      1. Take your glass bottle & fill it up with the beads of your choice.
      2. Then take waxed cotton cord & measure out how long you’d like your necklace to be.
      3. Take your string & wrap it around your bottle.
      4. Add a tag on string for a final touch!

      Get more information about this episode >>

      DIY Wool Heart Sweaters
      50 of 96
      DIY Wool Heart Sweaters

      Materials

      • Wool Sweater
      • Foam Block
      • Heart Cookie Cutter
      • Wool Roving
      • Felting Needle
      • Iron
      DIY Wool Heart Sweaters - Home & Family

      Directions

      1. First, we are going to take our foam block and place it in between the shirt, where we want our wool heart to be. In our case, we are doing it on the pocket, but you can do it wherever you’d like. Position your cookie cutter where you want heart to be. Take the wool roving and spread it out inside the cookie cutter. Now comes the fun part! Take your felting needle and push it through the roving and keep poking. Repeat poking until roving is embedded into the sweater. If you have an area with bare spots, just take another piece of roving and place it in the bare spot. Then start your needling until the spot is filled.

      2. Once you’re done, remove the cookie cutter. Clean up the edges if needed. Once it’s ready to go, press the area with a warm iron and lock it into place. Viola!

      Get more information about this episode >>

      DIY Crystal Heart Hairpins
      51 of 96
      DIY Crystal Heart Hairpins

      Materials

      • Hairpins
      • Felt
      • E6000 Glue
      • Scissors
      • Crystals/rhinestones
      DIY Crystal Heart Hairpins - Home & Family

      Directions

      1. Take a felt and line it out on table.
      2. Scallop one side to imitate “petals”.
      3. Wrap around and glue in the middle.
      4. Flatten out the petals so it looks like “rose” is in full bloom.
      5. Attach to hairpin with glue.
      6. For crystals: Put a dab of glue on parchment paper, use bamboo skewer to pick up crystal and place into heart and/or rose.
      7. Only work in small sections of heart at a time as the glue will dry very fast!

      Get more information about this episode >>

      DIY Candy Jars
      52 of 96
      DIY Candy Jars

      Materials

      • Terra Cotta Pot
      • Spray Paint or Acrylic Paint
      • Fish Bowl or Bubble Ball Vase
      • Hot Glue
      • Wooden Dowel End Cap or Drawer Pull
      • Paint Pen
      • Ribbon
      DIY Candy Jars - Home & Family

      Directions

      1. Paint your terra cotta pot and saucer to your desired color.
      2. Place the pot upside down with the opening facing table.
      3. Glue your fish bowl onto the pot, making sure the opening of your bowl is facing upward.
      4. Glue the wooden dowel cap to the bottom center of your saucer so that it creates a lid.
      5. Place the saucer, upside down, over the fishbowl.
      6. Add any extra touches to your container that will personalize it for your valentine. I used a paint pen to write a sweet phrase to the outside and wrapped a little ribbon around the bottom.
      7. Fill the bowl with candy and give it to your Valentine!

      Get more information about this episode >>

      DIY Felt Potpourri Pops
      53 of 96
      DIY Felt Potpourri Pops

      Materials

      • Potpourri
      • Felt
      • Scissors
      • Bamboo skewers
      • Essential oils
      • Fabric glue
      • Puff paint

      Directions

      1. Cut two hearts out of the felt pieces.

      2. Using puff paint, Write your message on the heart.

      3. Once dried, take fabric glue and glue the two hearts together on the edges.

      4. Leave a small opening to add the potpourri.

      5. Put bamboo skewer inside and glue the bottom.

      Get more information about this episode >>

      Last-Minute Romantic Gestures
      54 of 96
      Last-Minute Romantic Gestures

      Materials for Romantic Walkway

      • Cardstock
      • Heart Shaped Hole Punch
      • Paper Bags
      • Battery Operated Tea Light

      Materials for Heart-Shaped Wall Decor

      • Flowers (Cut)
      • Washi Tape (Or Tape That Won't Strip Your Paint)

      Directions for Romantic Walkway

      1. Create Confetti Using Hole Punch

      2. Spread On Ground

      3. Insert Tea Lights Into Paper Bags

      4. Line Walkway W/ The Tea Lights

      Directions for Wall Decor

      1. Create Design Using Chalk Or Freehand

      2. Attach Flowers To Design Using Washi Tape

      Get more information about this episode >>

      DIY Heartie Phone Docking Station
      55 of 96
      DIY Heartie Phone Docking Station

      Materials

      • Oval Craft Plaque
      • Wood Buttons
      • Pre-Made Wooden Heart
      • 1/8 inch of wood
      • Wood glue
      • Decoupage glue
      • Sandpaper
      • Dremel tool & x-acto knife
      • Wood stain

      Directions

      1. Measure your phone charger insert

      2. Mark onto the center of the oval craft plaque

      3. Use Dremel tool to insert pilot hole

      4. Change drill bit to create a wider hole and make sure to carve out hole in a slant
      Use wood glue on four wooden buttons & let dry

      5. Use x-acto knife to cut a flat surface on the bottom of the premade heart

      6. Optional (use sandpaper to smooth out the edges)

      7. Use x-acto knife to cut out an angle shape from thin 1/8-inch wood piece

      8. Use sandpaper to smooth all edges

      9. Glue on triangle to heart & let dry

      10. Glue heart with triangle piece onto wood plaque in the center & let dry

      11. Use stain wood finish & let dry

      12. Print picture, trace heart shape one inch smaller than wood heart

      13. Use decoupage glue onto picture and place on heart

      14. Take cord and slide underneath plaque and staple cord onto base.

      Get more information about this episode >>

      DIY Valentine's Day Crafts for Kids
      56 of 96
      DIY Valentine's Day Crafts for Kids
      DIY Valentine's Day Crafts for Kids
      Level:
      Beginner
      How-To:
      Kids crafts
      Seasonal Event:
      Valentine's Day

      MATERIALS:

      DIY Unicorn Cups

      • Paper Cups
      • Small Marshmallows
      • Clear Cone Shaped Party Bags
      • Curling Ribbon
      • Marker
      • Foam Sheets or Foam Hearts
      • Hot Glue Gun/ Glue
      • Scissors

      DIY Fringed Love Bug Bags

      • Crepe paper
      • Scissors
      • Double-sided tape or glue
      • Brown paper bags
      • Googly eyes
      • Pipe cleaners

      DIY Candy iPods

      • Construction Paper
      • Candy Hearts Box (Or other Rectangular Candy Box)
      • Ipod Face Template (Download below)
      • Hot Glue/Tape
      • Yarn
      • Mini Reese's Cups

      INSTRUCTIONS:

      Unicorn Cups

      1. Fill the party bag with marshmallows and tie off the end
      2. Glue the party bag onto the paper cup, upside down
      3. Glue your ribbons in front of and behind the marshmallow bag, creating the mane
      4. Cut hearts out of your foam sheets and cut them in half. (I actually found foam hearts at the store and cut those in half)
      5. Glue the half-hearts (ears) on either side of the marshmallow bag and mane
      6. Use your marker and draw eyes on either side of the cup
      7. Optional (add any of your favorite rainbow or glitter unicorn embellishments!)

      Love Bug Bags

      1. Cut the crepe paper to the same size as the width of the bag
      2. Use the scissors to cut fringe into one side of the crepe paper leaving about a 1/4-1/2 inch uncut at the top
      3. To speed up the process, you can cut about 3 sheets at a time
      4. Place the double-sided tape, or glue, on the uncut part of the crepe paper
      5. Place onto the brown bag, starting at the bottom, and working your way up
      6. Repeat until the entire bag is covered
      7. Fill with candy, and use tape to secure the bag shut; optional
      8. Use the glue gun to add the eyes to the front of the bag and the antennas to the back of the bag.

      Candy iPods

      1. Wrap and glue the candy heart box with your construction paper and cut it to fit the candy box
      2. Cut out and glue template to the front of your ipod (Fill the ipod template with your favorite songs, either on the computer or with pen.)
      3. Cut and glue a 12 inch piece of yarn onto the top of your candy box (This starts the headphone wire)
      4. Cut a 4 inch piece of yarn. Tie the end of this yarn piece 4 inches down from the other end of the longer yarn piece. Cut away excess.
      5. Tape two mini reese’s cups to the ends of the yarn pieces
      6. Gift to your favorite music lover!

      Download the iPod Valentine Template

      "You're My Rock" Bracelet
      57 of 96
      "You're My Rock" Bracelet

      Materials

      • Agate Rock
      • Jump Rings
      • Jewelry Pliers
      • Chain/Leather
      • Clamp Clasp
      • Lobster Clasp

      Materials for Display

      • Small Gift Box
      • Colored Card Stock
      • Pen or Printer
      • Scissors

      Directions

      For Bracelet:
      -Thread leather through jump rings that are connected to both sides of stone.
      -Wrap leather around wrists to determine desired length. Cut leather to desired length.
      -Attach clamp clasps on each end end of leather using pliers.
      -On one end of clamp clasp attach a clasp using a jump ring
      -On other end attach a jump ring

      For Necklace
      -Attach jump ring to predrilled hole at the top of stone
      -Attach an additional jump ring to the jump ring attached to the stone
      -Thread chain through jump 2nd jump ring
      -Attach clasp to one end of chain using a jump ring

      Directions for Display

      -Trace shape of box onto colored card stock
      -Cut shape out using scissors. Make sure to cut a little smaller than box
      -Using a pen or printer write out “You’re my Rock”
      -Using scissor make two slits on outer sides
      -Place bracelet into slits so the rock sits in the middle

      Get more information about this episode >>

      DIY Love Photos
      58 of 96
      DIY Love Photos
      DIY Love Photos
      Level:
      Beginner
      How-To:
      Party Decor
      Seasonal Event:
      Valentine's Day

      MATERIALS:

      For Holding Heart Backdrop

      • crepe paper
      • scissors
      • tape
      • balloons

      For Blowing Kisses Backdrop

      • hearts of ascending sizes (can be precut, or cut out using red paper and scissors)
      • tape

      For Baby in Heart Shape

      • swaddle
      • mini hearts
      • rose petals

      DIRECTIONS:

      For Holding Heart Backdrop

      1. Cut the crepe paper in long strips and attach to a wall with tape to create a long sheet of the three different colors; this creates a cool backdrop
      2. Place the toddler in front of the sheet of crepe paper with balloons

      For Blowing Kisses Backdrop

      1. Use the tape to attach the hearts to a wall going from small to large to look like the toddler is blowing hearts like a kiss

      For Baby in Heart Shape

      1. Place the rose petals or hearts onto the swaddle to create a large heart
      How to Care for Plants that Say I Love You
      59 of 96
      How to Care for Plants that Say I Love You

      ANTHURIUM & PHILODENDREN CARE TIPS

      - Anthuriums and heart shaped Philodendrons are perfect for bright rooms, (but no direct sunlight) with temperatures in 70-90 degree range.
      - Let the soil dry out before watering, don't overwater or roots will rot!
      - In winter, place anthurium in cold room for 6 weeks so it can rest and store energy for more flower spikes the following year.

      BLEEDING HEART AND CYCLAMEN CARE TIPS

      - As a potted plant combination, Bleeding heart and Cyclamen should be watered when the soil feels slightly dry to the touch but do not allow to dry out!
      - When spring arrives, plant the bleeding heart and cyclamen in a shady garden so that they can return and continue to grow year after year.
      - Both plants will start to look yellow and dead during the heat of summer, but this is normal. They will become dormant during warm summer through winter and come back the following spring with new growth!

      HOYA AND STRING OF HEARTS CARE TIPS

      - Indoors, place in a very bright room but not direct sunshine
      - Temperatures between 60-80 degrees indoors
      - Water when soil dries in between watering

      Get more information about this episode >>

      DIY Heart Socks and Sweaters
      60 of 96
      DIY Heart Socks and Sweaters

      Materials

      • Sweater
      • Socks
      • Needle & thread
      • Material of your choice (for your heart)
      • Fabric scissors

      Directions

      1. On a piece of folded paper draw your half heart

      2. Cut it out. Use the cut out as a template for your heart

      3. Place paper on your fabric, cut around it

      4. Choose your placement for the hearts

      Sew your heart cut outs onto your socks and/or sweatshirts!

      -Tip: you may use fabric glue for this project

      Get more information about this episode >>

      DIY Conversation Plates
      61 of 96
      DIY Conversation Plates

      Materials

      • Clear plates
      • Font stencils
      • Metallic sharpies

      Directions

      1. Decide on which phrase or saying you'd like

      2. Print it out (inverted, depending on if your plate is opaque or clear) on the computer with
      whichever font you like best

      3. Tape the stencil to the bottom of the plate

      4. Do your first layer on the top side

      5. Then remove the paper

      6. Double up the layer on the backside so that it's more opaque

      7. Ta da!

      Get more information about this episode >>

      DIY Valentine's Wreath
      62 of 96
      DIY Valentine's Wreath

      Materials

      • Grapevine heart
      • Pine cones
      • Spray paint
      • Birds
      • Hot Glue
      DIY Love Birds Wreath - Home & Family

      Directions

      1. Hot glue pine cones onto wreath in cluster

      2. Spray paint everything white

      3. Let dry

      4. Once dry attach birds to wreath with hot glue

      Get more information about this episode >>

      DIY Doggie Tags
      63 of 96
      DIY Doggie Tags

      Materials

      • Card stock (in brown and in cream)
      • Scissors
      • Printer
      • Glitter paper (red)
      • Glue
      • Hole punch (small)
      • Ribbon or twine
      • OPTIONAL: Heart punch and tag punch

      Directions

      1. Print out your favorite kind of dog on brown card stock. I searched “dog silhouettes” on google and picked my favorite.

      2. Once printed out, cut each little doggie out. You will be using the back side of the paper so that the pups remain brown.

      3. Print out “dog treats” on cream card stock.

      4. You can cut out tags from here, or use a tag punch.

      5. Glue the three layers together: Tag, dog, heart.

      6. With a small hole punch, cut a hole in the top of the tag.

      7. Run the twine or ribbon through the hole in the top of the tag.

      8. Voila! Give to your pups or a friend’s pup and watch them enjoy!

      Get more information about this episode >>

      Sentimental Cufflinks
      64 of 96
      Sentimental Cufflinks

      Materials

      • Cufflinks
      • Paper
      • Resin
      DIY Sentimental Cufflinks - Home & Family

      Directions

      1) Use blank setting cufflinks for this project

      2) Create your letter, scan and shrink on the computer in order for the letter to fit

      3) Resin will take 6 to 24 hours to dry

      Get more information about this episode >>

      Check out more fun DIY projects at the Home & Family Pinterest Page

      DIY Galentine's Day
      65 of 96
      DIY Galentine's Day

      Materials for Place Mats

      • Butcher Paper
      • Acrylic Paint

      Materials for Gift Tags/Bookmarks

      • Paint Swatches
      • Heart Hole Punch
      • Ribbon

      Directions for Place Mats

      1) Paint X’s and O’s across your white napkin

      Directions for Gift Tags/Bookmarks

      1) Find your favorite color swatch at your local hardware store

      2) Using a heart shaped hole punch (or your favorite shape) punch a pattern of heart holes along the edge of paint swatches

      3) Tie a ribbon to the end of the gift tag

      Get more information about this episode >>

      Check out more fun DIY projects at the Home & Family Pinterest Page

      Birdseed Cakes
      66 of 96
      Birdseed Cakes
      Ingredients

      Ingredients

      • 1/2 cup warm water
      • 3 tablespoons light corn syrup
      • 1 and 1/2 package unflavored gelatin (4 tsp.)
      • 4 cups bird seed
      • Nonstick cooking spray
      • Drinking straws
      • Thin string or twine

      Directions

      1) Spray silicon mold with cooking spray.

      2) On the stovetop over medium heat, whisk gelatin and water until dissolved. Whisk in corn syrup and mix well. Pour gelatin mixture into a large bowl.
      Add 4 cups birdseed to gelatin mixture. Stir to coat all of the seed.

      3) Using a small spoon, spoon birdseed mixture into your mold.

      PRO TIP: Spray your finger tips with cooking spray and press firmly down on mixture so it is well packed in the mold.

      4) Cut your drinking straw into 2 inch pieces and stick one piece into each birdseed mold, pushing all the way to the bottom and creating a whole. Leave straw in place while it sets.

      5) Place in refrigerator (or freezer if you’re impatient like me), until it sets. It will be hard to the touch when it's sets.

      6) It usually takes about 1/2 hour in the fridge.
      Remove from mold onto baking sheet, carefully. Let dry for a couple of days (turning over occasionally). Tie on a bow of decorative string for hanging.

      7) An easy way to get the string through the hardened birdseed mold is to remove the straw, thread the string through the straw and stick the straw (string inside), back through the whole until you can grasp it on the other end.

      Get more information about this episode >>

      DIY Birch Tree Vase
      67 of 96
      DIY Birch Tree Vase

      Materials

      • Birch Bark
      • Burning Kit
      • Glass Vase
      • Candles
      • Optional: Sanding Block

      Directions

      1) Draw your design in pencil around the bark

      2) Then take the lines with a heat tool or brown permanent marker.

      3) Wrap bark around the tall cylinder. Allow for overlap.

      4) Pull until tight. Apply glue inside the overlap.

      5) Press in place; hold while glue sets

      6) Sand the top to give it a smooth, beautiful finish.

      Optional: You can insert a glass vase or waterproof the interior if you plan to add fresh flowers.

      Get more information about this episode >>

      Check out more fun DIY projects at the Home & Family Pinterest Page

      DIY Dining Picnic Tables
      68 of 96
      DIY Dining Picnic Tables

      Materials

      • Ten (10) 2”x4” planks cut to your desired length
      • Water-based wood stain
      • Paint for legs (spray paint works best)
      • Picnic table kit

      Directions

      1. Pick out the paint you would like for your table legs, and spray all sides of your legs.

      Leave ample amount of time to dry based on the manufacturer’s suggestion on the

      spray paint can.

      2. Cut the length of the table top (or have a hardware store cut the 2x4’s for you).

      3. Stain the 2x4’s and set aside to dry.

      4. Attach the legs to the table top and table center according to the manufacturer’s

      directions.

      5. Voila! Set the dining table in your home and invite over friends and family to enjoy!

      Get more information about this episode >>

      Check out more fun DIY projects at the Home & Family Pinterest page

      DIY Personalized Shawls
      69 of 96
      DIY Personalized Shawls

      Materials

      • 100 % Cotton Fabric Shawls
      • Fabric Paint
      • Rubber Stamps
      • Paint brush

      Directions

      1) Use an old shawl or new

      2) Use a rubber stamp with a deep pattern works best

      3) Using your brush apply a small amount of paint onto the raised parts. You'll get some elsewhere but do your best to keep things neat.

      Make sure your worktop is nice and even and then place the stamp directly onto the fabric and push down

      Lift the stamp straight up. If you don't your stamp will smudge. And definitely feel free to practice this on scrap before you take on the big show.

      Your stamp won't be perfect in all places but that lends to the charm of the fabric.

      Get more information about this episode >>

      Check out more fun DIY projects at the Home & Family Pinterest Page

      Letter Bundles for Loved Ones Away From Home
      70 of 96
      Letter Bundles for Loved Ones Away From Home

      Materials

      • Stationery in a variety of sizes – the more antique it looks, the better. Get whatever paper you want to use.
      • Envelopes in a variety of sizes to match your stationery
      • Red & white twine
      • OPTIONAL: Cardboard box to hold the letter bundle

      Directions

      1. This will take you some time, but it’s worth it! Download the list of 20 Loved One notes.
      2. Pick your envelopes first. Since you will want it to look like an old-world bundle, use different sized envelopes and write on the top left corner of each envelope what the subject is: “Open me when you are…”
      3. Based on the size of the envelopes you chose, pick a stationery that will fit inside them.
      4. Start with the same subject on the top left corner of the sheet or note card: “Open me when you are…”
      5. Then start writing each note.
      6. Once your note is done, put it in the envelope and seal it up!
      7. Continue this process until all 20 letters/notes are complete. Feel free to add your own notes as well…you don’t have to stop at 20!
      8. Once all notes are completed, put them in a pile with the largest envelope on the bottom. Stack them so that the smallest envelope is on top.
      9. Take your red and white twine (or any twine you would like) and wrap the letters like you would wrap a ribbon around a present – all four sides need to have twine around them to meet in the center of the top. Tie in a bow.
      10. Either give this bundle to your loved one, or put the bundle in a cardboard box.
      11. Voila! Give the bundle of love to your loved one!

      Here is a list of 20 ideas for “Letters to a Loved One” notes:
      1. Open me when you miss me
      2. Open me when you can’t sleep
      3. Open me when you wake up grumpy
      4. Open me when you feel like giving up
      5. Open me when you need a hug
      6. Open me when you miss the kitties
      7. Open me when you miss the puppies
      8. Open me when you miss our kids
      9. Open me when you don’t feel like waking up and taking on the day
      10. Open me when you need to laugh
      11. Open me when you’ve had an embarrassing moment
      12. Open me when you feel like you are alone
      13. Open NOW
      14. Open me when you are missing the house
      15. Open me when you are stressed
      16. Open me when you need a friend
      17. Open me when you need a pep-talk
      18. Open me when you are feeling sick
      19. Open me when you need someone to talk to
      20. Open me when you’ve had a bad day

      Get more information about this episode >>

      Check out more DIY projects at the Home & Family Pinterest Page

      DIY Pet Portrait
      71 of 96
      DIY Pet Portrait

      Materials:

      • A 16”x20” frame
      • A 16”x20” canvas
      • A black and white matting (various sizes to layer)
      • Black acrylic paint
      • White acrylic paint
      • Artist paint brush (small and large)
      • Printer
      • A paper plate to use as a palette
      • A cup of water to wash your paint brush
      • A free “Cartoon” app on your smart phone
      • A picture of your beloved pooch
      • Iron-on transfer paper

      Directions:

      1. Download a cartoon application on your phone. We used “Cartoon Sketch Avatar Free” with the “pencil sketch" effect

      2. Enter a picture of your pet into the program, and convert the image to a cartoon in black and white shades.

      3. Print the image either on regular paper or on iron-on paper. If you are making a larger painting, you will need to divide the painting into two or four sections and print sections.

      4. Transfer the image to your canvas (or any surface that you wish to paint. I am using canvas and will iron on the image to the canvas).

      5. Open your paint and squeeze a little of the color onto your palette. You will only need black, white and gray paint (Technically only black and white because you will mix the two to create gray).

      6. Paint over all of the areas that are marked with that color.

      7. Wash your brush after you are finished with that color, and let the canvas dry before applying the next color. (If you are using acrylic paint, the dry time will be minimal. If you are using oil-based paint, each step could take up to a day to dry.)

      8. Repeat these steps until you have every area of the painting is complete.

      9. If you want to use the glass over the picture, make sure that your acrylic paint is as smooth as possible. If you want to leave off the glass, you can add texture to the painting with adding a bit of extra paint (or even adding drywall mud).

      10. Hang up, and show off your pet on your wall! Voila!

      Get more info about this episode >>

      DIY Braided Heart Wheat Weaving
      72 of 96
      DIY Braided Heart Wheat Weaving

      Materials:

      • 6 pieces of dried wheat with straw (available at craft or floral shop)
      • Scissors 
      • carpet thread or string (beige)
      • Ruler
      • ribbon
      • wallpaper tray (for soaking wheat)

      Directions:

      1. Select 6 pieces of wheat (you want nice heads and straws all the same size , and as long as possible between head and first 'node' or joint.

      2. Cut straws just above the first 'node'; remove the dried leaf sheath and remaining straw.

      3. Soak the prepared wheat in very warm water for 20 minutes to 2 hours, or until the straw can be bent easily without cracking (test bending the butt end of the straw).

      4. Take 3 pieces of wheat and tie them together snugly with a square knot just under the wheat heads. Trim thread ends.

      5. Braid the wheat straws for a distance of about 4".

      6. Tie a square knot just above the end of the braid. Trim thread. Set the braid aside.

      7. Repeat steps 4-6 with second set of 3 pieces of wheat.

      8. Lay the two braids side-by-side with wheat heads facing away from you and straw ends pointing toward you. Tie both together with a square knot on top of the knots previously tied towards the straw end. Trim thread.

      9. Spread the straw heads apart (will look like the letter 'Y'). Continue moving the straw heads apart and around. Tie them on either side of the bundle of straws, about 2 inches below the last tie, forming a heart. Trim thread.

      10. Adjust the braid into a heart, and spread the wheat heads to evenly fill the bottom 180 degrees of the weaving. Dry flat.

      11. Tie a bow directly on top of the last tie, hiding the thread. Add a second piece of ribbon as a hanger, covering the other thread tie.

      12. Enjoy your Braided Wheat Heart!

      Find out more about this episode >>

      Get more from JoAnn Kelly Catsos at her website

      DIY Felt Ruffle Wreath
      73 of 96
      DIY Felt Ruffle Wreath

      Materials

      • Felt – amount varies depending on size of wreath and density of ruffles, but 2 ½ - 3 yards based on 72 wide.
      • Stick Pins – 250 to 400 depending upon wreath size and density of ruffles
      • Foam Wreath Form in your preferred size
      • Circle Cutter ( a must have) or you can draw with a template and a cut but it will take MUCH longer
      • Ribbon - For hanging wreath ( or a wreath hook will do).
      • Embellishments: For sign, construction paper, felt pen, peel and stick letters.
      • Scissors

      Directions

      1) Start by using the circle rotary cutter to cut your felt circles. For this particular wreath, I made my circles 4″ wide for this project. ( they can be 2” wide for smaller wreaths or smaller pile)You will need approx. 280 – 300 circles.

      2) To affix the felt circles to the wreath, simply fold the felt circle in half, and then in half again ( for full rosette Lie I did, fold circle in half then fold in thirds(your piece should essential be a quarter-pie shape).

      3) Use a stick pin and push it through the felt, near tip bottom and then push the felt into the wreath. Repeat this process, overlapping your ruffles so that the foam does not show through.

      4) Fold circle in half then fold in thirds

      5) Fluff and open your ruffles as you go along.

      ** NOTE: If you you hang your wreath on a wood door or wall, there is no need to add rosettes all the around the form. You can leave some of the back showing. If you hang on glass, simply pin flat half circles in a fan-like fashion to cover back.

      Get more information about this episode >>

      Check out more fun DIY projects at the Home & Family Pinterest Page

      DIY Valentine's Floral Arrangement in a Chocolate Box
      74 of 96
      DIY Valentine's Floral Arrangement in a Chocolate Box
      DIY Valentine's Floral Arrangement in a Chocolate Box
      Level:
      Intermediate
      How-To:
      Floral Decor
      Seasonal Event:
      Valentine's Day

      MATERIALS:

      • Cardboard
      • Scissors
      • Floral Foam
      • Rubber Solution
      • Red Roses
      • Tuna Cans
      • Succulents
      • Moss

      INSTRUCTIONS:

      1. Cut out heart shaped cardboard.
      2. Glue strip to side.
      3. Add tuna cans.
      4. Cut floral foam to fit.
      5. Insert flowers and succulents into foam.
      6. Add moss.
      DIY Valentine's Monster Boxes
      75 of 96
      DIY Valentine's Monster Boxes
      DIY Valentine's Monster Boxes
      Level:
      Beginner
      How-To:
      Kids DIY , Home Decor
      Seasonal Event:
      Valentine's Day

      MATERIALS:

      • 2 Empty tissue boxes
      • Hot glue
      • Foam paper
      • Pipe cleaners
      • Pom-poms
      • Pom-pom garland
      • Fur/material/paint (for body)
      • Googly eyes
      • Scissors
      • Feather boa

      INSTRUCTIONS:

      1. Cut out plastic lining from tissue box opening
      2. Pick a tissue box that will be the “head” of the monster. Line it up with the tissuebox that will act as the “body” and cut out a hole so that it creates a connecting compartment that will hold all of the cards.
      3. Glue head and body together
        4) Cut out monster’s teeth using scissors and foam paper
      4. Glue to the opening of the “head” tissue box
      5. Glue on fur and/or material to body. You can also paint body (optional)
      6. Glue on feather boa for monster’s hair (optional)
      7. Use pipe cleaners and pom-poms to create antennas (optional)
      8. Use pom-pom garlands and foam paper to create hands, arms, legs and feet(optional)
      DIY Valentine's Day Arrows
      76 of 96
      DIY Valentine's Day Arrows

      Materials for Wall Arrows

      • Wood Dowels
      • Paint
      • Painter’s Tape
      • Foam Paper
      • Hot Glue Gun
      • Foam Hearts; or make your own by cutting the foam paper

      Materials for Arrow Heart Valentines

      • Pencil
      • Foam sheets
      • scissors
      • hot glue gun
      • Candy or pencil
      • Paper/ Paper Bag
      • X-acto knife

      Materials for Arrow Straws

      • Straws
      • Foam sheets
      • Scissors
      • Hot glue gun; optional

      Materials for Arrow Kabobs

      • Kabob skewers
      • Foam sheets
      • Scissors
      • Hot glue gun
      • Fruit

      Directions for Walll Arrows

      1) Wrap the painter’s tape around the wood dowels in a few different spots to create the color block style
      2) Paint the dowels whatever colors you like; allow to dry
      3) If you can’t find pre-cut hearts, you can make your own by cutting them out with the foam sheets

      4) To make the end of the of the arrow, cut the sheet so that it is a rectangle; fold it in half lengthwise and cut the top and bottom on an angle to create the overall shape; then, while still folded, cut slits into the foam sheets to create a fringed look; please see pictures below for an example!

      5) Use a hot glue gun to attach the foam to the wood dowels
      6) Hang them on the wall! I simply placed these ones on small nails that I hammered into the wall; it helps to use a level to make sure they are even

      Directions fro Arrow Heart Valentines

      1) Cut the foam sheet into a small rectangle
      2) Fold it in half lengthwise
      3) Cut the two ends on an angle to create the overall shape, then while it is still folded, cut slits into the the foam sheets to create a fringed look
      4) Attach these to the pencil with a hot glue gun, or tape if using candy
      5) Fold a piece of paper in half and draw a heart so that one side of the heart is on the fold; this way the heart will be able to open like a book
      6) Cut out the heart shape, making sure not to cut the folded area
      7) Use an X-Acto knife to cut to slits into the the heart so that the "arrow" pencil or candy can be placed in the two slits to stay in place and look as though it is going through the heart.
      OR
      Create the arrows in the same way as the Kabobs, only using lollipop sticks, and attaching them to cute little bags.

      This "valentine" that can be passed out at school/work.

      Directions for Arrow Straws

      1) Cut the foam sheet into a small rectangle
      2) Fold it in half lengthwise
      3) Cut the two ends on an angle to create the overall shape, then while it is still folded, cut slits into the the foam sheets to create a fringed look
      4) Attach these to the straw with a hot glue gun

      Directions for Arrow Kabobs

      1) Cut the foam sheet into a small rectangle
      2) Fold it in half lengthwise
      3) Cut the two ends on an angle to create the overall shape, then while it is still folded, cut slits into the foam sheets to create a fringed look
      4) Attach these to the skewers with a hot glue gun
      5) Slide desired fruit onto the kabob and serve
      **These can also be placed into cupcakes, truffles, etc, for a fun decoration

      Return to the Episode Guide >>

      Check out more fun DIY projects at the Home & Family Pinterest Page

      DIY Pop-Up Cards
      77 of 96
      DIY Pop-Up Cards

      Materials for a DIY Heart Pop-Up Card

      • Print on white or colorful thick paper stock
      • X-Acto knife: can be found at your local arts and crafts store
      • Glue stick
      • Various decorations including washi tape, confetti, color pencils
      • Download the template to make this pop-up card right here

      Materials for DIY Rad Pop-Up Card

      • Print on white or colorful thick paper stock
      • X-Acto knife: can be found at your local arts and crafts store
      • Glue stick
      • Various decorations including washi tape, confetti, color pencils
      • Download the template to make this pop-up card right here.

      Steps for DIY Heart Pop-Up Card

      1. Download our Heart Pop-Up template right here. You can use the template to trace over any other paper (patterned, solid colors, glittered, etc) or print it on paper of your choice.
      2. Fold the printed template in half, then cut on the solid lines and fold on the dotted lines so that you're creating a full-sized heart when it's open. The inside piece (page 2 of the template) has the pop-up, and the outside piece (page 1 of the template) is a solid heart.

      3. Make sure to pop out the inside's mini heart (see image above), and then attach the inside and outside together with glue, double-sided tape, or any smooth adhesive. Then, decorate it however you like!


      Steps for DIY Rad Pop-Up Card

      1. Cut along the solid lines
      2. Gently pull each letter out
      3. Fold in half along the dotted lines 4. Glue card together
      5. Fold again and press firmly
      6. Decorate to your heart’s content

      Get the Rad Pop-Up Card Template

      Download the Love Letters Template


      Return to the Episode Guide >>

      Check out more fun DIY projects at the Home & Family Pinterest Page

      DIY Valentine Button Art
      78 of 96
      DIY Valentine Button Art
      DIY Valentine Button Art
      Level:
      Beginner
      How-To:
      Wall Art, Home Decor

      MATERIALS:

      • Buttons
      • Thread
      • Hot Glue
      • Heavy Paper
      • Pencil
      • Frame or Mount

      INSTRUCTIONS:

      1. Lightly sketch the shape of your heart on the paper.
      2. Run paper through sewing machine randomly to get stitch marks around the heart.
      3. Glue buttons around edge of heart and then fill in the center.
      4. Create button heart well inside stiches so thread shows.
      5. If desired, add letters to create a phrase (i heart u).
      6. Place in frame and hang.
      DIY Personalized Coasters
      79 of 96
      DIY Personalized Coasters

      Materials

      • Coaster molds (purchased on Amazon)
      • Resin and hardener
      • Decorative items for the coaster
      • Cork pads

      Steps

      • Mix equal parts resin to hardener.
      • Pour resin into a disposable cup and stir. Then pour that into equal parts hardener and stir again for two minutes.
      • Pour resin mixture into the coaster mold to the half waypoint
      • Let dry overnight
      • Once they’re dry, you’ll want to pop them out of the mold form.
      • Then, you’ll need to glue the cork pads on the bottom!

      Return to the Episode Guide >>

      Check out more fun DIY projects at the Home & Family Pinterest Page

      DIY Heart Tee
      80 of 96
      DIY Heart Tee

      Materials

      • Top
      • Scissors
      • Pencil
      • 1/4 yard of contrast material

      Steps

      1. Draw your half heart shape and cut out 2 halves.
      2. Line them up to make sure it creates a good heart.
      3. Take one of your stencils and lay it on your fabric on the fold
      4. Pin your heart stencil onto your top and cut out the heart shape.
      5. Lay your contrast fabric on the inside of your top and pin it into place. 6. Either sew or glue along the edges and cut off the excess.

      DIY Heart Tee - Home & Family

      Return to the Episode Guide >>

      Check out more fun DIY projects at the Home & Family Pinterest Page

      The Meaning Behind the Color of Roses
      81 of 96
      The Meaning Behind the Color of Roses

      Popular Color Roses - And Their Meanings

      RED- Ultimate expression of romantic love for your partner

      PINK- Dark pink indicates admiration, gratefulness or say's "thank you"

      WHITE-Expresses purity and innocence as a love parent has towards their children

      YELLOW- The warmth of yellow roses is shared with platonic friends or co- workers

      ORANGE- The color of burning embers reveals a fascination or romantic crush on someone

      Popular Rose Styles

      STANDARD/MODERN ROSE: Classic long stem hybrid tea rose with pointed center bloom. 2-3"-inches wide. 10 days vase life. Bred for vase and arrangement performance No fragrance (Tibet, Escimo, Mondial)

      GARDEN/ENGLISH ROSE: Old fashioned rose style bred for longer vase life: 7-10 days. Rosette or deep cup shape, more fragrant than modern rose. Popular wedding flower. (Alabaster, Juliet, Wild Spirit)

      SPRAY ROSE: Miniature cluster rose. Each stem 3-5 blooms. Last 7-10 days. Good for small scale arrangements and most affordable rose. (Viviane, Majolica)

      POTTED MINI ROSE: Long lasting mini rose plant in many colors for garden lover. Available year round.

      CARE FOR CUT ROSES
      --Don't delay putting your roses in water when you receive them.
      --Remove the leaves from the stem so they don't rot in the water
      --Make fresh diagonal cut on bottom of stems and dip in "hydrating solution" for 1 second
      --Place conditioned rose in cool water that's been prepared with flower food --Change water and recut stems every few days for extended bloom

      Return to the Episode Guide >>

      Get more Shirley at EdenMakers.com

      DIY Heart Pocket Pillows
      82 of 96
      DIY Heart Pocket Pillows

      Materials for Flower Heart Pocket Pillow

      • Pillow
      • Felt
      • Scissors
      • Glue (hot and fabric)
      • Artificial flowers

      Materials for Love Poem Pillow

      • Pillow (with a removable pillow case)
      • Stencils
      • Fabric paint
      • Paint brush
      • Book
      • Painters Tape

      Steps for Flower Heart Pocket Pillow

      1) Draw heart outline on piece of felt
      2) Cut felt heart out with a pair of scissors
      3) Arrange artificial flowers on felt heart
      4) Glue flowers in place
      5) To create the pocket, glue felt heart onto pillow by only gluing the outline of the heart until you get to the top arches. Do not glue the top center of heart because it will serve as a pocket for a special note or gift.
      6) Let dry overnight

      Steps for Love Poem Pillow

      1) Take pillow out of pillowcase
      2) Run painters tape along pillow to create a straight line to paint over -Place a book inside of pillowcase to create a hard service to paint on -Use fabric paint with stencil and paintbrush to create message
      3) Let dry

      Return to the Episode Guide >>

      Check out more fun DIY projects at the Home & Family Pinterest Page

      DIY Soap on a Rope
      83 of 96
      DIY Soap on a Rope

      Purchase Mountain Rose Herbs Here >>

      Purchase Jasmine Perfume Here >>

      Directions

      1. Cut a length of cotton rope 10-12" long.

      2. Knot each end

      3. Mark a circle on the top of a tennis ball with a marker (the size of a quarter)

      4. Use a craft knife to cut out the circle

      5. Make up the perfume: (See Recipe)

      6. Place one drop of oil in each tennis ball.

      7. Melt Nature's Garden Shea butter Melt N Pour soap into the microwave (About

      4 squares per tennis ball

      8. Mix in the oil and 3 drops of Nature's garden red or blue soap dye.

      9. Carefully pour into the hole in the top of the tennis ball.

      10. Poke the knotted ends of the rope through the hole into melted soap.

      11. Leave to set up for 15 minutes and then check (you may want to re-melt and add

      a little more soap, as the level will drop)

      12. Leave to set up overnight.

      13. Use your craft knife to very carefully cut away tennis ball.


      Perfume Recipe

      Men’s Spice:

      1 tsp of the each of the following essential oils: vetiver, clove, cedarwood, sandalwood. (you can also use just 4 tsp of sandalwood or vetiver)

      Women’s:

      ·4 tsp Jasmine essential oil

      Return to the Episode Guide >>

      Check out more fun DIY projects at the Home & Family Pinterest Page

      DIY Heart Shaped Massage Bars
      84 of 96
      DIY Heart Shaped Massage Bars
      DIY Heart Shaped Massage Bar
      Level:
      Intermediate
      How-To:
      Health & Beauty

      MATERIALS:

      Rose & Jasmine Scented Bars:

      • 4 Tsp Beeswax
      • 2 Tb Cocoa Butter
      • 2 Tb Shea Butter
      • 2 Tb Rosehip seed oil
      • 1 Tb Tahitian Monoi Oil
      • 1 Tb crushed rose powder
      • 40 drops rose perfume oil

      INSTRUCTIONS:

      1. Gently heat oils, butters and waxes in double boiler until everything has melted.
      2. Whisk in the rose powder and the rose perfume essential oil.
      3. Pour into silicone rose molds.
      4. Allow them to set for a couple of hours.
      5. Remove your mini bars from the molds and package beautifully for your loved ones.
      Valentine's Day Wreath
      85 of 96
      Valentine's Day Wreath

      Materials

      • Heart wreath form
      • Hot glue
      • Scrap fabric
      • Pins
      • Dowel
      • Paint
      • Watercolor Paper
      • Pins

      Directions

      1) Pin fabric strips around heart until no foam shows through

      2) Cut a banner out of watercolor paper

      3) Glue banner onto heart

      4) Write message onto banner

      5) Stick dowel through heart

      6) Cut a heart and 2 triangle shapes out of watercolor paper to glue to dowel to create an arrow

      7) Paint heart and triangle shapes (optional)

      Return to the Episode Guide >>

      Check out more fun DIY projects at the Home & Family Pinterest Page

      DIY Valentine's Day Sign Post
      86 of 96
      DIY Valentine's Day Sign Post

      Materials

      • Fence posts
      • Saw
      • Paintbrush
      • Paint
      • Stencils
      • Hot glue/nails

      Steps

      1) Cut your boards
      2) Paint boards and post
      3) Let dry
      4) Paint each individual sign with a cute Valentine’s Day quote -Let dry
      5) Hot glue or nail signs to post
      6) Display

      Return to the Episode Guide >>

      Check out more fun DIY projects at the Home & Family Pinterest Page

      DIY Love Letters
      87 of 96
      DIY Love Letters

      Materials

      • Canvas
      • Letters
      • Paint
      • Glue

      Steps

      Step 1: Create a layout with the letters or words you would like to use

      Step 2: Paint your letters to match the color of the canvas

      Step 3: Glue letters on in the design or phrase you want to convey

      Step 4: Let dry

      Return to the Episode Guide >>

      Check out more fun DIY projects at the Home & Family Pinterest Page

      Monica Potter's Lip Exfoliant
      88 of 96
      Monica Potter's Lip Exfoliant

      Ingredients

      • 2 tablespoons honey
      • 2 tablespoons granulated sugar
      • 2 teaspoons Vaseline
      • 5-10 drops of your favorite essential oil (Example: Rose or Spearmint

      1) In a bowl combine all four ingredients. 

      2) Mix until all the ingredients are well incorporated. 

      3) With your forefinger, place some of the exfoliating mixture onto your lips and massage in a circular motion for about a minute. 

      5) Rinse your lips with a warm washcloth and follow up with a nourishing Monica Potter home lip balm.

      Return to Episode Guide >>

      Get more Do It Yourself Ideas at the Home & Family Pinterest Page

      Find out more about Monica's store at MrsPotter.com

      DIY Lemon Verbena Fragrance Water
      89 of 96
      DIY Lemon Verbena Fragrance Water

      Instructions

      1) Place a colander into a stainless steel stock pot and fill it with water until it reaches the bottom of the colander. Remove the colander for a moment and add 2 to 3 cups of fresh lemon verbena stems and leaves to the water. Replace the colander.

      2) Insert a stainless steel or ceramic bowl into the stockpot, placing it on the colander to hold down the leaves in the water.

      3) Invert the stockpot lid and put it on top of the pot. The lid must have a knob handle in the middle in order to be used for this procedure. Turn the heat on low. You want the herbs to steep, not boil. Keep the heat level low so the herbs are barely simmering.


      4) Fill the inverted lid with about two or three trays worth of ice. This will allow condensation to form inside the stockpot.


      5) Simmer the herbs until all the ice has melted. Carefully lift the stockpot lid and discard the ice water into the sink. Inside the stockpot, the bowl in the colander has retained the fragrant water of the lemon verbena. Remove the water and pour it into a glass jar or spray bottle.

      Return to Episode Guide >>

      Check out more recipes at the Home & Family Pinterest Page

      Michael Gaffney's Romantic Floral Spheres
      90 of 96
      Michael Gaffney's Romantic Floral Spheres

      Materials:

      • Start with a grapevine sphere (come in many sizes)
      • Choose the flowers you want to suit your table
      • Trim flowers leaving some stem
      • Glue to grapevine with oasis glue
      • Continue until full
      • Spray with “finishing touch”

      Tips:

      1. Buy flowers from your local wholesale market for best prices
      1. Grapevine spheres are available at all major craft stores
      1. Trim flowers but leave enough stem to glue into sphere
      1. Oasis glue will adhere to flowers and grapevines
      1. Spray with “Finishing Touch” by Floral Life Co. to hydrate for days

      Tips for Tablescape:

      1. Start with 3 layers of linens in ascending lengths
      1. Use contrasting colors for effect
      1. Dress each place setting with a water, wine and champagne flute
      1. Use a larger dinner plate or charger in contrasting color to set off your dinner service
      1. Set your flatwear with salad, dinner forks on the left, knife, spoon on the right. Dessert across the top
      1. Glasses: water above the knife, wine and champagne to the right
      1. Bread plate: upper left with butter knife on it

      Return to Episode Guide >>

      Get more great recipes and crafts by visiting us on Pinterest at pinterest.com/homeandfamilytv and follow "Home & Family" on Twitter @homeandfamilytv and Facebook. Plus, check out our YouTube channel for backstage videos.

      DIY Love Marquee
      91 of 96
      DIY Love Marquee

      Materials:

      • Paper Mache Letters
      • Spray Paint
      • Awl
      • Exacto Knife
      • LED Lights

      Directions:

      1. Mark It: Put your name in lights! Start by grabbing your pencil and marking off 10 evenly spaced 10 dots for your lights.
      1. Cut & Poke Next, with an x acto knife, cut out the back of each letter about a quarter of an inch from the edge. Then, take your awl and poke through your pre-marked holes.
      1. Spray It Now, you're ready to paint! Lightly spray your letter with your spray paint, wait about a minute and add another coat. Allow your letter to dry for 30 minutes before moving on to the next step. Note: When spraying, it's best to step back about 5 feet to stay away from the spray.
      1. Light It Up With all of your holes in place, you're ready to add lights! Push your lights through your holes from the back of the Letter. Place the light strings into the back of your board to keep your lights secure and neatly organized. Turn your switch on and light 'er up!

      Return to Episode Guide >>

      Get more great recipes and crafts by visiting us on Pinterest at pinterest.com/homeandfamilytv and follow "Home & Family" on Twitter @homeandfamilytv and Facebook. Plus, check out our YouTube channel for backstage videos.

      X’s & O’s Valentine Wreath by Ken Wingard
      92 of 96
      X’s & O’s Valentine Wreath by Ken Wingard

      Materials:

      • Wreath form
      • Birch branches
      • Birch ribbon
      • Red burlap
      • Raffia

      Directions:

      1. wrap birch ribbon around forms
      1. bundle branches and wrap with raffia to make X's
      1. hang ribbon on wall or door
      1. hang x and o's in top of ribbon

      Return to Episode Guide >>

      Visit Ken Wingard at www.KennethWingard.com and follow him on Twitter @KennethWingard.

      Get more great recipes and crafts by visiting us on Pinterest at pinterest.com/homeandfamilytv and follow "Home & Family" on Twitter @homeandfamilytv and Facebook. Plus, check out our YouTube channel for backstage videos.

      Ken’s DIY Valentine’s Day Tablescape
      93 of 96
      Ken’s DIY Valentine’s Day Tablescape

      Materials for Table:

      • Tablecloth
      • Vases
      • Flowers
      • Votive Candles

      Materials for Wood blocks:

      • Wood
      • Paint
      • Key
      • Ribbon

      Directions:

      1. Roll down the tablecloth
      2. Add vases
      3. Place flowers (pre-bundled).
      4. Decorate with candles around the table
      5. Make your place settings
      6. Diy valentine wood blocks for everyone at the table

      Directions for wood blocks:

      1. Cut woodblock into desired square size
      2. Drill 2 holes an inch a part in center
      3. Paint your heart
      4. String ribbon through the two holes
      5. Add a vintage key with the ribbon for finishing touch

      Watch the Video >>

      Return to Episode Guide >>

      Visit Ken Wingard at www.KennethWingard.com and follow him on Twitter @KennethWingard.

      Get more great recipes and crafts by visiting us on Pinterest at pinterest.com/homeandfamilytv and follow "Home & Family" on Twitter @homeandfamilytv and Facebook. Plus, check out our YouTube channel for backstage videos.

      No Sugar "Sundae" Valentines Bath Salts
      94 of 96
      No Sugar "Sundae" Valentines Bath Salts

      Materials

      • Epsom salts
      • Essential oil of choice
      • Food coloring of choice
      • Glass or plastic Sundae glasses
      • Scrubby
      • Straw
      • Spoon
      • Ribbon
      • Red heart bead (cherry on top)

      Directions

      1) First make the bath salts by taking 1 cup of Epsom salts a few drops of oil and a drop or two of food coloring and mix.


      2) Place this inside the sundae cup.

      3) Take the scribble and place on top with glue doth on the rim of the glass.

      4) Glue on the "cherry" 

      5) Add in the spoon and straw. Hold in place with glue dots.

      6) Finish off with ribbon and a Valentine message

      Return to Episode Guide >>

      Get more from Tanya at Facebook.com/TanyaMemme

      Get more DIY Projects at the Home & Family Pinterest Page

      Paige Hemmis’ DIY Romantic Ring Holder
      95 of 96
      Paige Hemmis’ DIY Romantic Ring Holder

      Materials:

      • A small frame
      • A small piece of foam (1/2” thick)
      • A small piece of fabric
      • Scissors
      • Black marker
      • A decorative pin
      • A glue gun and glue
      • A scrap piece of card stock

      Directions:

      1. Open the back of the frame cover
      2. Discard the glass
      3. Trace the back cover on scrap card stock
      4. Place foam against your cut card stock
      5. Trace the card stock onto the foam with marker
      6. Cut the foam to size
      7. Lay fabric on a table
      8. Place cut foam on top, and trim fabric larger than foam (about ¼” around all sides)
      9. Glue back of fabric onto card stock
      10. Place it inside the frame and lock off the back
      11. Inset a pin to hold the ring
      12. Hang your ring

      Watch the Video >>

      Return to Episode Guide >>

      Follow lifestyle design expert Paige Hemmis on Twitter @paigehemmis and check out her site www.paigehemmis.com.

      Get more great recipes and crafts by visiting us on Pinterest at pinterest.com/homeandfamilytv and follow "Home & Family" on Twitter @homeandfamilytv and Facebook. Plus, check out our YouTube channel for backstage videos.

      Valentine’s Day Gifts for Teachers
      96 of 96
      Valentine’s Day Gifts for Teachers

      Paige: While teachers appreciate the thought that goes into homemade cookies, brownies and other treats, believe it or not, they’d actually prefer something they can actually use; practical gifts! I know this first hand because my mom and my brother are both teachers! Also, when it comes to food gifts you have to be aware of dietary restrictions and the excess of sweets they receive this time of year.

      Kym: This is perfect for me because I can’t cook to save my life! But I DO know beauty! So that’s what I always choose to give Hunter’s teachers…

      #1: KYM’S GIFT- “I’M AWAKE” BEAUTY KIT

      Kym: Teachers have to be up early every single morning and still look bright and wide awake no matter what. Yet no one gets the perfect amount of sleep every single night.  So when Valentine’s Day comes around, I give Hunter’s teachers something they can really put to use…something I call the “I’m Awake” beauty kit.

      The “I’m Awake” kit includes 3 must-have essentials to put your best face forward first thing in the morning: an eyelash curler, eyebrow pencil and lipstick. Eyelash curlers make your eyes look bigger and stand out, with or without mascara. Disclaimer: you always want to curl your lashes before applying mascara-because if the mascara sticks to the curler and dries, it can pull out your lashes! I also include an eyebrow pencil because you can use them to draw a bigger, higher arch, which instantly makes your eyes look more awake and lifted! And finally, lipstick pulls everything together, like tying it up in a bow! Just make sure the lipstick color will go with the teacher’s personal style!

      #2: PAIGE’S GIFT: “I’M AWAKE” COFFEE KIT

      Paige: Piggy-backing off Kym’s idea…I’d give my own version of an “I’m Awake” kit…except this is everything coffee! The ultimate gift any teacher can use is a gift certificate-it’s almost like giving a more personalized version of actual money, except it shows you put thought into it and personalized it based on where you bought the certificate. For example, I bought this certificate at Starbucks but I’m taking it a step further to personalize it- which is a major rule when it comes to teachers’ gifts. This is the perfect gift for a teacher like my mom, who LOVES her morning coffee. But just like I wouldn’t gift someone a wad of cash, I also wouldn’t gift someone a plain gift certificate. So a great way to personalize a gift certificate is to present it in a festive way. So I’ve decided to put the card inside a personalized mug filled with chocolate covered coffee beans. It doesn’t cost much to go the extra-mile and make that teacher feel good!

      #3: KYM’S GIFT- “MEN’S BEAUTY PRODUCT”

      Kym: Men’s manicuring kit with sign that says, “HANDS DOWN, You’re the best teacher around!” This is a beauty gift for all the male teachers out there. Most men won’t venture to the nail salon and male teachers are not different! But they’re constantly using their hands…writing on chalk boards all day long, helping out with softball practice or showing how to make a volcano out of paper mache! So why not give them a nail salon in a box! I found this fabulous kit at the grocery store! They’re so adorable and show that you really do care!

      Give your kids’ teacher pampered hands with an at-home nail salon kit! www.trim.com 

      #4: PAIGE-PICTURE HANGING KIT

      Paige: As we’ve been saying, it’s always good to put thought into the gifts and make sure it’s something he/she will use or enjoy- this may be something the teacher can use or an item to put on display. Most teachers I know have fond memories of their experiences and any way you can help them put these memories on display will be loved! There’s a great picture hanging kit that I found- it comes with drywall nails and a level-basically everything you need to hang a picture with MINIMAL damage to the public property of school walls!

      Return to Episode Guide >>

      Follow lifestyle design expert Paige Hemmis on Twitter @paigehemmis and check out her site www.paigehemmis.com.

      Get additional tips from lifestyle and beauty expert Kym Douglas at KymDouglas.com. Follow her on Twitter @KymDouglas and like her on Facebook.

      Get more great recipes and crafts by visiting us on Pinterest at pinterest.com/homeandfamilytv and follow "Home & Family" on Twitter @homeandfamilytv and Facebook. Plus, check out our YouTube channel for backstage videos.

      ADVERTISEMENT
      ADVERTISEMENT
      ADVERTISEMENT