12 thick slices of egg bread about 3/4-inch (Challah bread)
8 large organic eggs
2 cups cream
2 cups whole milk
2 cups sugar
5 tablespoons hazelnut liqueur (Frangelico)
1 tablespoon vanilla extract
1 teaspoon almond extract
4 ripe medium bananas
powdered sugar for garnish
Yield: 20 - 24 Servings
DIRECTIONS:
1. Spray or butter a 13 by 9 by 2-inch baking pan.
2. Spread the Nutella on all your bread slices, then put 2 slices together to make 6 sandwiches. Cut each sandwich into 9 pieces and place them into a large stainless-steel bowl.
3. Place your eggs in another bowl and whisk in the cream, milk, sugar, hazelnut liqueur, vanilla and almond extracts. Pour this mixture over the Nutella sandwich cubes and mix thoroughly.
4. Next, mash your bananas and stir that into the bread cube mixture. Mix all together and pour the mixture into the prepared baking pan. Let stand for at least 1 hour, occasionally pressing the bread down into the mixture to absorb all the cream mixture.
5. Preheat the oven to 350 degrees f. Bake until the pudding is set in the center, about 40 to 45 minutes. Cool slightly. Sift some powdered sugar over the bread pudding and serve warm.
2 of 20
Honey Almond Cake with Berries and Mascarpone Crème Fraiche
Bake the cake featured in the Hallmark Channel original romance movie, “The Secret Ingredient.”
INGREDIENTS:
Almond Cake
1 cup plus 2 tbsp. buttermilk
2 ¼ cups granulated sugar
6 large eggs
1 tbsp. vanilla extract
1½ tsp. almond extract
2 ¼ cups all-purpose flour
1 cup almond meal flour
1 ½ tbsp. baking powder
1 tsp. kosher salt
1 cup plus 2 tbsp. canola oil
Vanilla Honey Glaze
1 tbsp. honey
1 tsp. vanilla extract
1 tsp. lemon zest, fresh
½ cup confectioner’s sugar
4 tbsp. half and half cream
Mascarpone Crème Fraiche
3 (8-oz.) packages mascarpone, room temperature
1 ¼ cups crème fraiche
1 cup confectioner’s sugar
1 ½ tsp. vanilla extract
As needed, whole strawberries
As needed, sliced toasted almonds
As needed, fresh mint sprigs
DIRECTIONS:
To prepare cakes: preheat oven to 350 degrees. Coat three 8-inch cake pans with nonstick cooking spray. Place a round of parchment paper on the bottom of each pan; spray with cooking spray.
Using a handheld or stand mixer fitted with a paddle attachment, combine buttermilk, sugar, eggs, vanilla extract and almond extract in bowl and mix until fully blended. With a rubber spatula, scrape down sides of bowl.
In a large bowl, combine flour, almond flour, baking powder and salt. Add to buttermilk mixture and beat on low until fully blended. Scrape down sides of bowl.
Slowly add oil to buttermilk/flour mixture and beat on medium-low until fully blended.
Divide batter evenly between prepared pans. Bake for 25 to 30 minutes, or until a toothpick inserted in the center of each cake comes out clean. Cool in pans for 10 minutes; invert on wire rack to release cakes.
Prepare Glaze
Combine honey, vanilla extract, lemon zest, confectioner’s sugar and half and half in a bowl and whisk until smooth.
Brush tops and sides of warm cakes evenly with glaze. Cool cakes completely. (If making cakes ahead, wrap tightly and freeze.)
Prepare Mascarpone Crème Fraiche
Combine mascarpone, crème fraiche, confectioner’s sugar and vanilla extract in a large bowl and whisk until smooth.
Assemble Cake
Place first cake on cake pedestal or serving plate.
Spread about ¼ of mascarpone crème fraiche over top of cake. Top with second cake layer. Spread about ¼ of mascarpone crème fraiche over top of cake. Top with third cake layer. Spread about ¼ of mascarpone crème fraiche over top of cake.
Spread remaining ¼ of mascarpone crème fraiche on sides of cake to make a light crumb coating. Using a bench scraper or cake spatula, lightly scrape top and sides of cake to remove excess mascarpone crème fraiche forming a smooth surface.
Top cake with strawberries, toasted almonds and fresh mint sprigs.
Chill thoroughly before serving.
NOTE: Find prepared crème fraiche in the dairy aisle of your grocery store. Crème fraiche is easy to make if not available in your area. Combine 1¼ cups heavy cream with 2 tbsp. buttermilk. Cover and let sit at room temperature for 12 hours or until thickened. Refrigerate until ready to use.
2 tablespoons cocoa powder + 1 tablespoon granulated sugar for coating the pan
1 ¾ cups ap flour
¾ cup cocoa powder
2 teaspoons baking powder
¾ teaspoons salt
3 large eggs
1 ¼ cups sugar
½ cup neutral oil
1 teaspoon vanilla extract
½ cup heavy cream, chilled
Whipped Cream Topping
2 cups mini marshmallows
1-pint heavy cream
3 tablespoons sugar
¼ teaspoon kosher salt
1 teaspoon vanilla extract
DIRECTIONS:
Whipped Cream Topping
Heat oven to 250˚. Place marshmallows on sheet tray and cook in oven until softened, about 5-10 minutes.
Beat cream in stand mixer with sugar, salt, and vanilla until soft peaks form.
Add warm marshmallows to stand mixer and beat cream to heavy peaks.
Cake
Heat oven to 375˚. Cut a round of parchment, place in bottom of 9-inch springform pan. Grease with butter or oil, then coat with mixture of sugar and cocoa powder, shaking out any excess.
In a medium bowl, whisk together flour, cocoa powder, baking powder, and salt. Set aside.
In a medium bowl whisk together eggs and sugar until lightened in color, and slightly thickened.
Continue to whisk egg mixture while pouring in oil and vanilla.
Stir in half of the flour mixture until combined. Repeat with the remaining flour mixture.
Make whipped cream. Beat heavy cream with whisk or in stand mixer until doubled in volume. Stop when you’ve reached stiff peaks. Fold whipped cream into batter
Pour batter into prepared pan.
Bake in oven until toothpick inserted in the center comes out clean, about 35-40 minutes.
Remove the cake from the oven, let it cool for 10 minutes, then remove the springform collar. Allow cake to cool completely before frosting with whipped cream topping.
¼ cup lakanto monkfruit sweetener or sweetener of choice
½ tsp baking powder
½ cup butter melted
Filling
1 cup lily's chocolate chips low carb (lily’s or lakanto brand)
1 ¼ cup cream
¼ cup lakanto monkfruit sweetener powdered, or sweetener of choice
Topping
⅓ Cup almonds sliced and toasted
DIRECTIONS:
Preheat oven to 350*
Sift together all dry ingredients for the crust so there are no lumps. Melt the butter and then add the butter to the dry ingredients. Using a fork mix all the ingredients together.
Press the crust mixture into the 9” round tart pan with removable bottom. Press mixture evenly up the sides of the tart pan and all of the bottom. Prick the bottom of the tart crust with a fork all over to prevent puffing when baking.
Bake the tart crust for 15 minutes, then remove and let fully cool. Place in fridge to speed up the cooling time if desired.
Place sliced almonds on dry, rimmed baking sheet. Bake in oven for 5-7 minutes at 350*. Watch the toasting process closely as these cook very quickly. You may even turn the broiler on for 30 seconds to a minute to get a nice toasty brown. Again…watch these closely as they will burn if you walk away. Set aside to cool.
In a small saucepan heat the cream to a medium simmer. Stir the cream gently to fully heat through for 1-3 minutes. Carefully pour hot cream over the chocolate chips and let sit for 1 minute. Gently whisk together the hot cream and the chocolate chips until creamy smooth. Add in the powdered sweetener and continue to whisk gently.
Evenly pour the chocolate mixture into your cooled tart shell. Spread evenly to cover bottom of crust and all the way to the sides. Sprinkle the toasted almonds over the top of your tart and then chill in the fridge for at least one hour.
Slice and serve. Whipped cream or low carb vanilla ice cream optional
Preheat the oven to 350. Line 2 baking sheets with parchment paper.
Make the chocolate whoopie cookie: In a small bowl, whisk together the almond milk and lemon juice. Allow the mixture to curdle, about 10 minutes.
In a medium bowl, whisk together the flour, cocoa powder, baking soda and baking powder.
Whisk the oil, sugar, and 1 teaspoon vanilla into the curdled almond milk.
Make a well in the center of the flour mixture and pour in the wet mixture. Mix until well combined.
Place the heart cookie cutter on the prepared baking sheet and scoop 1 tablespoon of the batter into the center. Spread evenly, then remove the cookie cutter. Repeat with the remaining batter.
Bake until the edges are set and the top is soft to the touch, 10 to 12 minutes.
Let cool on the baking sheets for 5 minutes, then transfer to a wire rack to cool completely.
Make the caramel filling: Make the Vegan Caramel Sauce and transfer to a large bowl. Add the shortening, vegan butter, and 1 teaspoon vanilla and beat with an electric mixer until creamy. Add the powdered sugar ½ cup at a time, beating well after each addition, until the filling is stiff enough to pipe (you may not need to use all the sugar).
Scoop the filling into a piping bag fitted with a #12 decorating tip.
Turn half the hearts upside down and pipe filling onto the flat side. Top with the remaining hearts, flat side down.
6 of 20
Chocolate Hazelnut Mousse Tart with Praline Crust and Raspberry Compote
Chocolate Hazelnut Mousse Tart with Praline Crust and Raspberry Compote
Course:
Dessert
Seasonal Event:
Valentine's Day
INGREDIENTS:
6 ounces pecan pralines
32 Biscoff cookies
4 ounces unsalted butter
4 large egg yolks
3 cups heavy cream, divided
6 tablespoons granulated sugar
8 ounces bittersweet chocolate
¾ cup Nutella hazelnut spread
4 tablespoons Confectioners sugar, divided
Pinch Kosher salt
6 ounces fresh raspberries
¼ cup Grand Marnier
Juice of one orange
Zest of one orange
Equipment
10.5” tart pan
DIRECTIONS:
Praline Crust
Preheat the oven to 375 degrees.
Add Biscoff cookies, pralines and pinch of Kosher salt to a food processor. Blend until mixture resembles coarse sand. Place contents into medium bowl.
Add melted butter and mix until well incorporated and resembles wet sand.
Press the crust mixture into the tart pan, pressing firmly into the bottom and sides.
Bake the tart for 5 minutes. Remove from oven and place in the refrigerator until completely cool.
Chocolate Hazelnut Mousse
Place the chocolate chips into a medium mixing bowl.
In a medium saucepot, whisk together egg yolks, 1 cup heavy cream and granulated sugar until well incorporated.
Over medium-low heat, consistently stir the custard mixture until it thickens and coats the back of a spoon. *Be careful not to boil.
Whisk in Nutella until it melts into the custard, about 1 minute.
Remove warm custard mixture from heat, and strain through a sieve/strainer onto the chocolate chips in bowl. Mix with a rubber spatula until the chocolate melts and is well incorporated.
Place in refrigerator until completely cool, at least 15 to 20 mins.
Chill a large bowl in the freezer for 10 to 15 mins until ice cold.
Place 1 cup heavy cream and 2 tablespoons confectioners sugar into chilled bowl. Whisk rapidly until cream develops stiff peaks.
Fold 1/3 of the whipped cream into the chilled chocolate hazelnut custard until well incorporated.
Add the chocolate hazelnut custard to the large bowl of remaining whipped cream and gently fold until well incorporated into a smooth mousse consistency.
Pour the custard mixture into the prepared tart shell. Chill for at least 6 to 8 hours or overnight.
Raspberry Compote
Place Grand Marnier, orange juice, orange zest, and 2 tablespoons granulated sugar into a medium sauce pot and whisk together. Bring to a boil.
Add the raspberries. Mash and stir occasionally.
Reduce the liquid by half. About 5 to 7 minutes.
Remove from the heat and allow to cool completely.
Whipped Cream
Chill a medium bowl in the freezer for 10 to 15 minutes until ice cold.
Rapidly whisk 1 cup of cream and 2 tablespoons of confectioner’s sugar until stiff peaks develop.
To Serve:
Slice the tart into 10 even wedges and garnish with a spoonful of Raspberry Compote and a dollop of fresh whipped cream.
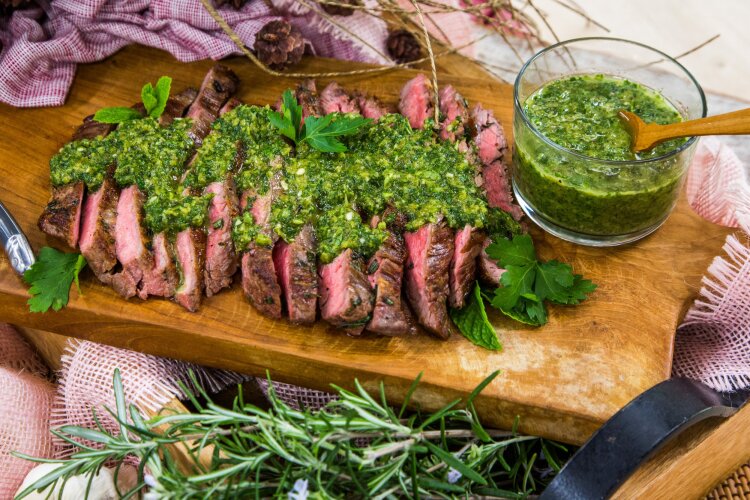
Ryan Scott - Simple Pan-Seared Flank Steak with Garlic And Rosemary
Course:
Dessert
Seasonal Event:
Valentine's Day
Yield:
2-3
Time:
20 minutes
INGREDIENTS:
1 lb whole flank steak, rinsed and patted dry with paper towels
1 teaspoon salt
½ teaspoon ground black pepper
½ Tablespoon vegetable oil
3 cloves garlic, rough chopped
3 rosemary sprigs, rough chopped
3 Tablespoons salted butter
Grilled Jalapeño Salsa Verde
1 clove garlic, peeled
1 cup arugula
½ cup fresh mint leaves
½ cup fresh parsley leaves
2 jalapeño peppers, stem removed and cut in half lengthwise
Juice of 1 lemon
1 teaspoon ground cumin
1 teaspoon salt
1 teaspoon ground black pepper
½ cup olive oil
Equipment
Cast-iron pan
Grill
Tongs
Food Processor
DIRECTIONS:
Preheat your cast-iron pan over a high flame. While the pan is heating (should take 3-4 minutes), sprinkle both sides of the steak with the salt and pepper.
When the pan is nice and hot, pour in the vegetable oil. Immediately lay the seasoned steak down in the hot pan and let it cook over high heat undisturbed (don’t touch it!) for 3 minutes.
Carefully flip the steak, and top it with the butter. Add in the chopped garlic and rosemary. Using a large spoon, carefully tip the pan to pool the butter and baste the steak while it cooks. The garlic and rosemary should be cooking and getting nice and toasty. Cook the steak like this for 3 minutes.
Turn the heat off and move the pan to a cool part of the stove to get the pan started cooling and the steak to slow its cooking. Let it rest in the hot pan for 10 minutes.
Carefully remove the steak from the cast iron pan and transfer to a cutting board. Slice against the grain in thin ¼”-½” slices. Top with the warm garlic-rosemary basting butter from the pan and serve immediately.
TECHNIQUE TIP: Instead of pulling the steak from the pan to rest on the cutting board and get cold, slightly undercook the meat and let it rest in the pan while the pan cools slowly, letting it finish cooking while simultaneously getting rested. The juices will still have time to redistribute into the meat, and you will have nice warm steak for dinner.
SWAP OPTION: Try using fresh thyme, or adding lemon/orange/lime zest and sliced jalapenos for a little zing.
WHY I LOVE THIS RECIPE: This is the fastest way to get delicious, savory mouthwatering steak on the table, and while it cooks I have just enough time to wilt some kale and boil some new potatoes. Dinner in 20 minutes!
Grilled Jalapeño Salsa Verde
1. Toss the jalepeños in a little vegetable oil and a pinch of salt. Place on a hot grill (or directly on the burner of your gas range) and cook on high heat until the outside of the pepper begins to blister and blacken. Remove from the heat and set aside.
2. In a food processor, finely chop the jalapeños with the lemon juice, and put the mixture into a medium bowl. If you like it spicy, include the jalapeño seeds. If not, make sure you remove the seeds from the pepper before chopping.
3. In the same food processor, combine the remaining ingredients and pulse until it looks like pesto. Put this mixture into the bowl with the jalapeño mixture and fold it all together. Store in a covered container in the fridge until serving time.
SWAP OPTION: Try using any herbs for this salsa verde, like tarragon, rosemary or basil.
WHY I LOVE THIS RECIPE: This is my go-to condiment for summer grilling, and is by far the most versatile sauce in my wheelhouse!
Heat the oven to 275°F with a rack in the middle position.
Coat the bottom and sides of a 9-inch springform pan with butter. Line the bottom of the pan with kitchen parchment, then butter the parchment.
Set a wire rack in a rimmed baking sheet.
In a large bowl, combine the bittersweet and semi-sweet chocolates and the butter; set a fine mesh strainer across the bowl, then set aside.
Using a vegetable peeler, remove just the outer zest of the orange, not the white pith beneath, in long strips; set the strips aside. Halve the orange and juice it into a liquid measuring cup. Measure 3 tablespoons of the juice into a medium saucepan.
Add the bourbon to the remaining juice in the measuring cup, then add enough water to equal 1 cup total liquid; set aside.
Add the 160 grams (¾ cup) sugar to the juice in the saucepan, then add the zest strips and peppercorns. Set over medium-high and cook, without stirring but occasionally swirling the pan, until the sugar dissolves, 1 to 2 minutes. Continue cooking, swirling the pan often, until the sugar caramelizes to deep mahogany brown and the peppercorns begin to pop, 4 to 5 minutes.
Remove the pan from the heat and carefully pour in the orange juice–bourbon mixture; the caramel will bubble up and harden. Set the pan over medium, bring to a simmer and cook, stirring, until the caramel has dissolved, and the peppercorns no longer stick together, 1 to 2 minutes. Remove from the heat and stir in the bitters.
Immediately pour the hot sugar syrup through the strainer into the chocolate-butter mixture; reserve the strained solids. Jostle the bowl to ensure the chocolate and butter are fully covered with syrup, then let stand for 2 to 3 minutes. Using a silicone spatula, gently stir until the mixture is well combined and completely smooth; it should be barely warm.
Add the beaten eggs to the chocolate mixture and stir with the spatula until homogeneous and glossy, 2 to 3 minutes. Pour into the prepared springform pan. Gently tap the sides of the pan to remove any air bubbles, then use the back of a spoon to smooth the surface. Set the pan on the prepared baking sheet and bake until the cake barely jiggles when the pan is gently shaken, about 45 minutes.
Remove from the oven and immediately run a thin, sharp knife around the edges to loosen the sides of the cake from the pan. Cool to room temperature in the pan, then refrigerate uncovered for at least 4 hours or up to 24 hours.
While the cake cools, transfer the zest strips from the strainer to a small, shallow bowl, removing and discarding any peppercorns stuck to them. Sprinkle the strips with the 70 grams (⅓ cup) sugar, then toss until the strips are completely coated. Cover loosely and store at room temperature until ready to serve.
About 2 hours before serving, remove the cake from the refrigerator. Remove the zest strips from the sugar and shake off excess sugar; reserve the sugar for another use.
Cut the strips lengthwise* (see note with decoration instructions) into thin strips. Remove the sides of the springform pan. Arrange the zest slivers on the cake around the edges. Slice the cake and serve with small spoonfuls of yogurt.
Heart Decoration
Unmold cooled cake and place on a sheet of parchment paper or aluminum foil.
Transfer chocolate to a baggie and push into a corner. Twist top of baggie securely. With scissors, snip off a very small portion of the baggie tip holding the chocolate.
Hold the baggie a few inches above the cake and beginning from one edge of the cake, squeeze the baggie gently while moving in long, fast sweeping motions over the cake, until you reach the opposite edge.
Break toothpicks in half and insert 3 halves in places to support the heart. Place heart cutout over toothpicks.
Place cocoa in a sieve and thoroughly dust the edges of the cake around the heart.
Remove the heart cutout and toothpicks.
When slicing the strips of sugared orange peel, slice them crosswise (instead of lengthwise). Place the strips on the cake, framing the heart.
One 17.3-ounce Package Puff Pastry Sheets (2 sheets), thawed
~⅔ cup Raspberry Jam (or any fruit jam you prefer)
~2 cups Chocolate Chips
Sugar for sprinkling
DIRECTIONS:
Heat oven to 400˚ F. Line two baking sheets with parchment paper.
Beat the egg and cream in a small bowl with a fork or whisk then set aside.
Lightly flour your work surface. Unfold one pastry sheet and lightly dust top with flour. Use a rolling pin to roll the sheet into a 16-inch square, it will be thin.
Cut pastry square in half then cut each half into four rectangles (making eight, 8-inch by 4-inch rectangles). Now, cut each rectangle diagonally into two triangles (making 16 triangles).
Smear about 1 teaspoon of jam on the surface of each triangle. Place about 1 tablespoon of chocolate chips down the center of each triangle.
Starting at the wide end, roll each triangle up carefully.
Place each croissant on the parchment paper so the tip of the triangle is tucked underneath.
If the ends of each croissant appear to be open, pinch them shut gently to prevent chocolate from leaking out while baking.
Bend the edges of each croissant into a crescent shape.
Lightly brush tops of each croissant with egg wash and then sprinkle with granulated sugar.
Repeat steps 3-10 with the second sheet of pastry.
Bake 15-20 minutes or until the croissants are golden brown.
If using frozen lobster tails, defrost the lobster tails overnight in the refrigerator. To defrost the lobster tails, place them in the refrigerator for 8 to 10 hours; alternatively you can thaw them by placing them in a bowl of ice cold water until completely thawed.
Insert kitchen shears between the meat and the shell, and carefully cut the shell down the center of the back. Be sure to leave the tail intact. Loosen the meat from the shell and carefully lift the tail through the slit to rest on the top of the shell.
In a small saucepan, melt 6 tablespoons butter and add the garlic, lemon, parsley and salt. Mix together and keep warm on a low heat.
Preheat oven to 350 degrees (F). Place prepared lobster tails on a baking sheet. Brush each lobster tail with the melted butter mixture and bake for 15 minutes. The cooked lobsters should be bright red in color and the meat should be firm.
8 tablespoons (115 g) unsalted butter, room temperature
1 tablespoon (15 ml) freshly brewed espresso or strong coffee
¾ cup (144 g) granulated sugar
¼ cup (55 g) light brown sugar, packed
2 large eggs, room temperature
3 teaspoons (15 ml) real vanilla extract
1½ cups (204 g) bread flour
½ cup (43 g) unsweetened dark (Dutch process) cocoa powder
1 teaspoon baking powder
¾ teaspoon baking soda
1½ teaspoons (7 g) sea salt
Cookie Coating
¾ cup (144 g) granulated sugar
¾ cup (98 g) powdered sugar
DIRECTIONS:
In a medium, heat-safe bowl, add the chocolate, butter and espresso and set over a medium saucepan of simmering water. Do not let the bowl touch the water or let.
The water come to a boil. Stir frequently until melted and smooth. Take off of the heat, add the granulated sugar and brown sugar and mix until smooth. Whisk in the eggs and vanilla.
Set aside.
In a medium bowl, whisk together the bread flour, cocoa powder, baking powder, baking soda and sea salt. Add this to the chocolate mixture and blend in as few strokes as possible.
Wrap tightly and refrigerate for 1 to 2 hours, or until the dough has firmed up.
Preheat your oven to 350°F (177°C) and cover several baking sheets with parchment paper.
To make the cookie coating, put the granulated sugar and powdered sugar in separate, shallow bowls to roll the cookie dough in. Roll 1½ tablespoons (21 g) of dough into a ball, plop it into the granulated sugar and cover completely. Don’t shake any off as you want it well coated. Then roll the balls in the powdered sugar.
Again, don’t shake off the excess.
Place the covered dough balls on the baking sheet, about 2 inches (5 cm) apart from each other. Bake one sheet at a time in the center of the oven for 11 minutes.
Don’t overbake - they will be soft and appear underdone when you pull them out of the oven.
Let the cookies cool on the sheet for 15 minutes. Then remove the cookies and place on a cooling rack.
Raspberry or strawberry jam for filling the hearts
Confectioner’s sugar for dusting
Equipment
Requires 2 standard rimmed cookie sheets
Parchment paper
2 heart shaped cookie cutters (one must be two sizes smaller than larger cutter)
DIRECTIONS:
To make the dough, cream butter and sugar until pale and fluffy on low speed. Add egg and vanilla, then mix on low speed until just combined. Add salt and flours, then gently mix until it just comes together. Do not overmix dough.
Pat dough into a disc and wrap in cling film. Refrigerate 30 minutes.
To make the cookies, remove dough and allow to sit on the counter 5-7 minutes, until it’s workable but still cold. Roll out dough to 1/4 inch thickness. Cut out 12-14 hearts using your 2-2 1/2 inch heart shaped cookie cutter. Place cookies on a baking sheet and bake 8-10 minutes at 350°F. While the first batch of cookies is baking, roll out dough again and cut out 12-14 more hearts using 2-2 1/2 in cookie cutter. With the small heart cookie cutter, cut a heart out of each cookie. Bake this batch, including the mini hearts, 8-10 minutes. Repeat this process until all dough is used up.
Allow cookies to cool completely before assembly. Place 1 tsp. of jam on each full cookie. Dust a light layer of confectioner’s sugar on each cookie with a cut out heart along with the mini hearts. Place the cut out heart on top of the full cookie as if it were a lid. Use the small hearts to decorate the platter of cookies.
3 sticks (1 1/2 cup) unsalted butter, left out at room temp for 20 minutes to slightly soften
Pinch of salt
1 Tablespoon vanilla (or clear vanilla if you want it to be whiter)
2 Tablespoons Raspberry Emulsion (Lorann)
6-7 Cups Powdered Sugar
(Pink) White Chocolate Ganache Drip
1 Cup White Chocolate Candy Melts (I use "Very White" or "Bright White" from Wilton)
1/4 Cup Heavy Cream
Red Gel Coloring
DIRECTIONS:
Red, Pink and White Striped Cake
Preheat oven to 325 degrees. Prep 3 6" cake rounds with a swipe of shortening and dust of flour. Set aside.
In a medium bowl, whisk together the buttermilk, sour cream, vanilla, egg whites, and vegetable oil until thoroughly combined. Sift in cake mix and stir until just combined.
Spoon 1/3 of the batter into the first prepared cake round. Add a small drop of red gel coloring to the remaining cake batter and stir (should be pink). Spoon 1/2 the cake batter into the second prepared cake round. Add a few drops of red gel coloring to the remaining cake batter (should be red). Spoon the rest of the cake batter into the third and final prepared cake round.
Bake for 25-27 minutes. Remove from oven. Cool for 2 minutes in pan, then flip out onto a cooling rack. Cool to room temperature. Wrap in plastic wrap twice and freeze for easier frosting.
Before frosting, slice each round in half to make 6 skinny cake rounds (2 white, 2 pink, and 2 red).
TIPS: Slice cakes when cold and with a super sharp knife. Slice edges first, then slowly the inside to make an even slice. Use plenty of gel coloring - the color bakes out slightly in the oven, so go bold. Wrapping up the cake rounds before frosting them makes it infinitely easier to decorate - the cakes won't wobble around as much and the rounds hold together better at such a skinny shape.
Buttercream
In a small glass bowl, microwave white chips and 1/4 cup heavy cream for 30 seconds. Stir until creamy and no lumps. Set aside.
In a bowl of a stand mixer fitted with a paddle attachment, whip up the butter on high speed until light and fluffy. Add in chocolate ganache mixture you made.
Add in pinch of salt, vanilla, and emulsion. Whip up to combine.
Add in the other 1/4 cup heavy cream, and then add in the powdered sugar 1/2 cup at a time. Add more heavy cream if needed. Turn mixer on high speed for about three minutes to expand the texture and lighten the color. Hand beat with a wooden spoon afterwards to remove any air bubbles.
TIPS: Making a white chocolate ganache to add to the buttercream is an easy way to have that signature white chocolate taste in every bite without having big chunks of white chocolate. Hand whipping the buttercream gets out any air bubbles in the buttercream to make for a cleaner buttercream on the side of your cake. The raspberry emulsion is an easy way to get the raspberry taste in the buttercream while also keeping the buttercream white. You could also use freeze dried raspberries, raspberry compote, etc, but your buttercream will be a pinkish color.
Ganache
In a medium glass bowl, stir together the white chocolate and heavy cream. Microwave for 30 seconds, stir until thoroughly combined. Add 10-20 more seconds if needed (normally you wouldn't, but just in case).
To achieve the pastel light pink color, use a tiny toothpick prick of red color to add to the ganache and stir. A little goes a long way, so go easy.
Add to your drip bottle and set aside for ganache drip.
Garnishes
Valentine's Sprinkles (mixture of different colored sprinkles and nonpareils, etc.)
Gumballs (from party store)
Red Fondant Roses (Roll out red fondant, use Wilton rose cutter, roll the two pieces together into a rose, slice off the back, let dry overnight).
White Sprinkle Chocolate Bark (made by melting chocolate candy melts and adding on sprinkles. Using a sharp knife to cut out triangle shards).
Marbled Fondant Hearts (made by loosely mixing together red and white fondant pieces, rolling it out, and using a heart cutter for the heart shape. Dry overnight. Attach white sticks to the hearts with melted chocolate as glue.
Assembly Instructions
Tape a 6" cardboard cake round to an 8" cake round for ease of decorating.
Fill a large piping bag with buttercream.
Using a cake turntable, pipe a small dab of buttercream in the center of the 6" cake round to act as glue. Use an offset icing spatula to spread it out.
Place down first red cake round, pipe on a layer of buttercream. Place down pink cake round, repeat. White cake round, repeat. Repeat again with the remaining red, pink and white rounds.
Crumb coat the entire cake. Freeze for 5 minutes.
Add on final layer of buttercream, add sprinkles to bottom rim by pressing them on gently.
Add on ganache drip, place in the freezer for 5 minutes to harden.
Add on chocolate sprinkle bark, marbled fondant hearts, fondant roses, gumballs, and more sprinkles.
Preheat oven to 325 F. Spray ¼ sheet pan with a nonstick cooking spray and line with parchment paper.
In a medium bowl, cream together the sugar and oil. Beat in the eggs, one at a time, then stir in the vanilla.
Combine flour, cocoa powder and baking soda and salt, add to the creamed mixture and mix well.
Finally stir in the milk until batter is smooth.
Pour batter into the sheet pan, be sure the batter is even in the sheet pan and bake for 30-35 minutes. Cool in freezer for approximately one hour before use.
Frosting
In a medium bowl, cream together cream cheese and butter. Add confectioners’ sugar and vanilla and strawberry extracts. Mix until fully combined and smooth. You may have to use a spatula to scrape the sides of the bowl to make sure all ingredients are mixed well.
Make the Hearts
Once the cake is cold, use different sized heart cut outs to make hearts (two of each size).
Pipe strawberry frosting in the inside of ONE of the cut outs and place the unfrosted cut out on top of the frosted cut out like a sandwich.
Cool again in freezer for at least one hour. Cake must be cold to successfully complete the next step.
While the cake is in the freezer, melt melting chocolate of any color and make sure it’s not too thick. You may use Crisco or melting crystals to liquify the chocolate enough that it pours easily.
Take the frozen cake and pour the chocolate over the heart shaped cake. You’ll want to put a cooling rack on top of parchment paper or a sheet pan to catch the excess chocolate.
Cool the chocolate heart in the freezer for another 10 minutes until chocolate is hardened.
Angled spatula and hot water for smooth buttercream
Heart shaped cookies
Round cookies
Rectangle cookies
Square cookies
White buttercream
Light brown buttercream
Dark brown buttercream
Pink buttercream
Candy heart sprinkles
Smooth Buttercream
1 cup hot water
1 Angled spatula
Tip 5, 10, or 12
Kitchen towel
DIRECTIONS:
Red Velvet Sugar Cookie
Cream butter, sugars, vanilla, red velvet emulsion, vinegar, and egg together in a stand mixer on medium speed for 1 minute.
Mix dry ingredients (cocoa powder, flour, pinch of salt, and baking powder) in a separate bowl. I use a whisk to blend the dry ingredients together.
Add dry ingredients to your wet ingredients. Mix until the cookie mix becomes a dough and it pulls away from the sides of the bowl.
Preheat oven to 375°F.
Remove dough from bowl, wrap in plastic, and place in fridge for at least 15 minutes. If you flatten the dough, it gets colder quicker. This will allow your dough to firm up a bit for rolling and helps prevent spreading.
Flour your surface or use some cocoa powder to roll your cookies; most of the flour will bake off.
Roll out dough to 1/4-inch thick. Cut your cookies into desired shapes.
Place on a baking sheet and bake for 6 to 7 minutes or until the cookies puff up. These cookies will bake fast and they won’t brown since the cookie is deep red.
Once baked, let sit for 1 minute on the cookie sheet to firm up. Transfer to a cooling rack.
American Crusting Buttercream
Cream your butter and shortening until well incorporated. Both must be at room temperature to prevent clumping.
Once creamed, add your vanilla. Mix again for 1 minute.
Sift your powdered sugar to make sure there are no clumps and add it in.
Place a towel over your mixer to prevent a powdered sugar storm.
Once mixed, slowly add in your heavy cream or milk, 1 tablespoon at a time (you can always add more but you can’t take it out). Continue to add MORE milk than the recipe states if it’s too thick. Temperature and humidity factor in how much more you will need.
Mix until smooth, about 1 minute on medium to high speed. Be sure not to overwhip your buttercream. DON’T panic—you won’t ruin it if it whips longer. Store unused buttercream in an airtight container in the fridge for up to a week or freeze for up to three months.
**MASTER TIP** add in 8oz of cream cheese to buttercream recipe for a delicious Valentine’s Day treat.
Box of Chocolate Cookie
Chocolate box: Using a heart shaped cookie, pipe on buttercream with tip 5 or 10. Use my smooth buttercream technique (listed below).
Pipe on top of your smooth buttercream using Tip 5 with dark and light brown buttercream to make the chocolates. Pipe on swirl design using tip 2 and pink/white buttercream.
Box top: Use a heart shaped cookie and tip 5 to outline and fill. Make a bow using white buttercream and also tip 5. Place a heart sprinkle on the center of the bow.
Chocolate: Pipe on buttercream using tip 5 and dark or light brown. Make pink or white swirls using tip 2.
Smooth Buttercream Technique
Pipe on buttercream with tip 12 to cover cookie.
Smooth buttercream on your cookie with angled spatula.
Dip angled spatula in hot water for 10 seconds and quickly dry.
Smooth buttercream with heated spatula until smooth. Repeat if needed.
1⁄4 cup [55 g] unsalted butter, at room temperature
2 tsp pure vanilla extract
1 1⁄2 cups [300 g] granulated sugar
1 cup [240 ml] ice water
4 egg whites, stiffly beaten
Pink Buttercream
1 1⁄2 cups [330 g] unsalted butter, at room temperature
1⁄2 tsp table salt
6 cups [720 g] confectioners’ sugar, sifted
2/3 cup [160 ml] whole milk or heavy cream
4 tsp pure vanilla extract
Red food coloring, optional (but so pretty)
Pink sanding sugar for decorating
DIRECTIONS:
Preheat the oven to 350°F [180°C]. Grease two 9-in- by-2-in [23-cm-by-5-cm] round cake pans with non- stick cooking spray or softened butter. Line with parchment paper and grease again.
For the cake, in a medium bowl, whisk together the flour, baking powder, baking soda, and salt. In the bowl of a stand mixer fitted with the paddle attachment, beat the shortening, butter, and vanilla on medium to medium-high speed until fluffy and light, 2 to 3 minutes, scraping down the bowl with a rubber spatula as needed. Add the granulated sugar and continue beating for another 3 to 5 minutes, until the mixture doubles in volume.
Decrease the speed to low and add the dry ingredients in three additions, alternating with two additions of the water, scraping down the bowl as needed with a rubber spatula. Stop the mixer when there are still streaks of flour in the batter. Finish mixing by hand, adding the egg whites in three stages, and folding them in with a rubber spatula.
Transfer the batter to the prepared pans and bake for 20 to 25 minutes, rotating at the halfway point. The cakes are ready when a cake tester comes out with a few moist crumbs and the cake has just started to come away from the sides of the pan. Let cool for about 20 minutes and invert the cakes right-side up onto cooling racks. Let the cakes cool to room temperature.
The cakes can be tightly wrapped in plastic wrap and stored on the counter for up to 1 day.
For the buttercream, in the cleaned bowl of the stand mixer fitted with the paddle attachment, beat the butter on medium speed until smooth and soft. On low speed slowly add the salt and 2 cups [240 g] of the confectioners’ sugar, scraping the bowl periodically with a rubber spatula. Add one-fourth of the milk and mix until incorporated. Continue mixing in this manner, adding the remaining confectioners' sugar and milk, until the frosting is fluffy and spreadable.
Add the vanilla and a few drops of food coloring, if using, and continue mixing on medium-low to medium speed for at least 5 minutes, until fluffy and stable. A longer mixing time results in exceptionally light frosting. The frosting will keep on the counter in an airtight container for up to 1 day but may need to be re-whipped in a stand mixer before using.
Generously frost the cooled cake layers with the buttercream, using an offset spatula or butter knife. If you do not want a thickly frosted cake, you will have leftover frosting. Sprinkle sanding sugar on top of the first frosted layer, before placing the second on top of it, and on the top and sides of the frosted cake once you are done. Slice the cake using a long-serrated knife.
The cake will keep, lightly covered in plastic wrap, on the counter for up to 3 days.
Pink and Red Food Coloring (as much as you’d like, for coloring the coconut)
~1 tablespoon Water
80-96 candy eyes
48 White Chocolate Hershey’s Kisses
1 pound Red Licorice Laces
DIRECTIONS:
Heat oven to 350°F.
Line a 9x13-inch baking pan with parchment paper or spray it with baking spray.
Combine cake mix, pudding mix, sour cream, milk, oil, and eggs in a large mixing bowl.
Using an electric mixer, beat on low speed for 30 seconds.
Increase speed to medium and beat for 2 minutes.
Pour into pan.
Bake for 28-34 minutes until a toothpick inserted in the center of the cake comes out clean.
Allow cake to cool completely.
Crumble cake into a large bowl, preferable the bowl of a stand mixer.
Add ⅓ cup frosting and stir or beat until well blended and smooth. If too dry, add more frosting until desired texture is achieved.
Scoop out 40-48 tablespoon size portions of the cake ball dough and roll into balls. Set aside to dry for an hour.
While cake is drying, make colored coconut. Divide coconut shreds into two plastic bags. Dissolve 10-12 drops of red food coloring in 1-2 teaspoons of water. Pour solution into one bag of coconut, shake until coconut color is even. Repeat with remaining coconut, using pink with the water instead of red.
Prepare antennae and feet: Cut licorice laces into 2-3 inch pieces (you’ll need two for every cake ball), set aside as antennae. Unwrap White Chocolate Kisses and set aside (you’ll need one chocolate kiss for every cake ball).
Dip the cake balls in melted white candy melts and immediately roll each ball in colored coconut.
Press covered cake ball onto pointy end of chocolate kiss. Insert two pieces of licorice lace for antennae at the top.
Use melted white candy melts to attach two candy eyes to each cake ball.
½ cup of good quality dark chocolate, finely chopped
1 tsp of cocoa powder
½ tsp of espresso powder
Whiskey Cream
1 ½ cups of cream
3 tbsp of whiskey
3 tbsp of icing sugar
DIRECTIONS:
Preheat the oven to 150°C/300°F/Gas Mark 2. Line two baking trays with baking parchment.
Place the icing sugar and egg whites in a standing food mixer and whisk on high for 10 minutes until glossy white peaks form. Using a spatula, gently fold in the cornflour and the white wine vinegar. When this is mixed through, sift the cocoa powder and espresso powder over the meringue mix and gently fold in.
Using a tablespoon, place 3-inch/8cm spoonfuls of the meringue mix onto the baking tray and flatten each one gently in the centre with the back of a spoon. Bake for 45 minutes.
Place the sugar and water in a small saucepan over a medium heat and stir gently to dissolve the sugar. Add the espresso powder, whisk through and bring the mix to a steady simmer for 3 minutes. Remove from the heat, allow to sit for 1-2 minutes, then add the chocolate and whisk through until combined. Sift in the cocoa powder and whisk until smooth.
For the whiskey cream, whisk the cream into soft peaks. Dissolve the icing sugar with the whiskey in a bowl and then add to the cream, folding to combine. To assemble the meringues, place one on each plate, add a spoonful of whiskey cream on top, drizzle with the chocolate sauce and sprinkle with the toasted hazelnuts.