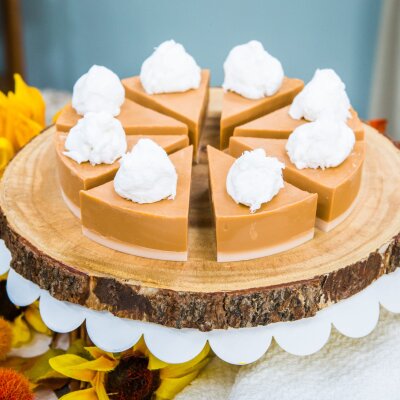
DIY Pumpkin Pie Soap
Level:
Intermediate
How-To:
Healthy & Beauty
Seasonal Event:
Fall
DIY PUMPKIN PIE SOAP MATERIALS:
- White soap base, 2 lbs.
- Soap colorant in yellow, brown, orange and red
- Pumpkin pie soap fragrance
- Ground cinnamon
- Round silicone cake molds 6”-8” diameter
- Rubbing alcohol in spray bottle
- Electric hand mixer
- Glass bowls
- Microwave or pot for double broiler
- Knife
- Measuring cups
- Measuring spoons
- Mixing utensil like large spoon
INSTRUCTIONS:
- First, create the pie crust soap mixture. Melt about 8 oz. Of soap base in a bowl in either a double broiler or the microwave. If doing this in the microwave, melt in 30 second intervals stirring in between so that you don’t burn or boil the soap. Then, stir in yellow and brown colorant until a tan crust color is reached.
- Add the aroma to your crust mix. Stir ½ teaspoon of the pumpkin pie fragrance and a pinch of cinnamon into the liquid soap.
- Pour the crust soap mix into the silicone cake mold carefully and spray with alcohol immediately to get rid of any air bubbles that may form.
- Create the pie filling soap mixture while you allow the crust to cool until hardened. Melt down about 25 oz of white soap base and add in soap colorant in orange, yellow and brown until the color looks like pumpkin pie filling.
- Add the aroma into the melted pie filling mixture, about ½ teaspoon of pumpkin pie fragrance.
- Pour the pie filling soap mix slowly and carefully into the mold over the pie crust that should be cool by now. If it is not, wait until the crust is completely cool to pour. Spray with alcohol to remove any air bubbles. Allow to cool until hardened.
- Cut the pie into slices with a knife. PRO TIP: If your crust separates from the filling, melt a bit of soap down and layer it in between so that it acts as a glue for the layers.
- Now it’s time to make the whipped cream, melt another 6 oz. Of soap base in a separate bowl. Once melted and slightly cooled, use an electric mixer to whip the soap until thick and fluffy.
- Mold the whipped soap into dollops on each pie piece. PRO TIP: You will want to work quickly because the whipped soap will harden fast.
- Sprinkle a bit more cinnamon on top if desired and enjoy!