Share

Home & Family Holiday How-Tos

DIY Present Tree
1 of 67
DIY Present Tree

Materials

  • Plywood rounds-4ft, 3ft, 2ft, 1ft
  • Paint-optional
  • Gift Wrap
  • Galvanized pipe-¾ inch
  • 6 Flange ¾
  • Screw gun
  • Pillow filling
DIY Present Tree - Home & Family

Directions

1. Start with largest 4ft plywood round and screw on flange in the middle of plywood

2. Once secured attach 2 ft pipe into flange and screw on until secure

3. Take 3-ft plywood round and screw on flange in center on both sides

4. Once secured attach 2 ft pipe into flange and screw until secure

5. Take 2-ft plywood round and screw on flange in center on both sides

6. Once secured attach 2 ft pipe into flange and screw until secure

7. Take 1-ft plywood round and screw on flange in center on one side only

8. Once secured attach 2 ft pipe into flange and screw until secure

9. Once tree has been built and is secure, paint desired color optional

10. Add bows and pillow filling to look like snow

11. Let dry

Get more information about this episode >>

DIY Christmas Cottage Garden
2 of 67
DIY Christmas Cottage Garden

Materials

  • Bird house
  • Acrylic paint
  • Hot glue
  • Pipe cleaners
  • Popsicle sticks
  • Mini lights
DIY Christmas Cottage Garden - Home & Family

Directions

1. Paint Birdhouse & Let Dry

2. Twist Pipe Cleaners To Create A Candy Cane

3. Hot Glue Pipe Cleaner To House

4. Place Popsicle Sticks Around House To Create A Fence

Get more from Shirley at EdenMakers.com

Get more information about this episode >>

DIY Succulent Christmas Trees
3 of 67
DIY Succulent Christmas Trees

Materials

  • Tomato cage
  • Chicken wire
  • Sphagnum moss
  • Pliers
  • Zip ties
  • Succulents

Directions

1. Start with a tomato cage and wrap it in chicken wire, leaving the base open for now.

2. Turn the “cone” upside down, so that the pointed end is pointing downward.

3. Line the inside of the cone with moss.

4. Top the cone off with the final side of chicken wire, securing it with zip ties.

5. Flip the entire tree over so the base sits flat on its surface.

6. Plant your succulents within the moss. If the root ball is too big for the hole, snip a bigger
hole through the chicken wire.

7. Water it by hosing it down once a week or when moss dries out.

Get more information aout this episode >>

DIY Dried Fruit Ornaments
4 of 67
DIY Dried Fruit Ornaments

null

    Steps

    1) Cut citrus fruit with sharp knife uniform size (1/8" to 1/4" thick) and place on dehydrator rack

    2) Slice apples and pears on mandolin uniform size (1/8"- 1/4" thick)

    3) Dip THE cut apples and pears in bowl with 1 quart of water and 2 tbsn of ascorbic acid (citric acid) for 2 min to pre-treat against browning

    4) Place apples and pears on dehydrator rack and place inside machine

    5) Set the temperature at 135-degrees and timer for 5 hours

    6) Remove dried fruit from machine after timer stops and insert ornament hangers

    For more information or to order your Excalibur Dehydrator, visit ExcaliburDehydrator.com


    Return to Episode Guide >>

    Check out more fun DIY projects at the Home & Family Pinterest Page

    Creative Ways to Display Christmas Cards
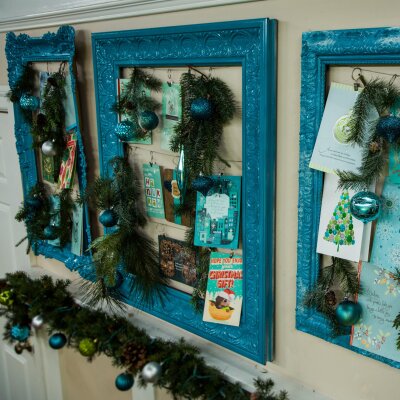
    5 of 67
    Creative Ways to Display Christmas Cards
    Creative Ways to Display Christmas Cards
    Level:
    Easy
    How-To:
    Home Decor, Storage
    Seasonal Event:
    Christmas

    Materials for Framed Look

    • Picture Frame
    • Hanging wire
    • Café hooks
    • Staple gun
    • Holiday Cards

    Materials for Snowman

    • 2 large white foam cord
    • Tape
    • White felt
    • Spray glue
    • Accessories for snowman

    Steps for Framed Look

    1. Take a picture frame, whatever size you choose
    2. Remove the back of the frame
    3. Attach wire to back of frame using staple gun
    4. Attach café hooks to wire
    5. Hang cards from hooks and display

    Instructions for Snowman

    1. Cut outline with x-acto knife
    2. Attach boards with tape
    3. Spray adhesive
    4. Cover outline with felt
    5. Trim felt
    6. Add accessories (eyes, nose, hat, buttons)
    7. Attach cards using velcro dots

    Check out these other methods of preserving your Christmas cards on a Card Tree, Card Display, or Memory Book.

    Return to Episode Guide >>

    DIY Domed Light Sculptures
    6 of 67
    DIY Domed Light Sculptures

    Materials

    • Glass dome
    • Copper lights
    • Ornaments
    • Decorations of your choosing

    Steps

    Step 1: Choose your glass dome size and make sure the items you want to use will fit the size you’ve chosen.

    Step 2: Get an idea of the design and style you want and set where the front of your dome will be. 

    Step 3: Begin gluing and securing base pieces 

    Step 4: Secure battery operated copper lights 

    Step 5: Begin string lights throughout pieces 

    Step 6: Turn on lights

    Step 7: Cover with Glass dome top


    Return to the Episode Guide >>

    Check out more fun DIY projects at the Home & Family Pinterest Page

    Santa and Mrs. Claus Tablecloth
    7 of 67
    Santa and Mrs. Claus Tablecloth

    Materials

    • Tablecloths
    • Ribbon
    • Felt
    • Faux fur (not going to shed)
    • Fabric-tac glue

    Directions

    1. Lay the tablecloth or runner on a flat surface

    2. Add faux fur trim along the outside and let fabri-tac glue dry.

    3. Use black felt for the belt.

    4. Add your detailing by using yellow and black felt for the belt buckle and buttons.

    Get more information about this episode >>

    DIY Snowball Bath Bombs
    8 of 67
    DIY Snowball Bath Bombs

    Materials

    • 15 Plastic Bath Bomb Molds
    • 2 lbs. Baking Soda (Sodium Bicarbonate)
    • 1lb. Citric Acid
    • 0.2 oz. Super Pearly White Mica
    • 0.2 oz Pearl Powder
    • 1 oz. Seaweed Extract
    • 1 oz. Polysorbate 80
    • 0.5 oz. Pacific Pearl Fragrance Oil
    • 1 oz.Blue Sugar Pearls
    • Spray Bottle Witch Hazel
    • Gloves
    • Dropper

    Directions

    1. Mix dry ingredients. Push all the baking soda and citric acid through the strainer into the large mixing bowl and use your gloved hands or a spoon to mix them.

    2. Add color. Add 2 tsp. Of white mica and 2 tsp. of pearl powder and stir to combine.
    3. Add liquid ingredients. Add all of the extract and fragrance oil. Using the dropper, add 12 mL of polysorbate 80. Use your hands to fully incorporate.

    4. Check consistency. Check the consistency of the bath bomb mixture. The ideal texture is similar to wet sand and should hold its shape when squeezed. If it’s too dry, use one hand to spritz the mixture with witch hazel and use your other hand to mix.

    5. Fill the molds. Drop a few pearls into one half of the mold. Add bath bomb mixture and press it in firmly. Fill the other half of the mold. Place loose bath bomb mixture on top of both halves. Clear any powder from the seam of the mold, match the eyelets, and close. Make sure to direct pressure on the seams to prevent dents.

    6. Allow to dry. Let bath bombs dry overnight in the molds.

    Get more information about this episode >>

    DIY Christmas Chair Leg Covers
    9 of 67
    DIY Christmas Chair Leg Covers

    Materials

    • Robes
    • Faux fur
    • Felt
    • Buttons
    • Fabric paint
    • Pom poms
    DIY Christmas Chair Leg Covers - Home & Family

    Directions

    1. Measure the circumference of your chair leg.

    2. Double the length of fabric so it slouches.

    3. Chair measure at 7”- Orly make it 10”.

    4. Fold over the top and tuck it in for a clean finish.

    5. Take a black sock and sew teardrop shape to create elf tip.

    6. Cut out excess fabric.

    7. Flip the sock inside out.

    8. Stuff sock with pillow stuffing.

    9. Use hands to emphasize “pointy foot.”

    10. Slide pant leg onto chair leg.

    11. Slide sock onto chair leg.

    12. Wrap seam with white faux fur trim.

    13. Cut buckle out of gold glitter foam.

    14. Attach to sock.

    Get more information about this episode >>

    DIY Gingerbread Train
    10 of 67
    DIY Gingerbread Train

    Materials

    • Treat boxes
    • 4x4 boxes
    • Christmas sweets
    • Life savers
    • Embellishments
    • Glue
    • Scissors
    • Polyurethane
    • Small plastic cups
    • Paint pens

    Directions

    1. Assemble the treat boxes and cut off the top flaps

    2. Build 4x4 boxes

    3. Add embellishments to each train car (washi tape, trim, paint pens)

    4. Glue life savers as wheels

    4. Cut a triangular cardboard piece for the front of the train and glue on

    5. Use a small plastic cup as the chimney

    6. Add treats and enjoy!

    Download the Gingerbread Train TemplateGet more informaton about this episode >>

    DIY "Ho Ho Ho" Sign
    11 of 67
    DIY "Ho Ho Ho" Sign

    Materials

    • Foam ball
    • Paint
    • Water
    • Celluclay (instant paper mache)
    • Paint pens
    • Gue gun
    DIY Ho Ho Ho Sign - Home & Family

    Directions

    1. Cut the bottom of the foam ball so that it can sit flat.

    2. Mix up the celluclay according to package instructions and cover the foam ball; allow to dry completely.

    3. Once the foam ball is dry, paint it and let dry

    4. Shape the celluclay into the desired shape antlers to attach to foam ball

    5. Once celluclay is dry, paint antlers & allow to dry.

    6. Using paint pens to draw the eyes and mouth

    7. Get celluclay and shape it into a ball let dry

    8. Once dry paint red and that will be your nose

    9. Use hot glue to attach nose ball on foam

    10. Attach antlers to foam ball

    11. Add any extra details that you like

    Get more information about this episode >>

    DIY Christmas Pinatas
    12 of 67
    DIY Christmas Pinatas

    Materials for Ornament Pinata

    • Round paper lantern
    • Candy/goodies
    • Tinsel
    • Glue
    • Scissors
    • Tape
    • Glittered paper

    Materials for Snowman Pinata

    • 3 round paper lantern (different sizes)
    • Candy/goodies
    • Glue
    • Scissors
    • Tape
    • Embellishments

    Directions for Ornament Pinata

    · Assemble paper lantern
    · Cover the bottom of the lantern with paper and tape
    · Begin gluing on the tinsel and wrap around the whole lantern
    · Fill your pinata with candy and goodies
    · Add top of ornament with glitter paper
    · Hang and enjoy!

    Directions for Snowman Pintata

    · Assemble paper lanterns
    · Cover the bottom of the lanterns with paper and tape
    · Add embellishments for hat, eyes, nose, mouth, buttons and scarf
    · Fill the middle lantern with candy
    · Connect lanterns with glue
    · Use string to hang

    Get more information about this episode >>

    DIY Lawn Elves
    13 of 67
    DIY Lawn Elves
    DIY Lawn Elves
    Level:
    Advanced
    How-To:
    Outdoor Decor, Christmas Decor
    Seasonal Event:
    Christmas

    Materials

    • 16” planter pot 
    • 8” planter pot
    • 6 pieces of 12”x1” pvc pipe
    • Deli container
    • Christmas ornaments
    • Buttons
    • Plywood round
    • Hot glue
    • Paint

    INSTRUCTIONS:

    1. Glue & screw 2 PVC pieces on side of 16” planter pot.
    2. Glue plywood round on the inside of planter pot with 2 PVC pieces.
    3. Attach the 2 PVC pipes for legs.
    4. Fit into wood blocks for feet.
    5. Attach 2 PVC pipes for arms/elbows.
    6. Fit wood blocks on for hands.
    7. Glue the 8” pot on the ornament head to make the elf’s hat.
    8. Glue ornament for nose.
    9. Glue buttons for eyes.
    10. Glue buttons down midsection for shirt.

    Click here for more Christmas crafts

    Return to the Episode Guide >>

    Check out more fun DIY projects at the Home & Family Pinterest Page

    DIY Holiday Ship in a Bottle Ornaments
    14 of 67
    DIY Holiday Ship in a Bottle Ornaments

    Materials for Ornaments

    • Acrylic fillable ornaments
    • Desired items for inside the ornaments (I used photos, small Christmas tree, a merry Christmas sign, ship wheel, an craft anchor, heart, twine, ribbon, stickers, etc.)
    • Scissors
    • Hot glue gun
    • Wire
    • Craft paper (I used glitter paper and construction paper)
    • Wire cutter
    • Paint pens (I used red and gold)
    • Any other decorations (I used bling adhesive jewels)
    • Paint (if you want to paint any part of it)

    Materials for Mercury Glass Antiquing

    • Spray bottle
    • White vinegar
    • Paper towel
    • Spray paint – Krylon Looking Glass
    • Spray paint – Krylon Gold

    Directions for Ornaments

    1. Take apart ornaments, and start with one half
    2. Fill the ornaments with your décor
    3. Hot glue any items you do not wish to move around 4. Attach the other half of the ornament
    5. Add wire as a ornament hanger
    6. Add any other décor (ribbon, twine, etc.)


    Directions fro Mercury Glass Antiquing

    1. Get your finished ornaments.
    2. Spray the ornament with white vinegar in your spray bottle.
    3. Take the “looking glass” spray paint and slightly cover your ornament. Go light on this first step.
    4. Spray the ornament again with the white vinegar.
    5. Spray the “looking glass” spray paint and add more to your ornament.
    6. Repeat this process until you get the desired affect of antiquing you would like (go light if you have a lot of items in the ornament that you would like to be seen...others can cover the ornament only completely so it covers more of the contents).
    7. When you have reached the desired color you would like of antiquing, spray one last pass of the vinegar.
    8. Very gently, take paper towel and pat your ornament dry.
    9. If you would like to add another element or color, do so now with a very light coat of spray paint. We are using gold metallic spray paint to enhance the Mercury finish. 10. Let dry for several hours before hanging it on your tree!

    Return to the Episode Guide >>

    Check out more fun DIY projects at the Home & Family Pinterest Page

    DIY Hot Cocoa Candles
    15 of 67
    DIY Hot Cocoa Candles

    Materials

    • Cute Christmas mugs
    • Vegetable shortening
    • Soy wax chips
    • Glass measuring cup that is 2 cups or larger
    • E-6000
    • Candle wicks
    • Broken crayons in brown and black
    • Fragrance oils in peppermint and vanilla
    • Candy canes
    • Ziploc bags
    • Bakery sprinkles
    • Microwave

    Directions

    1. Take one long candle wick (don’t cut it yet) and attach it to the bottom middle of the coffee mug with E-6000.

    2. Keep wick in middle of the mug by using scotch tape to hold it in place. Set aside to dry for a few hours.

    3. Once wick is dry, take veggie shortening (Crisco), and scoop into measuring cup. (To get the exact size, just estimate how big your mug is or fill the cup with water to get the exact measurement, then start with a completely dry mug.)

    4. Take broken crayons and add them to the Crisco mixture. You will need one full brown crayon broken up and one small piece of black crayon.

    5. Microwave this mixture in your glass measuring cup until it melts (about 3 minutes).

    6. Add scent into mixture by adding a few drops of fragrance oil. Mix it up in the measuring cup. I’m using both peppermint and vanilla since I love the combo of those two!

    7. Take melted mixture and pour into your mug, leaving about ½” from the top. This will make it look like a full cup of hot chocolate, while giving you enough room to add your “whipped cream” to the top.

    8. Let mixture in mug dry for a couple hours. (This will depend on the heat and humidity of your house…anywhere from 2-6 hours.) If you are unsure, just leave yourself enough time to let it dry. Note – you cannot put this in the refrigerator to dry since that will make it sweat.

    9. To make the whipped cream and toppings, take about ¼ cup to about ½ cup of soy wax and put it in measuring cup. Put in microwave for 30 seconds intervals until it starts to melt. You do not want this to completely melt, so it keeps the consistency of whipped cream. Keep checking it and stir occasionally.

    10. Once it is the consistency that you like, scoop it out and put it on top of the hot chocolate mug. Use a spoon and your fingers to arrange it on the top of the chocolate portion.

    11. Take candy canes and put them in a plastic ziplock bag. Break it up into small pieces by hitting it with spoon.

    12. Sprinkle that on top of your mixture, making sure not to cover the wick. You can add a full candy cane, add sprinkles, or any other decoration that you would use to decorate real hot chocolate.

    13. Cut the wick to about ½” above the mixture.

    14. Light it and enjoy the SCENT and LOOK of hot chocolate!

    Get more information about this episode >>

    DIY Christmas Robes
    16 of 67
    DIY Christmas Robes

    Materials

    • Robes
    • Faux fur
    • Felt
    • Buttons
    • Fabric paint
    • Pom poms

    Directions

    ELF & SANTA
    1. Cut three-inch-wide faux fur or white French terrycloth.
    2. Fabric glue the terry or faux fur to the hem, cuff and hood of robe.

    FOR THE BELT
    1. Cut black terry cloth twice as wide as you want your belt to be.
    2. Sew together and flip inside out and hem the ends.

    POLAR BEAR
    1. Use black French terry to create 3 large ovals
    2. Cut 8 small ovals (This creates the paws and face of the Polar bear)
    3. Cut scarf out of scrap plaid fabric

    Get more information about this episode >>

    DIY Light Up Reindeer
    17 of 67
    DIY Light Up Reindeer

    Materials

    • Plywood
    • Pencil
    • Marker
    • Saw blade
    • Paint & paint brush
    • PVC pipe
    • Wood stake
    • Screws
    • E6000 glue
    • Stripe LED lights

    Directions

    1. Trace reindeer image on plywood

    2. Use saw blade to cut out reindeer

    3. Paint entire reindeer in white and let dry

    4. Apply E6000 glue onto PVC pipe and let dry

    5. Drill screws into PVC pipe

    6. Insert wood stake

    7. Outline reindeer with stripe LED lights

    Download Reindeer TemplateGet more information about this episode >>

    DIY Angel Tree Topper
    18 of 67
    DIY Angel Tree Topper

    Materials

    • Doll
    • White duct tape
    • Cardstock
    • Cheesecloth
    • Lace or other fabric
    • Hot Glue
    • Feathers
    • Wire
    DIY Angel Christmas Topper - Home & Family

    Directions

    1. Use white duct tape to cover your dolls body.

    2. Use the tape and attached two pieces of cardstock together. Fold the card stock into the shape of a cone and place over body. Now it should look like your doll is wearing a strapless white dress.

    3. Cut a piece of lace or any contrasting fabric. Find the center of the fabric and cut a hole in it. Place over the top of doll’s head. If the fabric does not sit at the waist, use hot glue to bring it up higher.

    4. Cut an extra large piece of cheesecloth and pleat it around the waist with hot glue. Make sure it is large enough to cover the entire bottom of poster board cone. This will give volume at the waist and it will cover the cone.

    5. Cut an extra long piece and wrap it around the bodice to cover the waistband of the skirt. Wrap this same piece around the body and over the arms to create the top.

    6. Personalize dress by adding decorative pieces or leave as is.

    7. Use feathers for wings. Hot glue to the back.

    8. Use gold jewelry wire and wrap to look like a halo. Hot glue in place.

    9. Place your angel on top of your tree and enjoy through the holiday season!

    Get more information about this episode >>

    DIY Ladder Christmas Tree
    19 of 67
    DIY Ladder Christmas Tree

    Materials

    • Ladder
    • Wood boards
    • Paint primer
    • Gold Spray paint
    • White Paint
    • Paint brush
    • Fake snow (optional)

    Directions
    1) Sand down ladder and spray paint it gold.

    2) Measure the distance between each step and add 12". Cut boards down to size.

    3) Paint boards white. Let dry.

    4) Place boards along ladder steps.

    5) Cover with fake snow (optional) and decorate!

    Download Home & Family's Christmas Workbook here>>

    Get more information about this episode >>

    DIY Christmas Tree Book Shelf
    20 of 67
    DIY Christmas Tree Book Shelf

    Materials

    • Galvanised pipe
    • Plywood rounds
    • 3 bolt round flangettes
    • Screwdriver
    • Paint

    Directions

    1) Lay out rounds in descending sizes

    2) Screw on galvanized pipe using flangette onto widest wood round

    3) Repeat process on next one but screw flangette and pipe on either side

    4) Repat until you've reached the top round and only screw on the flangette to the underside

    5) Paint

    Get more information about this episode >>

    Check out more fun DIY projects at the Home & Family Pinterest Page

    DIY Santa Chair
    21 of 67
    DIY Santa Chair

    Materials

    • Chair
    • Plywood
    • Utility knife
    • Drill
    • Wood posts
    • L-brackets
    • Wood brackets
    • Corbels
    • Wood appliques

    Directions

    1. Remove chair seat. Overturn chair upside down and unscrew. Set aside seat cushion for later.

    2. Remove chair back cushion as well. Use your utility knife to cut out the cushion and don't worry about the ragged fabric edges left dangling (as this won't be seen upon completion).

    3. Attach oversized chair back using a piece of plywood screwed into front of your chair back. This plywood should be raised a bit from the seat to allow space for the seat cushion to be reattached later.

    4. Add post brackets (pre-drill and glue) along side.

    5. Attach side wood posts to the side of your chair. Attach wood brackets to the side of your chair. Drill and use wood glue.

    6. Drill a shelf L bracket along side.

    7. Add wood corbels to bottom of chair.

    8. Glue wood appliqué on top and along sides of chair.

    9. Cover cushions with red velvet fabric using staple gun.

    10. Use heavy duty Velcro to adhere to chair.

    Get more information about this episode >>

    DIY Santa Tracker Globe
    22 of 67
    DIY Santa Tracker Globe

    Materials

    • Painter’s tape
    • Trace paper
    • Paint pens
    • Magnets
    • Spray paint
    • A small sleigh with Santa
    • A child’s globe
    • Hot glue and glue gun

    Directions

    1. Take your trace paper and trace the continents. Cut these out and set them aside.

    2. Then take painter’s tape and place several strips together to use as the continents.

    3. Place the cut out traced continents on the painter’s tape and trace the continents.

    4. Cut out the painter’s tape as a continent and place on top of the continents

    5. Spray paint the rest of the globe in the color of your choosing.

    6. You can add the continent names, or even countries and cities…depending what you want the globe to say. I will be typing “Santa Claus is coming to town”.

    7. Take your magnets and place them around the globe on the places that you would like Santa to stop.

    8. Take you Santa’s sleigh and glue on magnets to it. If you have reindeer, you will need to add magnets to them as well.

    9. Take a journey with your kids to watch where Santa is in the world on the big night…Christmas Eve!

    Get more information about this episode >>
    DIY Peppermint Plates
    23 of 67
    DIY Peppermint Plates

    Materials:

    • Springform pan
    • Parchment paper or tin foil
    • Bag of peppermint candies

    Directions:

    1. Line Springform pan with parchment paper or tin foil
    2. Lay peppermint candies on the bottom of pan and completely fill
    3. Bake pan in the oven for 5-8 minutes at 350 degrees
    4. Let pan cool completely before removing from pan

    Return to Episode Guide >>

    Get more great recipes and crafts by visiting us on Pinterest at pinterest.com/homeandfamilytv and follow "Home & Family" on Twitter @homeandfamilytv and Facebook. Plus, check out our YouTube channel for backstage videos.

    DIY Holiday Fireplace Cover
    24 of 67
    DIY Holiday Fireplace Cover

    Materials

    • Metal Fireplace Cover
    • Metal Decoration
    • Baling Wire
    • High Heat Resistant Paint
    Holiday Fireplace Covers - Home & Family

    Directions

    -Find a metal decoration that you would like to use. It can be a sign, a wall plaque, or even a coat hanger. You can cut the hooks off of the coat hanger.

    -You can leave it as is, but if you choose to paint it, you’ll need to use a high heat paint. This will prevent any mishaps in melting or fire safety.

    -Attach the decoration to your fireplace cover using bailing wire, or another low thermal conducting wire. (For instance, copper would be a bad wire to use because it heats up too easily.)

    -Enjoy your cover in front of your cozy fire!

    Get more information about this episode >>

    DIY Christmas Potpourri Manger
    25 of 67
    DIY Christmas Potpourri Manger

    Materials for Manger

    • 6 inch Cinnamon Sticks
    • Hot Glue
    • Cinnamon Oil
    • Star Anise
    • LED Lights

    Ingredients for Christmas Potpourri

    • Dried Conifer and Evergreen Leaves
    • Dried Pomegranate Buds
    • Mini Pinecones
    • Pepper Pods
    • Dried Orange
    • Cloves
    • Juniper Berries
    • Whole Cardamom
    • Cinnamon
    • Rose Hips
    • Fragrance Materials:
    • Orris Root (Absorbs and “fixes” fragrance to last a long time)
    • Essential Oils: Frankincense and Myrrh, Atlas Cedarwood, Bergamot, Vanilla

    Directions for Manger

    1. Assemble the manger in your desired shape using cinnamon sticks and hot glue

    2. Rub Cinnamon oil over the cinnamon sticks for extra fragrance

    3. Wrap lights around the manger, using it to hang the star anise from the top of the manger

    Directions for Manger

    1. Add drops of essential oil to orris root to absorb fragrances (We used 20 drops frankincense, 10 Bergemont, 5 Cedar, 2 Vanilla)

    2. Add scented orris root to dried florals

    3. Store in airtight container, in a dark closet until Christmas

    4. Place a few leaves on bottom of manger platform

    5. Add potpourri to manger

    6. Top basket of Frankincense, myrrh, & Gold!

    Get more information about this episode >>

    How To - DIY Sugarplum Fairy Tablescape
    26 of 67
    How To - DIY Sugarplum Fairy Tablescape

    Materials

    • Water bottles
    • Foam Paper
    • Hot Gun & Glue
    • Cellophane
    • Tape

    Directions

    1. Cut the top off the bottle with scissors.

    2. Cut foam into shapes.

    3. Glue shapes to water bottle to look like candy.

    5. Insert lights.

    6. Wrap with cellophane.

    7, Tie ends.

    Get more information about this episode >>

    DIY Rustic Christmas Three Wishes
    27 of 67
    DIY Rustic Christmas Three Wishes

    Materials

    • (2) 1”x2” wood pieces in 8’ length
    • (4) 1”x4” wood pieces in 8’ length
    • Miter saw (electric or can use a hand saw or miter box)
    • Nail gun with ¾” nails
    • Vinyl letters and/or vinyl wall decals that already have phrases on them.
    • Brown wood stain
    • Green acrylic paint
    • Gold glitter stars (you can make these or order them)
    • Hot glue and glue gun
    • Wood glue
    • Sand paper (any grit from 80 – 120)
    • Ruler or straight edge
    • Rag
    DIY Rustic Christmas Tree Wishes - Home & Family

    Directions

    1. The first cut was at a 45-degree angle to make a triangle that is 4” long on the bottom. This will be used for the top part of the tree

    2. Cut the second piece of wood in three different places. Cut the sides at a 45-degree angle to mimic a tree (so cut up – the larger part of the 45-degree angle should be at the bottom. Then, you need to take off just a small cut on the top of the second piece of the tree, so it will butt up against the first. Cut about 1.5” off the top. The bottom of the triangle should be 7”.

    3. Repeat this process for each layer of the tree with the third piece of wood measuring 11-inhces on the bottom. Remember to cut the sides at a 45-degree angle

    4. Repeat again with the bottom cut measuring 13”

    5. Now that you have your cut pieces, it’s time to assemble them! Cut your 1”x2” piece of wood

    6. Cut a piece of 1”x4” at 13” in length, just a straight cut with no angles. This will be your base.

    7. Lay your cut 1”x2” down on a flat surface.

    8. Add wood glue to the 1”x2” on top. The branch pieces will sit on top of that.

    9. Once all four branch pieces are on the 1”x2”, nail them into place.

    10. Add the 13” flat piece to the bottom of the 1”x2” and secure with nails underneath.

    11. You can stain the wood if you would like . Set aside to dry.

    12. Add your green acrylic paint to the branches and set aside to dry.

    13. Taking sand paper, sand back a bit of the green paint to reveal the wood underneath.

    14. Take a damp towel and wash off the surface of the tree. This is where we will be placing our stickers, so it needs to be a clean and dry surface.

    15. Add any words or phrases you would like!

    16. Enjoy your Rustic Christmas Tree Wishes!

    Download the Wood Tree PatternGet more information about this episode >>

    Paige's DIY Polar Bear Cut-outs
    28 of 67
    Paige's DIY Polar Bear Cut-outs

    To create the Polar Bear Cut Outs (makes Mama Bear and one Baby Bear): You will need the following items:

    • 4x8 sheet of foam insulation
    • Printer ( to print the cut outs)
    • X-acto knife or Dremmel Router
    • Sand paper / sander
    • Glue
    • Glitter
    • Paint (White for body and Blue or Black for eyes, ears, nose)
    • PVC pipe

    Directions:

    1. Draw  polar bear patterns/shapes on board
    2. Cut out shapes using and X-acto knife (or any tool you feel comfortable with), the foam thin and easy to cut.
    3. Using a medium grit sandpaper, smooth the cut edges
    4. Paint all pieces white.
    5. While paint is still wet, shake on glitter for a frosted effect.
    6. Next, have fun painting on a cute face to polar bear head.
    7. Once all parts are dry glue pieces together. (We used expanding gorilla glue but a low temp hot glue gun would also work).
    8. Set up and display your bears, by gluing on a short length of 3/4' - 1" PVC pipe vertically to the back of bear. These will act as sleeves to slip over stakes put in lawn.. If your area is particularly windy, add on extra pipe/sleeves to keep stable.
    9. *Although you could make these out of wood. Using foam board is easy to work with, cheap and lightweight. Perfect material for first time DIYer's or those not comfortable using power tools. Foam board is completely weatherproof and with proper care they will last for years.

    Download the Polar Bear Pattern >>
    Return to Episode Guide >>

    Follow lifestyle design expert Paige Hemmis on Twitter @paigehemmis and check out her site www.paigehemmis.com.
    Get more great recipes and crafts by visiting us on Pinterest at pinterest.com/homeandfamilytv and follow "Home & Family" on Twitter @homeandfamilytv and Facebook. Plus, check out our YouTube channel for backstage videos.

    Sophie’s DIY Pine Cleaner
    29 of 67
    Sophie’s DIY Pine Cleaner

    Materials:

    • 1 teaspoon borax
    • 1/2 teaspoon washing soda crystals
    • 2 Tablespoons white vinegar
    • 1/2 teaspoon liquid castille soap
    • 2 cups very hot water
    • 1/2 teaspoon pine essential oil

    Combine ingredients and funnel into a pretty spray bottle, add a vintage looking label and you’ve got a great Christmas gift!

    Check out RabbitAir.com for Matt's favorite air purifiers.

    Return to Episode Guide >>

    For more from natural lifestyle expert Sophie Uliano go to:
    Website: www.gorgeouslygreen.com
    Facebook: Facebook.com/GorgeouslyGreen
    Twitter: @sophieuliano

    Get more great recipes and crafts by visiting us on Pinterest at pinterest.com/homeandfamilytv and follow "Home & Family" on Twitter @homeandfamilytv and Facebook. Plus, check out our YouTube channel for backstage videos.

    DIY North Pole Ring Toss
    30 of 67
    DIY North Pole Ring Toss

    Materials

    • Wood round (24 inches in diameter)
    • PVC pipe (1 ½ feet. OR however tall you’d prefer the pipes to be)
    • Red duct tape
    • Gorilla glue (or hot glue, either will work)
    • Finial
    • Gold spray paint
    • Flying rings
    • Chunky yarn
    • Mod podge
    • Glitter
    • Numbers
    • Colored bows
    • Acetone
    • Paint
    • Ribbon

    Directions

    1. Paint the wood round white.
    2. Prep the PVC pipe to the length you prefer.
    3. Take your red duct tape & tape it down the PVC pipe to make it look like a candy cane. Be sure to turn the actual pipe while taping it on because otherwise the duct tape will get all tangled.
    4. Take a pencil & mark where you’d like to glue down your pipes to base.
    5. Then attach about 5 PVC pipes to the wood round with hot glue or gorilla glue (If you’d like to make the pipes removable from the ground then take a piece of PVC & cut it at a point to make it a stake)
    6. Take your finials & spray paint them gold.
    7. Attach the finial to the top of the pipe with hot glue.
    8. Mix mod podge & glitter together & spread on top of the white wood round to make it look like glitzy snow.
    9. Attach numbers to the poles to make a point system.
    10. Now time for the rings. Take your flat flying rings & start wrapping them in thick green yarn. The green yarn will give it the wreath look.
    11. Take any kind of a color ribbon & make a bow, attach these to the rings & color code them so you know which ones yours are. You can attach with hot glue.

    Get more information about this episode >>

    Kym's Holiday Beauty Prep Products
    31 of 67
    Kym's Holiday Beauty Prep Products

    When it’s Christmas time, we all want gorgeous hair and perfect skin. But the reality is you cannot start in December and expect to get good results. The proper treatment takes adequate time, and much like going for a peel or plastic surgery, you won’t see results until some time. That is why now is the ideal time to start prepping, so when December comes around and the holiday party invites come, you’ll be ready.


    Monat hair treatment. Men and women can get started now and have healthy, thicker hair by the holiday season! This is for those who may have hair thinning, or who have recently done a perm. Even after a hair coloring, it takes its toll. This helps your hair grow thicker and fuller.

    www.meet.mymonat.com - $34.95

    With this 100% bamboo washcloth, you’re provided with an extremely delicate and absorbent towel that is soft on the skin. It eliminates concerns about bacteria & mold and makes you much less prone to breakouts.  

    Bamboo Face Towel Kit - StackedSkinCare.com, $39


    Gerard cosmetics provides you with colors/tones of makeup for each season!

    GerardCosmetics.com, from $28

    Return to Episode Guide >>

    Get additional tips from lifestyle and beauty expert Kym Douglas at KymDouglas.com. Follow her on Twitter @KymDouglas and like her on Facebook.

    DIY South Pole Crossing Sign
    32 of 67
    DIY South Pole Crossing Sign

    Materials

    • 6 ft wooden post
    • 1 wood cap
    • 1 wooden round
    • 4 scrolled L brackets
    • 6 ½ x 4 inch wood planks
    • Printed designs and lettering of your choice
    • Paint and brushes
    • Mod Podge
    • Flush mount hangers
    • Wood screws or nails
    DIY South Pole Crossing Sign - Home & Family

    Directions
    1. Paint wood post, let dry.
    2. Attach wood cap to top of post.
    3. Center post on plywood round.
    4. Take 4 scrolled L brackets, attach to base with nails or screws.
    5. To make base more secure if need be, drill holes in the round and stake pole into the ground.
    6. Paint planks or leave raw.
    7. Using a jigsaw, cut planks into desired shapes, or leave plain.
    8. Print sign designs on paper.
    9. Decoupage designs onto wood with Mod Podge, scrape out bubbles, let dry.
    10. Attach flush mount hangers to the back of the signs an onto the pole in desired locations.
    11. Hang signs on pole.

    Download the Grinch Arm Template

    Download the Leg Lamp TemplateGet more information about this Episode >

    DIY Family Christmas Photo Chargers
    33 of 67
    DIY Family Christmas Photo Chargers

    Materials

    • Glass chargers
    • Photos
    • Dishwasher safe Mod Podge
    • Brush

    Directions

    1. Select photos and print on paper.

    2. Cut photo to fit charger.

    3. Coat back of charger and photo with mod podge. Apply even layer.

    4. Place photo print side down onto back of charger and coat with Mod Podge.

    5. Let dry 1-2 hours and apply 2-3 additional coats of Mod Podge.

    Get more information about this episode >>

    DIY "Night Before Christmas" Cookie Tray
    34 of 67
    DIY "Night Before Christmas" Cookie Tray

    Materials for Tray

    • 1 16x12 wood tray
    • White paint and paint brush
    • Clear acrylic spray
    • Holiday images
    • Laser printer
    • Waterslide paper
    • Bowl of water

    Ingredients for Reindeer Food

    • Jars
    • Oats
    • Sprinkles
    • Edible glitter (optional)
    DIY "The Night Before Christmas" Cookie Tray - Home & Family

    Directions

    1. Paint wood tray white, let dry completely (suggested 3 hours).
    2. Print your design on the Laser waterslide decal paper, with your Laser printer.
    3. Cut the images as close to the borders/writing as you can. Cut the decal paper into several smaller pieces so it is easier to apply them.
    4. Apply three coats of the clear acrylic sealer onto the design, letting it dry completely after each coat.
    5. Put the first decal paper into the water and wait for a few seconds.
    6. Once dry, place the design into a bowl of water for about 30-60 seconds, or until the decal starts to peel away from the backing.
    7. Remove from water and carefully place the design onto the tray; once it is placed, it cannot be removed.
    8. Use a soft cloth to remove any excess water and remove air bubbles to make it smooth
    Allow to dry for a few hours to make sure it completely sets.
    9. Repeat the process by labeling the jars for the reindeer food if desired; you could also make a gift tag if you like instead.
    10. Make a funnel with a piece of paper, and add the “reindeer food,” aka oats and sprinkles, into the jars
    11. Once everything is dry and set, you can place your plate of cookies and glass of milk for Santa on the tray, along with the reindeer food.

    **Images available for purchase at silhouettedesignstore.com, getdrawings.com

    Get more information about this episode >>

    DIY Christmas Photo Op
    35 of 67
    DIY Christmas Photo Op

    Materials

    • Insulation foam board
    • Light projector or grid
    • Paint
    • Paint brush
    • Saw
    • Glue
    • Garland
    • Christmas lights
    • Glitter paper
    • Ribbon
    • Star
    DIY Christmas Photo Op - Home & Family

    Directions

    1. Glue together two Insulation foam boards

    2. Using either a grid system or light projector trace tree, ornaments, and presents onto board

    3. Paint tree, ornaments, and presents

    4. Using a saw, cut out the face holes

    5. Add embellishments with glue

    6. Using additional insulation foam board create legs to prop up the board. If you want to use this outside then glue a PVC pipes to the base of the board and place a stake in the grass to secure.

    Get more information about this episode >>

    Holiday Florals
    36 of 67
    Holiday Florals

    Materials

    • Flowers (We used roses, hydrangeas, lilies, and berries)
    • Glass Vase
    • Glass Frosting Spray
    • Spray Paint
    • Glitter
    • Spray Adhesive

    Directions

    1. For your first arrangement, choose the flowers you will use. We chose white hydrangeas and red roses.

    2. Spray the flower and leaves with spray adhesive. Sprinkle on as much glitter as you want. Both available in craft stores.

    3. For your second arrangement, we chose lilies and berries.

    4. Spray paint berries and leaves silver. Allow to dry.

    5. For your third arrangement, choose a tall and clear vase.

    6. Wrap any type of flower in cellophane and submerge in water. The cellophane will create an illusion that there is ice in the water.

    7. Place a full head of hydrangeas on top of the face.

    8. Display for all your guests to admire!

    Get more information about this episode >>

    DIY Christmas Countdown Clock
    37 of 67
    DIY Christmas Countdown Clock

    Materials

    • Clock
    • Plywood rounds
    • PVC pipe
    • PVC pipe end caps
    • Plastic column
    • Wood applique
    • Screws
    • Hot glue
    • House numbers

    Directions

    1. Take PVC end cap, center it, glue and screw to plywood round base.
    2. Attach your 6ft pipe.
    3. Take your plastic column and cut out the bottom and cut out a 3” hole in the top. Now slide the column over your pipe and at that point you can glue it or you can leave it and it will hold.
    4. Take your second plywood round and glue on your decorative wooden appliques at the top.
    5. On the bottom glue and screw on your second PVC endcap.
    6. On the appliques and the PVC endcap – cut a little flatter to attach them to one another (creating a stronger base to attach to).

    Clock – Take an old clock and remove the glass and remove the clock face and numbers that it came with and now take a piece of foam core to fit and paint it to your liking.
    Glue on house numbers to create 1-25.
    Put back in the clock.

    Take the “hour” hand as your template create a fanciful arrow with the same appliques that you used and that gets attached to your clock where the hand goes.

    Clock face then gets attached to your overall top
    Take finished painted one, walk over and put it on top and put it on your post. Then, add details – we painted it all back and added gold trim and added rope and wood plugs for decorative accents.

    Get more information about this episode >>

    DIY Christmas Flip Flops
    38 of 67
    DIY Christmas Flip Flops

    Materials for DIY Ornament Flip-Flops

    • Flip Flops
    • Paint
    • Round sponge brush
    • Sharpies

    Materials for Santa Flip Flops

    • Flip flops
    • Paint
    • Sharpie

    Materials for Christmas Tree Flip Flops

    • Flip flops
    • Paint
    • Cardstock
    • Paint pen
    • Scissors

    Directions for Ornament Flip-Flops

    1. Press round sponge brush into silver/metallic paint.
    2. Press sponge onto your flip flops.
    3. Space out ornaments so they’re evenly dispersed.
    4. Use Sharpie pen to add ornament detailing.

    Directions for DIY Santa Flip Flops

    1. Create Santa hat outline with black Sharpie pen.
    2. Use Sharpie to create the outline for Santa’s hat
    3. Use white paint pen to fill in the bottom of Santa’s hat.
    4. Go back over the outline in black for design to “pop.”

    Directions for Christmas Tree Flip Flops

    1. Use cardstock as a “straight edge” for the Christmas trees. Use scissors to create desired Christmas tree size and shape.
    2. Fill in the Christmas tree outline with green paint pen.
    3. Use desired color to create assortment of ornaments by adding a dot.

    Get more information about this episode >>

    DIY Gingerbread House Place Settings
    39 of 67
    DIY Gingerbread House Place Settings

    Materials

    • Cardboard
    • X-acto knife
    • Gingerbread house template; can be found online
    • Hot glue gun
    • Puffy paint
    • Glitter; optional
    • White paint pen
    • White plates
    • Wreath; size will depend on the size of the house made
    DIY Gingerbread Place Settings - Home & Family

    Directions

    1. Print a gingerbread template online; these can be found on any search engine

    2. Trace the gingerbread template onto a piece of cardboard; it is recommended to use cardboard that isn’t overused or overly bent, as it won’t hold up as well or look as nice as a flat, clean piece of cardboard

    3. Use the glue gun to attach the pieces of cardboard together similar to how you would use frosting to attaching a regular gingerbread house together

    4. Allow to cool/dry

    5. Decorate as desired with a white paint pen and/or white puffy paint and glitter

    6. Other craft supplies can be used as decorations as well similar to how you use candy to decorate a regular gingerbread house

    7. To make the houses into a table setting, place a white plate onto the table, place a large napkin (tri-folded lengthwise) so that it hangs over the front of the plate, place another white plate on top of the napkin. Then, place the wreath onto the place and put the house in the middle of the wreath

    8. You don’t have to just use white, you can use any color palate you like for your table, but the is to layer the plates with the napkins and top them with the wreath and house

    9. The size of the wreath you use will depend on how large you make your cardboard gingerbread house

    Get more information about this episode >>

    DIY Popsicle Stick Christmas Tree
    40 of 67
    DIY Popsicle Stick Christmas Tree

    Materials

    • Popsicle sticks
    • Hot Glue
    • Acrylic Paint (Green or whatever your preference is)
    • Cherry stain
    • Sponge brush

    Directions

    - Print out your template
    - It will print out on a couple different pieces of paper so line up the lines & tape them together
    - Start laying your popsicle sticks along the lines of the template
    - Hot glue the popsicle sticks together on the corners
    - Then place a second layer of sticks on top
    - Continue gluing and layering like this until your tree is as deep as you’d like it to be
    - Once you have the depth you’d like take your cherry stain & start applying it to the outside of the tree
    - Once the outside stain has dried it’s time go & put color in for the inside
    - For the inside use your colored acrylic paint & paint on the inside popsicle sticks
    - For the inside, it’s beneficial to rip the sponge brush off the stick & apply the paint with that. It’s easier to get paint into all of the nooks
    - Let dry & then you’re done!

    Download the Christmas Tree PDFGet more information about this episode >>

    DIY Faux Birchwood Logs
    41 of 67
    DIY Faux Birchwood Logs

    Materials

    • Corrugated cardboard roll in 12” width (can find it online as “Single Face Corrugated Roll”)
    • Craft knife
    • Hot glue gun and glue sticks
    • Drywall mud (also Joint Compound)
    • Scissors
    • Brown acrylic paint
    • Black acrylic paint
    • Plastic gloves/rubber gloves

    Directions

    1. Take a bit of your corrugated wrap and start rolling it tightly. If you would like the outside to be rough, keep the corrugated side facing out. If you would like the outside to be smooth, keep the corrugated side facing in.

    2. Roll a few of these in your desired thickness. Mine range from 2” – 5” in diameter. Since we are mimicking real logs, no two rolls need to be the same!

    3. Use your hot glue gun to glue each section as you roll it up. Keep the glue on the inside so that the sides will have a perfect rolled-look.

    4. Set those aside…now you are ready to make some branches. Roll just a couple of times to create a diameter of about 1”.

    5. Cut these small branches at an angle so that they will fit on your larger logs. These will be small, so cut down to between 2” – 4” in length.

    6. Hot glue these into place, mimicking where real branches would protrude from the log.

    7. With your plastic gloves, take your drywall mud and spread it with your hands along the entire log and branches. Apply a very thin layer, covering the ridges in the corrugated cardboard just a little bit since that will also lend itself to looking like a real log. If the drywall mud is too thick to spread evenly, you can add water to it to thin it a bit.

    8. Set aside to dry. Depending on what type of mud you bought, dry time will vary. Allow it to dry enough to the touch.

    9. Take your brown and black acrylic paint and put a little of it on your plate palette.

    10. Lightly take your sponge and start adding a bit of faux finishing with the paint to mimic the look of birch.

    11. You can leave them as a pile of logs or put them together with some twine to create a bundle! Enjoy

    Get more information about this episode >>

    Sophie Uliano's Christmas Tree Bath Fizzies
    42 of 67
    Sophie Uliano's Christmas Tree Bath Fizzies
    Christmas Tree Bath Fizzies
    Level:
    Beginner
    How-To:
    Beauty

    MATERIALS:

    • Baking soda
    • Corn starch
    • Bentonite clay
    • Cocounut oil
    • Fragrance
    • Witch hazel
    • Neon green fun soap colorant
    • Kelly green fun soap colorant
    • Citric acid
    • Candy confetti

    INSTRUCTIONS:

    1. Weigh out and mix 52 tsps. of Baking Soda, 14 tsps. of Corn Starch, 6 tsps. of Epsom Salt, and 1 tsp. of Bentonite Clay in a mixing bowl. If there are any clumps, break them up with your hands.
    2. In a separate bowl mix 6 tsps. of Coconut Oil 76 (use at room temperature form), a quarter tsp. of fragrance oil, 1 and a half tsp. of witch hazel, 2 and a half tsps. of Neon Green Fun Soap Colorant, and 1 tsp. Kelly Green Fun Soap Colorant. Use a spoon to mix these ingredients together. (It will have a clumpy paste like consistency.)
    3. Use a spatula to add the wet ingredients bowl to the dry ingredients bowl and incorporate well (using your hands).
    4. Once the color is fully dispersed among all of the ingredients, sprinkle your candies into your mold.
    5. Next, add 26 tsps. of citric acid to the bowl. Stir in to incorporate.
    6. Finally, fill your molds. Allow to harden before removing.

    *Note: It's best to use Spearmint Essential Oil instead of Peppermint during pregnancy, as you want to opt for gentler oils.

    DIY Christmas Shadowbox
    43 of 67
    DIY Christmas Shadowbox

    Materials

    • Memorabilia
    • Shadowbox
    • Foam core
    • Hot glue
    • Embellishments
    • Tape

    DIrections

    1. Decide on a theme and select memorabilia for project.

    2. Arrange your items in the shadowbox.

    3. Use foam core to make specific items pop out from the surface of the box.

    4. Use hot glue to attach the foam core and items to desired area.

    5. Seal box.

    6. Paint the box desired color.

    7. Hang and enjoy!

    Get more information about this episode >>

    DIY Christmas Wine Charms
    44 of 67
    DIY Christmas Wine Charms
    DIY Christmas Wine Charms
    Level:
    Easy
    How-To:
    Home Decor
    Seasonal Event:
    Christmas

    Materials

    • Wine glass charm rings
    • Beads
    • Charms

    Directions

    1. Open wine ring.
    2. Thread half of the person’s name through using letter beads.
    3. Half way between name add a Christmas charm.
    4. Finish threading the name through.
    5. Clasp in place.

    TIP: A cute way to gift the wine charms is by cutting circles into holiday colored craft paper. Then, print out a cute message on card stock and cut a slightly smaller circle around the message. Glue the message to the craft paper and cut a hole at the top. Slip a ribbon through the hole and slide on wine charm and tie in a bow. Now you have an easy and adorable way to gift them!

    Gift some wine with these adorable wine beanies!

    Get more information about this episode >>

    DIY Christmas Stockings
    45 of 67
    DIY Christmas Stockings

    Materials with Whimsical Dessert Stocking

    • Plain white stocking
    • Felt
    • Ribbon
    • Cookie Cutters
    • Hot glue
    • Fabric glue
    • Puffy paint
    • Glitter (optional)

    Materials for Glam Stocking

    • Plain tan/nude stocking
    • Sequin fabric with mesh
    • All sequin fabric (for trim)
    • Fabric glue

    Materials for Rustic Stocking

    • Wool plaid fabric
    • Fur fabric (for trim)
    • Pom poms
    • Wood lettering
    • Upholstery cording (optional)
    • Cord
    • Fabric glue

    DIY Christmas Stockings - Home & Family

    Directions for the Whimsical Dessert Stocking

    1. Take your ribbon & tuck a little piece under the top fold of the stocking.
    2. Add a little hot glue to keep intact.
    3. Start wrapping your ribbon around the stocking to make a candy cane effect.
    4. Secure at the end with a dab of hot glue.
    5. Take your felt & start tracing your cookie designs with your cookie cutters onto the felt.
    6. Cut out & glue them onto the stocking with fabric glue.
    7. Use puffy paint to put a face onto the gingerbread men.
    8. Use the felt to cut out candy shapes & you name or initials.
    9. Add glitter if you’d like for extra jazz.

    Directions for Glam Stocking

    1. Fold fabric in half & lay stocking on top.
    2. Cut out your stocking shape.
    3. Do this again so you end up with 2 stocking pieces for each side.
    4. Glue one side down over the edges & then glue down the other side folding the edges down over again creating a seam.
    5. For the trim: take your all sequin material & make sure cut a big enough piece so you can tuck material inside of the trim area & underneath the fold. About 1 inch on bottom 3-4 inches on the top This way you can get a clean line.
    6. Secure with fabric glue.

    Directions for Rustic Stocking

    1. Take your wool fabric & trace a stocking onto the fabric.
    2. Cut the shape out & using a sewing machine sew right sides together. (if using upholstery cording sandwich it together between the 2 pieces)
    3. Once sewn together, turn right side out.
    4. Fabric glue your fur trim to the top.
    5. For the tassel: Cut 18 inches of cord & stitch middle of cord to underneath fur & tie ends of cord to pom poms & wood lettering.

    Get more information about this episode >>

    DIY Snow Globe Wreath
    46 of 67
    DIY Snow Globe Wreath

    Materials

    • Fabric
    • Styrofoam wreath
    • Plastic sheet
    • Craft pearls
    • Snowflake charm
    • Hot glue
    • Pom Pom trim
    • Scissors

    Directions

    1. Put together two same-sized foam wreaths with hot glue. The hot glue will eat into the foam a bit, but it will create a bond that is covered up with fabric.
    2. Once together, set your wreaths on one of plastic sheets and draw the inside of the wreath onto the sheet with your marker that is the same color as your fabric.
    3. Take your scissors and cut out the circle about an inch larger than the circle you drew. Double up two sheets of plastic or do this twice so that you have 2 sheets.
    4. Cover the two wreaths with fabric and hot glue . Since the wreath is round, you will need to cut your fabric in strips in the back.
    5. Using hot glue, glue the plastic onto the back side of the wreath.
    6. Lay your wreath down with the plastic side touching the flat surface.
    7. Take your needle and thread and add a few hanging snowflakes about a third and a half of the way down to create the look of falling snowflakes. Do this inside the wreath.
    8. Add your pom poms or pearl beads to the bottom half of the inside of your wreath.
    9. Add any little props you would like on top of the snow. You can use hot glue to secure them inside.
    10. Using hot glue, put on the plastic sheet on the front of the wreath.
    11. Add your trim, pom poms or snowflakes around the seam of the plastic and the fabric with hot glue.
    12. If you would like to add ribbon, you can wrap the ribbon all along the base of the wreath and secure it with hot glue. Then bring the sides up to make a cute bow to hang your wreath.

    Get more information about this episode >>

    Ken Wingard's DIY Snow Village Holiday Wreath
    47 of 67
    Ken Wingard's DIY Snow Village Holiday Wreath
    DIY Snow Village Holiday Wreath
    Level:
    Beginner
    How-To:
    Decor, Home Decor
    Seasonal Event:
    Christmas

    MATERIALS:

    • Plain Holiday Wreath (or Wreath form and garland)
    • Miniature Houses and Trees
    • Spray Snow
    • Glue Gun
    • Scissors

    INTRUCTIONS:

    1. MAKE THE WREATH: If you are creating your own wreath, cut the garland to fit your wreath form, then wrap the garland around the wreath form and glue the ends together with your glue gun. If you are using a pre-made plain wreath or a live wreath, skip this step.
    2. CONFIGURE YOUR VILLAGE: Once you’ve created your wreath, organize how you want your village to lay out.
    3. BUILD YOUR PLATFORM: Now make the platform to hold the village. Cut a piece of cardboard large enough to hold the pieces you chose. This will be the base. Glue it in place on the wreath, and camouflage it with extra garland and some snow.
    4. ADD SNOW: This the most fun part. We get to make it snow! Use the Spray Snow to cover the parts you want to create the snowy illusion. Have fun!
    Shirley's Guide to Poinsettias
    48 of 67
    Shirley's Guide to Poinsettias
    Guide to Poinsettias
    Level:
    Beginner
    How-To:
    Plant Care, Gardening
    Seasonal Event:
    Christmas, Seasonal

    Current Poinsettia trends:
    Visions of Grandeur" - soft pink and crème
     "Winter Rose Red" - deep red with rose like or geranium flower shape
    "Carousel Red" - has scalloped edges
    "Ice Punch"- red with white frost details
    "Monet"- marbled peach and pink
    *Poinsettia varieties from Armstrong Garden Center:  ArmstrongGarden.com

    How to select a good poinsettia?
    Look for the "flower cluster" (cycathia) and select plant with unopened buds
    Strong, sturdy stems
    Dark green foliage (no yellow leaves)

    How to care for poinsettias at home?
    Indoors, indirect bright light
    Day temps 60-70 degrees, nights 55-65, not lower
    No drafts or direct heat
    Keep moist, don't allow to dry out or oversaturate
    Slit bottom of decorative wrapper so water will drain from plant
    No fertilizer while bracts are in color

    Some great display ideas:
    Combine Poinsettia with complimentary houseplants in a classic, lightweight planter for holiday display
    Add holiday decor and ribbon

    Vickie Howell's DIY Felted Ball Garland
    49 of 67
    Vickie Howell's DIY Felted Ball Garland

    Materials:

    • 1 ball Patons Classic Wool Roving, in desired color(s)
    • 2 yards Bakers Twine, string, or floss
    • Sharp darning needle
    • Scissors
    • Beads or additional embellishments (optional)

    For hand-felt method:

    • Medium-sized bowl
    • Liquid soap or shampoo

    For machine-felt method:

    • Pair panty hose or tights
    • Small rubber bands
    • Ruler or measuring tape
    • Washing machine & dryer
    • Laundry detergent

    Finished Measurements

    Felt ball: Approximately 1"/2.5 cmGarland: 60"/152.5 cm (or desired length)

    Directions to create 25 felt balls:

    1. Cut 20, 5"/12.5 cm strands of roving yarn
    2. Work cut strands in hand to loosen up fibers; smoosh into a yarn blob.
    3. Add a about a pea-sized amount of soap onto yarn blob; roll in your hands to distribute.
    4. Drop blob into hot water. Taking care to ensure water is comfortable for hands, pull blob out of water; vigorously roll yarn blob into a ball
    5. Add more soap and water to yarn ball; continue agitating and rolling ball
    6. Repeat last step until the fibers have melded together. The key to felting is agitation, so don't be afraid to put a little elbow grease into it!
    7. Once you’re satisfied with felt ball; let dry on a towel. Machine-felt version: Prep pantyhose by cutting legs off
    8. Wind yarn into small ball, measuring approx. 1 1/2"/ 3.75 cm --does not need to be perfect!
    9. Place ball into panty hose leg; secure tightly into place with rubber band
    10. Repeat these steps until legs of panty hose are filled with individually tied-off yarn balls
    11. Throw pieces into washer, along with a towel or help the agitation process; wash on hot; dry on hot
    12. Repeat last step until you can feel that the felted balls are now firm.
    13. Cut felt balls out of panty hose.
    14. MAKE GARLAND
    15. Cut approx. 60"/152.5 length of swine or string.
    16. Using darning needle, string felted ball (along with optional beads or embellishments) onto string, knotting string on either side of ball to keep in place.
    17. Repeat last step until garland is finished.
    18. Tie loops on either side of garland to hang.
    19. Return to Episode Guide >>

    Vickie Howell is a designer, author, Creativity Spokesperson for Yarnspirations.com and Host/Co-executive producer of PBS’ Knitting Daily TV with Vickie Howell. For more information on Vickie and her projects, go to: vickiehowell.com and follow @vickiehowell on Twitter.

    DIY Pom Pom Christmas Trees
    50 of 67
    DIY Pom Pom Christmas Trees

    Materials

    • Styrofoam cone
    • Fabric
    • Spray adhesive
    • Scissors
    • Pom Pom trim

    Directions

    • Cut your material in a rectangular shape and wrap around cone at an angle. For more precise measurements you can go online and download a template of a cone shape and cut out and glue.
    • Cut a small circle out of the fabric, this will serve as the covering for the top portion of the cone. Glue to top of cone
    • Depending on your esthetic choice either wrap trim around the cone starting from the bottom up, or cut strips of the trim and adhere to fabric.
    • Set on candlestick holder (use various heights) display and enjoy

    Get more information about this episode >>

    Christmas Countdown Marquee
    51 of 67
    Christmas Countdown Marquee

    Materials

    • Plywood
    • Craft wood
    • 1x3 wood
    • Adhesive letters
    • Drill bit
    • Wood glue
    • Lights
    • Hooks
    • Screws

    Directions

    1. First, if needed all of your wood pieces, sand and put aside

    2. Using wood glue and nails, adhere 1x3s to plywood base. This will create your frame.

    3. Stain or paint as desired

    4. Cut craft wood to fit inside frame and drill holes for hooks

    5. Using drill bit, drill holes to create the opening for the lights. (Be sure to pre-measure to ensure enough holes for the amount of lights you have)

    6. Take your hooks and screw them into the plywood base, make sure to measure out your spacing to fit the craft wood. With so many days until Christmas, make sure I had enough space for 3 plaques.

    7. Add your number to the craft wood and hang them on the hooks.

    8. Spell out your Countdown to Christmas, or whatever phrase you are using.

    9. Plug in your lights and enjoy your countdown.

    Get more information about this episode >>

    DIY Hanging Stars
    52 of 67
    DIY Hanging Stars

    MATERIALS:

    • Cutting mat
    • Craft knife or sharp scissors
    • Ruler
    • Pencil
    • Glitter paper
    • Bone folder
    • Hot-glue gun
    • Ribbon or double side tape for hanging

    INSTRUCTIONS:

    Measure and cut two 20”x 20” squares on your watercolor paper.

    2. Fold one corner to its opposite counterpart. Use a bond folder to help you create a durable fold. Repeat this process with the opposite corners to the ones you just used. You should now have two diagonal fold.

    3. Turn over your piece of watercolor paper and fold in half using your bone folder. Unfold and then repeat to create one horizontal and one vertical fold in the middle of your paper.

    4. Using the folds, you have just created fold into a triangle.

    5. Measure and mark in the center with a led pencil 3 inches up from the bottom. Draw a line from the center to the corners of each side. These will be your cut lines.

    6. Using scissors or a craft knife cute along your marked line.

    7. Unfold the shape and you should now have a star.

    8. Repeat steps 1-7 to create a second star.

    9. OPTIONAL: Should you prefer more texture and cover on your stars then add a coating of glass glitter.

    10. Hot glue gun your 2-star shapes in the center to make it a full star

    11. Trace a triangle onto a sheet of watercolor paper or cardstock. This will help to give the corner of your stars some support. Repeat this 8 times and each one out. Each point of your star should have its own triangle support.
    Using a hot glue gun secure your triangle supports to the back of your star.
    Attach double sided tape or you ribbon, & hang onto the wall.Ta-da!

    DIY Christmas Carolers
    53 of 67
    DIY Christmas Carolers
    DIY Christmas Carolers
    Level:
    Begginer
    How-To:
    Decor, Home Decor, Christmas Decor
    Seasonal Event:
    Christmas, Seasonal

    MATERIALS:

    • Dowels
    • Craft paint
    • Sponge brush
    • Wooden end caps
    • Pipe Cleaner
    • Felt
    • Disk door knob
    • Hot glue
    • Wood round

    INSTRUCTIONS:

    1. Paint all pieces and let dry
    2. Once dry begin assembly ( Wood end caps to dowel, etc)
    3. For Top hat: Take wooden door knob and glue to wood round, once dried glue to head.
    4. Wrap pipe cleaner around dowel several times, let excess become arms
    5. Cut paper and hot glue to hands to create song book
    6. For clothing, cut strip of felt for scarf and with excess material wrap around dowel and glue behind to secure.
    How to Make a Blessing Tree with Ken Wingard
    54 of 67
    How to Make a Blessing Tree with Ken Wingard

    MATERIALS:

    • Grab a branch from the back yard
    • Rocks
    • Jar
    • Bowl of cards or cut out leaves
    • String
    • Crayons

    INSTRUCTIONS:

    1. Get a branch from the backyard, secure it with some rocks in a pretty jar and then lay a bowl of cards or cutout leaves with string and let your guests and kids write what they’re thankful for and hang it from the tree.  
    2. As the day goes on, the tree will get fuller and fuller, You can do this on Thanksgiving, this could be a simple project and stress that it’s something the kids could put together while you’re finishing dinner.
    3. Since it’s Coco’s first Thanksgiving that she will understand, she can help me and explain what Thanksgiving means while we make the tree together.
    DIY Christmas Sweater Clips
    55 of 67
    DIY Christmas Sweater Clips

    Materials

    • Sweater Clips
    • Enamel Pins
    • Chain
    • Jump Rings
    • Jewelry Pliers and Cutters
    • Jewelry Glue
    DIY Christmas Sweater Clips - Home & Family

    DIRECTIONS FOR PERMANENT CLIP

    1. Layout the look you like for each set you before you start assembling.

    2. Cut three different sizes of the chain.

    3. Length of chain could be three to five inches.

    4. Attach each end of your chain to a sweater clip with a jump ring.

    5. Place jewelry glue onto the sweater clip and glue on your object.

    6. Do the same with the other side.

    DIRECTIONS FOR TEMPORARY CLIP

    1. Layout the look you like for each set you before you start assembling.

    2. Cut different sizes of the chain.

    3. Length of chain could be three to five inches.

    4. Attach each end of your chain with an enamel pin

    5. Place on collar

    6. Do the same with the other side.

    Get more information about this episode >>

    Ken Wingard’s Home & Family Holiday Garland
    56 of 67
    Ken Wingard’s Home & Family Holiday Garland
    Holiday Garland
    Level:
    Intermediate
    How-To:
    Decor , Home Decor
    Seasonal Event:
    Christmas , Seasonal

    MATERIALS:

    • Print your sentiments or milestones for the year
    • Cut into strips
    • Double fold each end of strip and cut with a "V"
    • Glue banner onto a barrette
    • Coat with spray glue
    • Add glitter

    Frames:

    • Paint pre-made mini-frames silver
    • Add black and white family photos

    INSTRUCTIONS:

    1. Add snow frosted boughs into garland for extra fullness
    2. Add glue and clear glitter to branches from the yard and add in to create wintery effect
    3. Use a mixture of blue, silver and clear ornaments
    4. Use battery-powered lights
    DIY Christmas Paint Brushes
    57 of 67
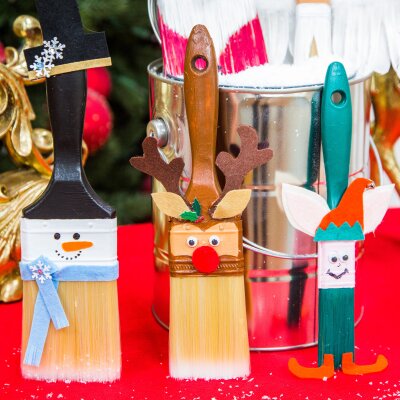
    DIY Christmas Paint Brushes
    DIY Christmas Paint Brushes
    Level:
    Beginner
    How-To:
    Decor, Christmas Decor
    Seasonal Event:
    Christmas , Seasonal

    MATERIALS:

    • Paint brushes in various sizes
    • Acrylic paint in the following colors: white, black, red, brown and any other color you would like.
    • Googly eyes
    • Brown felt
    • White felt
    • Wooden button plugs (1/2” size)
    • Black paint pen or Sharpie
    • Hot glue sticks
    • Glue gun
    • Fabric scissors
    • Artist paintbrush
    • Small White pom poms

    INSTRUCTIONS:

    1. Paint the handle part of your paintbrush solid red. Set aside to dry.
    2. Paint the top part of the bristles white. This will be Santa’s beard. Set aside to dry.
    3. Paint the bottom part of the bristles red in the shape of a “V”. This will be Santa’s jacket. Set aside to dry.
    4. Paint your wooden button red (or mix white and red to make a pink color). This will be Santa’s nose. Set aside to dry.
    5. Take your white felt or furry material and cut it to the size of your silver strip on the paintbrush. Leave a little part of the metal showing, about the size of your googly eyes. Measure all the way around so that all the top of the silver is covered with white fabric.
    6. Add the white fabric to the paintbrush with hot glue. Secure all the way around. This will be the white furry part of Santa’s hat.
    7. Add the googly eyes on the paintbrush for Santa’s eyes.
    8. Add any embellishments that you would like to the hat, like a little piece of holly on the brim and a white pom pom on the top of the hat/handle.
    9. You can leave the handle red, or add white polka dots.
    10. Use these same steps to create a reindeer, a snowman, an angel, or any other Christmas character you would like.
    Shirley Bovshow’s “Fire & Ice” Holiday Living Centerpiece
    58 of 67
    Shirley Bovshow’s “Fire & Ice” Holiday Living Centerpiece
    “Fire & Ice” Holiday Living Centerpiece
    Level:
    Beginner
    How-To:
    Home Decor

    MATERIALS:

    Snowball Planters:

    • Grapevine orbs in different sizes -  (you will cut a hole in orb to insert plant with it's container, so make sure orb is large enough)
    • Bag of Snow batting
    • White gloss spray paint
    • Silver glitter spray paint
    • Wire cutters
    • Glass, acrylic or plastic Christmas tree ornaments and medallions
    • Silver pearls for draping around your orb
    • Glass crafting brick (Michaels)
    • Battery operated tea lights

    Silver & Crystal Platter:

    • White foam board 3/16 thick- select size you want or custom cut (Michaels)
    • Cutting blade
    • Acrylic paint in silver or spray paint
    • Small bristle brush (for texture)
    • Black felt material ( enough to cover backside of platter)
    • Box of assorted size "flat sided" crystals (Michaels)
    • Strong crafting glue for paper and fabric
    • Textured ribbon (for "finishing" outside edge of board)

    INSTRUCTIONS:

    Snowball Planters:

    1. Cut a large opening on top of orb so that you can easily slip your plant with container and plastic saucer inside
    2. Spray paint orb with 2 coats of white paint
    3. Finish orb with 1 coat of silver glitter
    4. Spray paint moss white color
    5. Line inside the orb with a layer of "snow batting" so that it covers all the gaps in the orb
    6. Place your plant and plastic saucer inside the orb
    7. Fill space between your plant container and "snow" with the painted moss
    8. Decorate your Snow Planter with clear and silver colored ornaments- "chandelier" style
    9. Place on top of clear glass brick and insert battery operated tea lights in brick opening

    Crystal Platter:

    1. Cut foam board to desired platter size
    2. Paint 1 side of foam board with silver paint - 2 or 3 coats
    3. Cut and glue black felt materials to back of "platter"
    4. Glue crystals around the top edge of platter or create your own pattern
    5. Spray paint your textured ribbon silver to match color of platter
    6. Glue textured ribbon along the outside perimeter of your foam board to give a finished detail

    Make your arrangement! Now that your snowball planters and silver platter are made, place your glass bricks to elevate planters and display any way you like!

    DIY Keepsake Ornament Tree Display
    59 of 67
    DIY Keepsake Ornament Tree Display
    DIY Keepsake Ornament Tree Display
    Level:
    Advanced
    How-To:
    Decor, Home Decor, Christmas Decor
    Seasonal Event:
    Christmas, Seasonal

    MATERIALS:

    • 1”x 10” board
    • Log slice
    • Cup hook
    • jigsaw

    INSTRUCTIONS:

    1. Draw out tree pattern
    2. Use jigsaw to cut out shape
    3. Sand
    4. Water down paint and brush on. Wipe off excess paint
    5. Screw log onto bottom of tree
    6. Add cup hook to cut out area of tree

    Download Ornament Tree PDF

    DIY Christmas Spool Trees
    60 of 67
    DIY Christmas Spool Trees
    DIY Christmas Spool Trees
    Level:
    Beginner
    How-To:
    Decor, Christmas Decor, Home Decor
    Seasonal Event:
    Christmas, Seasonal

    MATERIALS:

    • Spools
    • Spools
    • Figurines
    • Accessories
    • Hot Glue
    • Ribbon
    • Scissors

    INSTRUCTIONS:

    1. Sort through your trees and accessories to see what you’d like to pair up. (Keeping Smaller trees with smaller spools, etc.)
    2. Wrap ribbon, wrapping paper or sheet music around center of spool and glue.
    3. Glue tree to spool and let dry.
    4. Glue additional accessories to the top of the spool and let dry.
    DIY Jumbo Ornament
    61 of 67
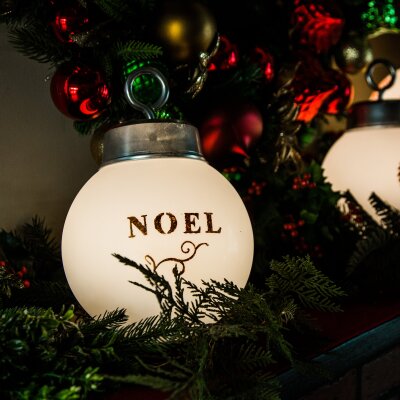
    DIY Jumbo Ornament
    DIY Jumbo Ornament
    Level:
    Intermediate
    How-To:
    Decor, Christmas Decor, Home Decor
    Seasonal Event:
    Christmas, Seasonal

    MATERIALS:

    • Glass globe
    • Deli cup
    • Eye hook
    • Battery operated light
    • Spray frost
    • Stencil
    • Spray paint
    • Craft paint
    • Small wreath or greenery
    • Hot glue

    INSTRUCTIONS:

    1. Insert eye hook into top of deli cup and spray silver
    2. Spray globe with frost.
    3. Attach stencil to globe.
    4. Paint stencil with craft paint and remove.
    5. Place light in the middle of wreath.
    6. Set globe over light.
    7. Attach deli cup with hot glue.
    DIY Lump of Coal Soap
    62 of 67
    DIY Lump of Coal Soap

    Materials for Soap

    • Clear or white melt-and-pour soap base (8 ounces)
    • Powdered activated charcoal (1 teaspoon)
    • Lavender essential oil (3 drops)
    • Cosmetic grade glitter; silver and/or gold could be used (¼ to ½ teaspoon)
    • Wax paper
    • Silicone cube or diamond molds
    • Cutting board
    • Kitchen knife
    • Microwave
    • Microwavable bowl
    • Spoon

    Materials for Packaging

    • Stamp kit to create “naughty” “nice” stamp
    • Brown treat bags
    • Ribbon
    • Red permanent marker

    Directions for Soap

    1. Working in small batches, chop up some of the soap into small pieces.

    2. Place in a microwave safe bowl.

    3. Microwave in 30 second increments, mixing after each 30 seconds, until completely melted.

    4. Stir the charcoal, lavender (or whatever fragrance of choice) and glitter into the melted
    soap; mix well.

    5. Sprinkle the molds with the glitter.

    6. Pour the melted soap into the molds and allow to cool.

    7. Remove from molds and cut pieces off using the knife to create and imperfect “coal” shape.

    8. Melt down the pieces that were cut (and add more pieces of cut soap if needed) and quickly
    dip the large pieces of soap into the melted soap; this is optional but can create a more “coal”
    like shape.

    9. Place on wax paper and allow to dry.

    Directions for Materials

    1. Stamp the words “naughty” and “nice” onto the bag

    2. Use the red permanent marker to circle the word “naughty”

    3. Fill with the “lump of coal” soap and seal with a sticker or ribbon

    Get more information about this episode >>

    DIY Holiday Pins and Brooches
    63 of 67
    DIY Holiday Pins and Brooches

    Materials

    • Felt (Red, White, Etc.)
    • Scissors
    • Hot Glue
    • Brooch/Pin
    • Embellishments
    • Pen

    Directions

    1. Trace your flower petals onto the felt. It should look like a leaf or teardrop
    2. Cut out 5 pieces of red felt that looks like a leaf. Leave room for a stem.
    3. Glue these pieces together by connecting the bottom of each together using hot glue. This will be the base of the flower.
    4. Cut out another 5 pieces. This will be the top of the flower.
    5. Cut a slit in the bottom/stem of the leaf shaped petal
    6. Pinch the bottom of the leaf together and hot glue. Repeat for all pieces.
    7. Glue these petals on top of the flat base
    8. Glue 3 beads in the center of the flowers.
    9. For the white flower cut out 5 leafs with a longer stem
    10. Cut a slit in the bottom of the petal
    11. Pinch together and hot glue
    12. Hot glue all 5 stems together

    Get more information about this episode >>

    Christmas Cactus with Shirley Bovshow
    64 of 67
    Christmas Cactus with Shirley Bovshow

    About flowering Christmas Cactus:

    • Schlumbergia is a small genus of cacti family with only 6 species native to jungles of Brazil
    • Grows on tree limbs instead of soil and has no spines
    • Flowers bloom at end of stem in many colors
    • Is a succulent but needs more water, less sunlight and less heat than most succulents

    How often does the Christmas Cactus bloom?

    • Christmas cactus varieties can begin blooming as early as October through early January
    • Plant requires "short days of sunlight" and "long" nights of darkness 12 hours plus in order to bloom
    • Plant sets flower buds when temperatures are between 55-65 degrees

    Do you have to move your plants to a dark room at night to encourage blooming?
    Yes, or try this technique:

    • Christmas Cactus needs COMPLETE darkness for 12 hours daily in order to bloom
    • Cover your plant with a paper bag (SHIRLEY DEMONSTRATES) around dinner time and take off in the morning
    • Start this routine 4 to 6 weeks before you want plant to bloom to force flowering for Christmas time
    • Make sure room is between 55 and 65 degrees

    What other care does it need?
    It’s not really a big maintenance plant; it’s just in need of some specifics and it will take care of itself.

    • Place in bright room but away from direct sunlight or outdoors in shady patio during summer
    • Place away from cold drafts and heating vents
    • Well draining soil
    • Water when soil BEGINS to feel dry on surface- likes humidity
    • No fertilizing during flowering

    How long will a Christmas Cactus live?

    • With proper care:
    • Long-lived plants 30- 50 years
    • Popular "legacy plant" that is passed down generation to generation

    How do you share Christmas Cactus?
    With cuttings!  Cut pieces of your cactus off and share with your family to continue the legacy of the Christmas Cactus!

    • Cut a 3 or 4 "cladodes" or sections
    • Stick in rooting hormone
    • Place in well draining soil
    • Water and keep moist until it roots
    • Give your Christmas Cactus away!

    Watch the Video >>

    Return to Episode Guide >>

    Check out Shirley Bovshow’s Garden Designing Expertise at EdenMakers.com, and follow her on Twitter @EdenMaker.

    Get more great recipes and crafts by visiting us on Pinterest at pinterest.com/homeandfamilytv and follow "Home & Family" on Twitter @homeandfamilytv and Facebook. Plus, check out our YouTube channel for backstage videos.

    DIY Snowglobe Magnets
    65 of 67
    DIY Snowglobe Magnets

    Materials

    • Tin containers
    • E6000
    • Ribbon
    • Fake Snow
    • Scrapbook paper
    • Accessories

    Instructions:

    1.Take your tin and using the lid as a guide, draw a circle on either your scrapbook paper or your photo.

    2. Cut it out and glue it to the inside base of the tin.

    3. Add your fake snow then seal the lid tight with super glue or E6000.

    4. You want to use E6000 to attach the magnet and allow for 24 hours of dry time.

    5. Once dried attach to either a magnetic strip or board or even your fridge.

    Get more information about this episode >>

    Ken Wingard’s  Random Acts of Kindness Advent Calendar
    66 of 67
    Ken Wingard’s Random Acts of Kindness Advent Calendar

    Materials:

    • Large picture frame
    • Foam core board
    • Fabric
    • 24 wood Christmas ornaments
    • 24 Hangtags
    • 24 clothespins
    • Twine
    • Silver paint
    • Glitter
    • Spray glue
    • Staple gun

    Directions:

    1.   Lightly spray foam core board with glue

    2.   Cover with fabric, press evenly

    3.   Tape cloth board into frame with staple gun, put staple on back of frame

    4.   Tie twine to staple, do same on other side

    5.   Do 4 twine strips which can hold 6 hangtags

    6.   Spray paint wood ornaments

    7.   Apply glitter

    8.   Number the hangtags

    9.   Write “Random Acts of Kindness” on back of hangtags

    10.  Clip each hangtag & ornament to twine   

    Visit Ken Wingard at www.KennethWingard.com and follow him on Twitter @KennethWingard.

    Get more great recipes and crafts by visiting us on Pinterest at pinterest.com/homeandfamilytv and follow "Home & Family" on Twitter @homeandfamilytv and Facebook. Plus, check out our YouTube channel for backstage videos.

    Return to Episode Guide >>

    Astro Weenie Christmas Tree
    67 of 67
    Astro Weenie Christmas Tree

    List of AWCT edible possibilities:

    • Pickles
    • Olives
    • Baby Corn
    • Maraschino Cherries
    • Carrot sticks
    • Celery sticks
    • Broccoli
    • Cauliflower
    • Radishes
    • Pineapple chunks
    • Grapes
    • Kumquats
    • Crab apples
    • Donut holes
    • Swedish Meatballs
    • Fresh shrimp
    • Cheese chunks
    • Cheeto balls
    • Gummy Bears
    • Grape tomatoes

    Directions for Assembly:

    1. Cover Styrofoam cone with tin foil.
    2. Smear the bare bottom of the cone with peanut butter to “glue” it to the plate.
    3. Begin tooth-picking fruits, veggies or just about anything else you can stick a toothpick through and into the Styrofoam. Be creative!
    4. Admire and then…dig in!

    What bite size edibles to put on your AWCT?
    Your AWCT can be sweet or savory, and just about anything will work as long as it’s edible! Don’t forget the most important ingredient of all: the cocktail weenies!

    Helpful hint #1: Make sure anything that comes in a can or jar is drained OVERNIGHT before putting on the tree. You don’t want a soggy tree.

    Helpful hint #2: If your want your AWCT to flame, simply stick birthday cake candles into the cocktails weenies. Have a friend help you light them just before presentation.

    Helpful hint #3: For a star tree topper, use either a cross cut of star fruit (if you can find one) or cut one out of a yellow bell pepper.

    Return to Episode Guide >>

     
    Charles Phoenix is a performer, humorist, chef and author. In his live shows, videos, media appearances and books, the self-proclaimed “retro daddy” explores America’s classic and kitschy pop cultural past and present, and predicts retro-inspired future trends. Fans enjoy his unique spin and genuine reverence for all things Americana, trust his guide to attractions from coast to coast. CharlesPhoenix.com

    Get more great recipes and crafts by visiting us on Pinterest at pinterest.com/homeandfamilytv and follow "Home & Family" on Twitter @homeandfamilytv and Facebook. Plus, check out our YouTube channel for backstage videos.

    ADVERTISEMENT
    ADVERTISEMENT
    ADVERTISEMENT