Make gifts more personal with something handmade! Try your hand at making jewelry, cute Christmas soap, or one of a kind candle. Add a little more to that bottle of Hallmark wine or curate a box with gifts for your hostess. The possibilities are endless, take a look at some of our picks and put your own spin on it! You can even craft while you watch all-new Countdown to Christmas movies!
DIY Holiday Gifts

Materials
- White soap block
- Clear soap block
- Soap Mold
- Soap Fragrance
- Soap Colorant
- Soap injector tool
- Soap clean up tool
Directions
- Take your soap injector & cut off the tip to make the hole bigger
- Then take your white soap & & chop it up
- Put chopped soaps into container & put in microwave for 30 second intervals
- Pull out when finally melted
- The temperature of the soap should be between 130 degrees & 140 degrees
- Spray rubbing alcohol into the mold cavity
- Use the injector tool & fill up the mold details of the snowflake & the gingerbread man
- If you splash some of the soap elsewhere or outside of the line, let it dry just a little & scrap off mistakes with the clean up tool
- Let the details dry for about 10 minutes
- Now it’s time to create the rest of the soaps
- Cut your clear soaps up & then separate into 3 different containers
- Take your container & melt your soap in the microwave
- Once melted chop off small chunks of your brown soaps, blue soaps, & green soaps
- For the first container put in your brown soap coloring & then stir
- Do the same for the blue & green soaps
- Spray mold with rubbing alcohol & pour brown soap into the gingerbread man
- Pour your blue coloring into the snowflake mold
- Pour your green coloring into the tree mold
- If you have any bubbles just spray with rubbing alcohol & they’ll disappear!
- Let soaps dry for about 3 hours or until completely cooled & hardened
Check out these out! bath fizzies, candy cane soap, bath bombs

Materials
- Leather Material
- Flat Jewelry Wire
- Rotary Blade
- Clear Ruler
- Hoop Earrings
Instructions:
- First you want to make your fringe. Lay out your leather fabric & decide how long you want your fringe to be & then double that. For example, if you want it to be about 3 inches, then measure out 6 inches because this is all going to be folded in half when it gets onto the earring.
- Using a ruler, take your rotary blade & cut right down along with the ruler. Make the fringe about ¼ inches wide.
- Make as much fringe as you want .
- To attach onto the earring -take individual fringe & just wrap it around the hoop, part in front & part in back. Then you’re going to take jewelry wire & clamp it down to secure it all together.
- The alternative option is to take individual pieces of fringe & just slip knot them over the earring.
- Ta-da!
Try making some tree earrings, ornament earrings, find a place to hang your jewelry, make a beautiful agate stone necklace

Materials
- Wine glass charm rings
- Beads
- Charms
Directions
- Open wine ring.
- Thread half of the person’s name through using letter beads.
- Half way between name add a Christmas charm.
- Finish threading the name through.
- Clasp in place.
TIP: A cute way to gift the wine charms is by cutting circles into holiday colored craft paper. Then, print out a cute message on card stock and cut a slightly smaller circle around the message. Glue the message to the craft paper and cut a hole at the top. Slip a ribbon through the hole and slide on wine charm and tie in a bow. Now you have an easy and adorable way to gift them!
Gift some wine with these adorable wine beanies!

Materials
- Pre-cut wood squares
- Wood glue
- Clamp
- Hand saw
- Drill
- Beeswax coating
- Rag
- Candle
- Sandpaper
Instructions
- Stack pre-cut wood pieces together with wood glue.
- Use a clamp to fuse together.
- Let dry (approx. 1hr).
- Use a hand saw to shave off desired edges creating a geometric shape.
- Drill a hole on top for the candle or votive.
- Sand candle holder.
- Rub on beeswax coating.
- Let dry for approx. 15minutes.
- Add candle.
- Enjoy!
Give a little more spark to your candles! Christmas candles, music sheet candles
Learn how to make candles!

Materials
- Gass Jar
- Cookie Cutter
- Pencil
- Scissors
- Enamel Paint
- Sponge Brush
- Puffy Paint
Directions
- First, we are going to create the little shape that isn’t painted. This allows you to see what’s inside the jar! This is the really fun part because you can literally customize it how you’d like. I like to use cookie cutters as a template. All you need to do is take your cookie cutter, or an image that you printed online, and trace it onto label paper. Once you trace the image, cut it out using a pair of scissors. Peel off the back and stick it in the center of the jar, making sure to press hard around the edges so paint doesn’t creep in.
- For glass you should use enamel paint. You’re going to want to paint this on with a sponge brush. Once you’re done painting, carefully remove label. Then you’re going to want to place jar in oven to cure, just like clay would. Follow instructions on the back of the paint bottle in order to know what temperature and how much time.
- Now for the fun part-to add the detailing. This is really where you can get creative. Just take some puffy paint and get creative.
Save more cookies for Santa with these cookie canisters!

MATERIALS:
- Wood rounds
- Stencils
- Drawer pulls
- Drill
- Adhesive spray
- Paint
INSTRUCTIONS:
- Take your stencil & spray it down with adhesive spray. This way it will stick to the board a bit & prevent moving.
- Chose where you'd like to place you stencil & then start filling in the stencil with acrylic paint.
- Once it you've stenciled in your lettering & designs & it's dry, use some spray on glaze to give it a nice seal.
- Once that is all dry it is time to attach your handles.
- Drill in 2 little hole with a drill & drill bit.
- Then screw in your drawer pull handles & you're good to go.
Try making these beautiful resin Christmas trays!

MATERIALS:
- One gallon fish bowl (glass or plastic)
- Fake snow
- Glue gun and glue sticks
- Super glue
- Scissors
- Craft knife
- Miniature Christmas trees
- White foam core
- Ribbon (optional)
- Family photo
- Printer
- Spray Adhesive
- Photo paper
- Wood rounds just slightly bigger than the opening of your fish bowl
INSTRUCTIONS:
- Take a family photo that you want to use and print it on photo paper. You will want your picture to be about 2/3 of the size of your fish bowl, so enlarge or decrease the size of your picture depending on the size of your glass fish bowl.
- Cut out your family figurines with scissors. Since we want to make it look like your family is in the snow with the trees, you want to make sure you cut out all background on your pictures.
- Take your cut-out picture and spray adhesive on the back.
- Attach it to the foam core. TIP: You can use gloves or a paper towel on top of the picture so that you don’t get fingerprints on it and it stays clean.
- Glue your family picture to the wood round with a lot of hot glue. This will be covered with snow so it doesn’t have to be perfect.
- Add little miniature trees and décor to create your own little snow globe scenes.
- Once you love the configuration, glue the items into place with hot glue.
- Let the glue set up and move over to your fish bowl. Turn it right side up and fill about 1/3 of the way up with fake snow.
- Keeping the bowl right side up, add a bead of glue all the way around the rim.
- Take your wood round and place it on top of the bowl and hold it in place (upside down) until it adheres.
- Turn the entire structure over and let the snow fall where it may! Voila! You have a Family Portrait Snow Globe!
Feature your kid's artwork!

MATERIALS:
- Sew-in fabric sheets
- Potholder
- Sewing machine or needle and thread
- Scissors
- Embellishments
INSTRUCTIONS:
- Cut pocket sleeve for potholder (dimensions will vary depending on potholder).
- Hem the pocket sleeve.
- Double roll edges of the pocket sleeve.
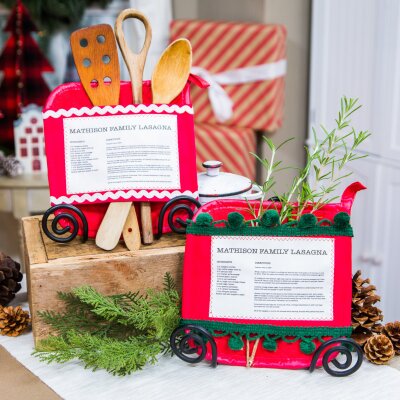
- Print out your recipe on sew-in fabric sheets.
- Cut out recipe to mimic a recipe card and add to the pocket sleeve.
- Add a zigzag stitch around the recipe.
- Add the sleeve across the center of the potholder. Roll over the edges of the potholder and stitch to get a clean front.
- Add embellishments.
Make some Pointsetta pillows or Gnomes pillow covers!
Get more from this episode >>

Materials
- Christmas Sweater
- Needle and thread
- Chalk
- Paper
- Scissors
- Fabric- Tac
- Christmas Embellishments
Instructions:
- Trace your hand on paper, creating pattern Add ½ inch for seam allowance.
- Place Pattern on sleeve of sweater.
- Fold Sweater inside out.
- Hem finger opening.
- Pin face to face.
- Sew hem and thumb with needle and thread.
- Flip inside out
Create more gifts to snuggle in! Christmas slippers, Christmas socks

MATERIALS:
- Rattan reeds
- Dried flowers
- Narrow neck, glass bottle preferably in a dark color
- Natural reed diffuser base
- Essential oils
- Funnel that fits into the bottleneck
- Floral tape
- Scissors
INSTRUCTIONS:
- Measure how much of each liquid is going into the bottle. Funnel the liquid into the bottle as you measure each. Fill with 2 oz of liquid total. Use 1 ¾ oz of base and ¼ oz essential oil.
- Place the rattan reeds into the bottle.
- Create a bouquet of the dried flowers and wrap the stems together with floral tape. Place the dried flowers into the bottle.
- Repeat steps 1-3 to create as many diffusers as you’d like.
- After a day flip the rattan reeds over so the aroma emanates and enjoy!


