Share

Get Creative with Home & Family's Activity Center Recipes & DIYs

DIY Christmas Photo Op
1 of 50

MATERIALS

  • Foam core
  • X-acto knife
  • Crayola quick dry paint sticks
  • Crayola glitter glue
  • Embellishments
  • Black marker
  • Pencil
Christmas Photo Op - Home & Family

DIRECTIONS:

  1. Trace your holiday character onto your sheet of foam core with pencil.
  2. Outline it with a black marker.
  3. Have an adult cut out the hole for face to pop through with X-Acto knife.
  4. Paint the character using Crayola quick dry paint sticks.
  5. Add embellishments (pom-poms, bells, Crayola glitter glue, etc.)
  6. Take your photos!
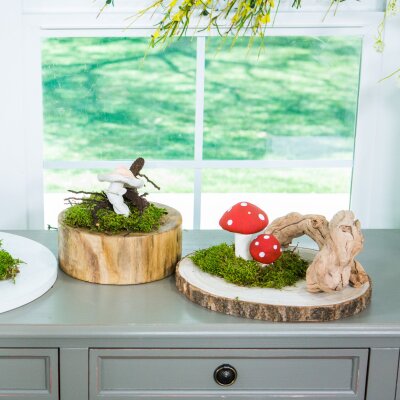
DIY Woodland Cloches
2 of 50
DIY Woodland Cloches
Level:
Easy
How-To:
Home Decor
Seasonal Event:
Spring

MATERIALS:

  • Crayola model magic
  • Acrylic paints
  • Paint brushes
  • Wood pieces
  • Moss
  • Wood round
  • Glue
  • Cloche

DIRECTIONS:

  1. Create a ball using Crayola model magic.
  2. Place thumb in center of the ball and push down.
  3. Full the edges around to create a mushroom cap.
  4. Roll the mushroom stem between hands using Crayola model magic.
  5. Place the cap onto the stem.
  6. Keep the mushrooms simple or add little details.
  7. Take pieces of wood and hot glue to the wood round.
  8. Add the mushrooms and moss using hot glue. There is no wrong way to do this…be creative!
  9. Cover your creation with a glass cloche.
DIY Drip Dye Flowerpots
3 of 50
DIY Drip Dye Flowerpots
Level:
Easy
How-To:
Outdoor Decor, Home Decor
Seasonal Event:
Spring

MATERIALS:

  • Crayola acrylic paint
  • Flowerpot
  • Disposable cups
  • Craft sticks
  • Water

INSTRUCTIONS:

  1. Pour a single color of paint into a smaller plastic cup. Add white, black or another, complementary color to create new shades. If your paint is too thick, add 1 tsp of water to thin it out.
  2. Protect your work surface with recycled newspaper before placing a small plastic cup in the center. Make sure your cup fits inside the opening of your flowerpot. Place your flower pot on top of your cup, upside down.
  3. Pour paint around the edges of your flowerpot to create a drip dye effect. TIP: Vary the colors to create a marbled effect.
  4. Let dry completely before picking up and removing the cup. Add flowers, stationery or other items for a colorful piece of decor. Enjoy!
DIY Colored Pencil Holders
4 of 50

MATERIALS:

  • 4” x 4” wooden block
  • Crayola signature acrylic paint
  • Crayola glitter markers
  • Drill
  • Drill bit to width of pencils; ¼” or 8mm
  • Masking tape
  • Pencil
  • Ruler or speed square
DIY Colored Pencil Holders - Home & Family

INSTRUCTIONS:

  1. Use a pencil and ruler or speed square to draw a grid on top of the block. Space these about ¾” apart. You’ll end up with a total of 16. PRO TIP: This can be made with any size block this is just good for average desktop use.
  2. Use hold a pencil up to the block to determine the depth you want them to sit somewhere between 2-3” works best for this size block.
  3. Place tape around the drill bit at the depth for the pencils you desire as a stop for yourself.
  4. Drill the holes for the pencils. Make sure not to drill past the tape line.
  5. Time to decorate! Draw the design in pencil onto the face of the block.
  6. Paint the design in using Crayola signature paints. Allow to dry.
  7. Add glitter details if desired with the glitter pens.
  8. Allow to dry.
  9. Organize your pencils, place on desk and enjoy!
DIY Canvas Paint Pour
5 of 50
DIY Canvas Paint Pour
Level:
Intermediate
How-To:
Kids, Home Decor

DIY Canvas Paint Pour - Home & Family

MATERIALS:

  • Crayola Acrylic Paint Set, Crayola Tempera paints or Crayola Paint Pour Kit
  • Canvas
  • Paint pouring medium
  • Silicone oil or other available oil
  • Deli cups medium and large
  • Large popsicle or stir sticks
  • Plastic sheeting

OPTIONAL:

  • Disposable gloves

INSTRUCTIONS:

  1. Cover your work area with plastic sheeting for easy cleanup.
  2. Set out medium deli cups, one for each color. Pour paint pouring medium into each deli cup until they are about halfway full.
  3. Pour a paint color into each deli cup of pouring medium, enough to create the color you’d like.
  4. Mix each color of paint into the medium thoroughly.
  5. If desired, mix some oil into to the colors to achieve a bubbly marble effect. Mix thoroughly.
  6. Pour layers of each color mixture into a large deli cup. Do not mix.
  7. To pour the paint on the canvas, place the canvas face down onto the top of the large deli cup then flip the canvas over while holding onto the cup. Remove the cup and watch the paint flow out!
  8. Move the canvas around to spread the paint until the entire surface is covered.
  9. Lay the canvas flat to dry for 24 hours, hang as desired and enjoy!

Get more from the episode >>

DIY Three Wise Men
6 of 50
DIY Three Wise Men
Level:
Beginner
How-To:
Kids, Home Decor, Christmas Decor
Seasonal Event:
Christmas

DIY Three Wise Men - Home & Family

MATERIALS:

  • Various wooden finials, candlesticks or turned wood pieces
  • Crayola signature acrylic paint set
  • Crayola signature pearlescent paint markers
  • Artist paintbrushes
  • Hot glue gun and glue sticks, wood glue or e6000
  • Optional:
    • Additional white paint

INSTRUCTIONS:

  1. Stack the wooden pieces to create the shape of the body, head and hat for each wise man.
  2. Glue the pieces in place. Hot glue will work well, but for a long-lasting strong hold use a more heavy-duty glue, like wood glue or e6000. Allow the glue to dry before painting. Wood glue or e600 will need about 24 hours to set all the way.
  3. Add a basecoat of white paint to the entire surface of each wooden stack. Allow to dry.
  4. Paint the base colors for the clothes and face using the Crayola signature acrylic paint set, allow the paint to dry. PRO TIP: Mix paints together to create custom colors. Adding a pinch of black to darken and white to lighten.
  5. Paint on the hair and face details as well as the hands and any other details you’d like with the acrylic paint.
  6. Add intricate details like the whites of the eyes and metallic elements with the Crayola signature pearlescent paint markers. Make sure the paint is dry before you apply the markers. Allow the paint from the markers to completely dry.
  7. Arrange into your décor and enjoy!

Click here for more Christmas crafts

Get more from the episode >>

DIY Christmas Care Package
7 of 50
DIY Christmas Care Package
Level:
Beginner
How-To:
Gifts
Seasonal Event:
Christmas

Share More Merry: DIY Christmas Care Package - Home & Family

MATERIALS:

  • Large box
  • Giftwraps of your choice
  • Scissors
  • Double stick tape or regular tape
  • Marker for writing notes on box
  • Ruler
  • Family photo prints

EXTRA SPECIAL BOX ITEMS:

  • Stocking (use glitter glue to add name to stocking!)
  • Stocking stuffers- candy, snacks, socks, silly toys, fun masks or anything recipient would like
  • Wish marble – big shooter marble – can find online or in toy store
  • Mini tree, tree skirt, tree topper, garland, battery operated light string – include batteries, mini ornaments of your choice

INSTRUCTIONS:

  • Select a box large enough for all your goodies!
  • Measure box and cut giftwrap to cover the inside flaps and into the box
  • Adhere with tape
  • Decide placement of family pics and adhere with tape
  • Write messages on box – have each family member write a message
  • Now box is ready to fill!
  • First put wish marble in the toe of the stocking with note (download Tammy’s wish marble template here)
  • Then fill stocking with goodies
  • Now put the mini tree and all the accessories in the box
  • Close up the box and address it!
  • Ready to take to post office

Click here for more Christmas crafts

Get more from the episode

DIY Ornament Door Hang
8 of 50
DIY Ornament Door Hang
Level:
Intermediate
How-To:
Home Decor, Christmas Decorations
Seasonal Event:
Christmas

Share More Merry: DIY Ornament Door Hang - Home & Family

MATERIALS:

  • Crayola vivid cardstock or color pop cardstock
  • Foam core
  • Spray adhesive
  • Crayola blending markers
  • Crayola paint brush pens
  • Crayola glitter markers
  • ¼” wide decorative ribbon
  • X-acto knife
  • Cutting mat
  • Wire
  • Wire snips
  • Twine
  • Tassels
  • Jingle bells
  • Hot glue gun and glue sticks

INSTRUCTIONS:

  1. Draw out the design of a vintage ornament onto the foam core. You can print something off of the internet to trace if you’re not comfortable drawing freehand.
  2. Cut the foam core to the shape of the ornament with an x-acto knife on a cutting mat.
  3. Apply spray adhesive to one side of the foam core. Place the sticky side face down onto a piece of fun colorful cardstock, if it has a pattern on one side that you want to use, have the cardstock placed pattern side down so you’re adhering to the back of it.
  4. Cut the cardstock to the edge of the foam core with an x-acto.
  5. Attach some ribbon around the edge of the foam core with hot glue to finish the edges.
  6. Add decorative patterns and details with markers as desired.
  7. Create the ornament cap by using the crayola glitter markers to color a piece of paper silver or gold. Add an excess of marker color and smudge with your finger to blend. Cut to the shape and size of an ornament cap for your ornament.
  8. Adhere the ornament cap to the front of the ornament at the top with hot glue.
  9. Cut and bend a piece of wire to act as the ornament hook. Glue it to the back of the ornament at the top.
  10. Add any decorative elements to the bottom of the ornament you’d like jingle bells or tassels with a little twine and some hot glue.
  11. String some twine through the hook of the ornament to hang it from.
  12. Repeat steps 1-11 to create as many ornament door hangers as you’d like then, hang and enjoy!

Click here for more Christmas crafts

Get more from the episode

Holiday Pillowcases
9 of 50
Holiday Pillowcases
Level:
Beginner
How-To:
Kids
Seasonal Event:
Christmas

Holiday Pillowcases - Home & Family

MATERIALS:

  • White or light color pillowcase, either 100% cotton or poly-cotton blend
  • Crayola take note permanent markers
  • Felt in desired colors
  • Fabric glue
  • Provided templates
  • Scissors
  • Tape
  • Fabric scissors
  • Chalk
  • Cardboard or foam core cut to size of pillowcase
  • Iron

INSTRUCTIONS:

  1. Wash your felt to remove any excess dye and pre-shrink. Set aside to dry.
  2. Print the template you’d like to use on tile setting, cut out and tape it together. PRO TIP: if creating the elf hat, the pointed brim of the hat should be cut separately from the hat because it’s a different color.
    1. Antlers Template
    2. Elf Hat Template
  3. Trace each template onto desired color of felt then cut out each piece with fabric scissors.
  4. Iron the pillowcase to remove any creases
  5. . Slide the cardboard piece into the pillowcase.
  6. Use your Crayola take note permanent markers to write your child’s name on and draw Christmas lights, snowflakes or any other details you’d like onto the pillow.
  7. Glue the antlers or elf hat on in place with fabric glue.
  8. Allow the fabric glue to dry for 24 hours and enjoy!

For more inspiration & project ideas visit: Crayola.com/Crafts

Get more from the episode

DIY Turkey Place Settings
10 of 50
DIY Turkey Place Settings
Level:
Beginner
How-To:
Kids
Seasonal Event:
Thanksgiving
For more inspiration & project ideas visit Crayola.com/Crafts.

MATERIALS:

  • Crayola model magic in brown, orange, red green and yellow
  • Pipe cleaners
  • Googly eyes
  • Crayola signature sketch & detail dual ended markers
  • Scissors
  • Crayola construction paper
  • Crayola signature gel pens

TO CREATE THE CORNUCOPIA NAPKIN FOLD:

  • Napkin
  • Tissue paper in yellow, orange, red and green
  • Twine or decorative ribbon
  • Scissors

INSTRUCTIONS:

  1. For each place card holder, roll brown model magic into 1 medium and 1 small ball. Attach to create the body and face of the turkey.
  2. Flatten model magic in a variety of colors to create feathers. Attach to back of turkey.
  3. Place 2 googly eyes on the face.
  4. Attach small, triangular piece of orange model magic to create a beak under the eyes.
  5. Attach small, wavy piece of red model magic to create the wattle under the beak.
  6. Bend a small section of a pipe cleaner and push into the body of the turkey to hold the place card. Dry overnight.
  7. For each place card, cut a small rectangular piece of construction paper. Use markers to write each name and gel pens to add flourishes.
  8. Place the name tag into the pipe cleaner stem to finish the place card.
  9. Repeat steps 1–8 for all your guests, set on your thanksgiving table and enjoy!

TO CREATE THE CORNUCOPIA NAPKIN FOLD:

  1. Fold the napkin in half, then in half again.
  2. Fold into a cone shape, with the folded edges at the bottom.
  3. Tie ribbon or twine around the napkin. Tie in a bow.
  4. Stuff with thanksgiving colored tissue paper and flatware.
  5. Set on each place setting and enjoy!

For more inspiration & project ideas visit:

Crayola.com/Crafts

Get more from the episode

Check out these pie garland and placemats to make with the kids!

DIY Stamped Trinket Bowls
11 of 50
DIY Stamped Trinket Bowls
Level:
Beginner
How-To:
Fashion, Home Decor

MATERIALS:

  • Crayola airdry clay
  • Rolling pin
  • Rubber stamps
  • Dish or bowl to size and shape you want bowl to be
  • X-acto knife
  • Bowl with water
  • Crayola acrylic paint
  • Paintbrushes
  • Crayola liquid metal craft markers
  • Non-stick work surface like wax paper or silicone mat
  • Optional:
    • Crayola diy trinket dish craft kit
    • Clear sealant

INSTRUCTIONS:

  1. Roll the clay out into a slab on a non-stick surface like wax paper or silicone sheet.
  2. Stamp the clay with stamps in desired design or pattern.
  3. Place the bowl or dish on top and use an x-acto knife to cut to size and shape of the dish. Pull away the excess clay from the shape you cut.
  4. Smooth the edges of the shape. Dip your finger in the water and run it along the edge until it reaches desired smoothness.
  5. With the dish upside down, drape the slab face-down on the dish to dry to form. Allow to dry according to instructions.
  6. Paint the trays as desired, mix the Crayola paints together to create a custom color or add water to create a wash which will give a translucent layer of color. Allow the paint to dry.
  7. Add a metallic rim to the dish using the Crayola liquid metal markers. Allow to dry.
  8. For a shiny, protective coat add a clear sealant. Allow to dry according to instructions and enjoy!
DIY Haunted House
12 of 50
DIY Haunted House
Level:
Intermediate
How-To:
Decor
Seasonal Event:
Halloween

DIY HAUNTED HOUSE MATERIALS:

  • Crayola acrylic paint
  • 2 large cardboard boxes
  • 2 medium cardboard boxes
  • 2” wide Halloween ribbon
  • 1” wide Halloween ribbon
  • Crayola construction paper
  • Crayola model magic
  • Crayola crayons
  • Decorative Halloween ribbon corsage or small faux pumpkin, faux leaves and wired ribbon
  • Masking tape
  • Yard stakes
  • Paintbrushes
  • Hot glue gun and industrial glue sticks
  • Ruler
  • Pencil
  • Box cutter

DIY HAUNTED HOUSE INSTRUCTIONS:

  1. To create the house, you need a total of 3 boxes; 2 large and 1 medium. Use a box cutter to open the boxes and attach them together use masking tape and some industrial hot glue. You want to make sure this is sturdy! PRO TIP: You can use yard stakes to really keep it in place by attaching them to the inside vertically.
  2. Create the roof by cutting a medium-sized box and attach it to the top of the boxes with tape and glue.
  3. Once the house is built, use a ruler and pencil and draw the door.
  4. Take the box cutter and cut out the door’s top and one side so that the other side acts as a hinge.
  5. Paint the house. You can mix the acrylic paint to create the pretty purple. Start with the original Crayola purple paint and then add white to make a softer shade. Allow the paint to dry.
  6. Add the shingles to the roof. Tape pieces of black construction paper on in rows from the bottom edge up to the top of the roof on each side. The spacing doesn’t have to be perfect, it’s fun to have some variety for a quirky Halloween look.
  7. Use construction paper to create windows and shudders on the house by using glue to attach them. Cut a piece of yellow or orange paper into four sections and space them about 1” apart so it appears there is a windowpane.
  8. Draw and cut out a paper ghost to add in the window if desired, glue to attach.
  9. Add the ribbon trim. Glue the 2” ribbon on the vertical corners of house. Glue the 1” ribbon to trim the edges of the door.
  10. Spell your child’s name or a spooky phrase in crayons on the door. Break them if to create the shapes of letters you need if necessary. Hot glue to attach.
  11. Glue the decorative Halloween corsage on as the topper. If you weren’t able to find one to purchase create your own out of a faux pumpkin, faux leaves and ribbon then glue on.
  12. To create the spiders, roll out all your pieces using Crayola model magic first. Two balls in black, one bigger than the other. Roll out eight, ½” thick legs for the spider. Then two eyeballs in white and add a small black flat oval on top as the pupils.
  13. Assemble the spider and allow to dry according to directions, once dry attach them to the house using hot glue.
  14. Add extra fun details like spider webbing, pumpkins around and enjoy!

Get more from the episode

DIY Pine Cone Trees
13 of 50
DIY Pine Cone Trees
Level:
Beginner
How-To:
Home Decor
Seasonal Event:
Christmas

DIY Pine Cone Christmas Trees - Home & Family

DIY PINE CONE TREES MATERIALS:

  • Pinecones
  • Hot glue gun and glue sticks
  • Faux berries, small jingle bells or pom poms
  • Wooden rounds
  • Mason jars
  • Mod podge and fake snow or snow-tex
  • Small wooden stars

DIY PINE CONE TREES INSTRUCTIONS:

  1. If you want to use pinecones from outside, look for ones with a flat bottom so they are easier to attach. Bake them in the oven at 200 degrees on a lined baking sheet for about an hour or so to get rid of any pests. Watch them so they don’t burn.
  2. Adhere chosen adornments to the pinecones with hot glue. If using faux berries, clip off the berries from the stems using wire cutters.
  3. Attach the pinecone to the base, either the wooden round or jar lid with hot glue. To create a snowy scene, glue multiple pinecones onto the base.
  4. Add snow to the trees and base if desired. Use a paintbrush to apply mod podge to the edges of the pinecone and anywhere around the base that you want to be “snowy” then pour the fake snow over the pinecone and base wherever there is mod podge. Allow the mod podge to dry completely and shake off any additional snow that didn’t stick. PRO TIP: You can also use snow-tex, just paint it on directly with an artist brush. Allow to dry according to directions.
  5. Top the tree with a small wooden star using hot glue, place in décor and enjoy!

Click here for more Christmas crafts

Get more from the episode >>

DIY Candy Corn Topiary
14 of 50
DIY Candy Corn Topiary
Level:
Beginner
How-To:
Home Decor
Seasonal Event:
Fall, Halloween

DIY CANDY CORN TOPIARY MATERIALS:

  • Paper Mache cones
  • Craft paint in orange, yellow, and white
  • Pot
  • Paint for pot in desired color
  • Styrofoam ball to fit in pot
  • ½” wooden dowel
  • Drill
  • ½” diameter drill bit
  • Paintbrushes
  • Rubber bands
  • Acorns, moss or other decorative filling element

OPTIONAL:

  • X-Acto knife

DIY CANDY CORN TOPIARY INSTRUCTIONS:

  1. Separate the cones into three even sections. Place the rubber bands over the cone and use a ruler to make sure it is even all the way around. PRO TIP: The rubber bands will act as painter’s tape to keep the paint lines clean between each section.
  2. Paint the top white, the middle orange, and the bottom yellow.
  3. Remove the rubber band and paint over the area it was on carefully. Set the candy corns aside to dry. PRO TIP: You can leave the rubber band on or cover it with something like twine or a ribbon.
  4. Paint your flowerpot as desired. Allow to dry.
  5. Once the pot is dry, place the Styrofoam inside and drill a hole in the center to the diameter of the dowel.
  6. Attach the candy corn cone to the dowel. There are two types of paper Mache cones you can use. One is an open cone and one has a closed base. The open cone gets attached by simply putting a little hot glue at the top of the dowel and then placing it on. The closed bottom just needs a little hole cut in the bottom with an x-Acto so you can slide it onto the dowel.
  7. Cover any visible Styrofoam with moss, acorns or any other decorative filling element you’d like and enjoy!

Get more from the episode

Catherine McCord - How to Make Sushi Sandwiches
15 of 50
How to Make Sushi Sandwiches
Course:
Lunch
Time:
5 Minutes
INGREDIENTS:

SUSHI SANDWICHES INGREDIENTS:

  • Favorite sandwich bread
  • peanut butter + jelly
  • whipped cream cheese + pesto
  • shredded carrots + hummus
  • whipped cream cheese + tapenade
  • whipped cream cheese + ground cinnamon

MONOGRAM SANDWICH INGREDIENTS:

  • 3 tablespoon whipped cream cheese
  • Dye free food coloring
  • 2 pieces sandwich bread

SKEWER SANDWICH INGREDIENTS:

  • Cooked bacon
  • Lettuce
  • Tomato
  • Avocado
  • Sliced turkey deli meat
  • Favorite bread

DIPPING SAUCES:

  • Mustard
  • Mayo
  • BBQBalsamic glaze

WATERMELON FRIES INGREDIENTS:

  • 1/2 watermelon

YOGURT DIPPING SAUCE:

  • 1 cup greek yogurt
  • Juice and zest of 1 lime
  • 2 tablespoons honey

Catherine McCord Lunchbox Sandwiches - Home & Family

SUSHI SANDWICHES DIRECTIONS:

  1. Using a rolling pin, roll out the sandwich bread to get it as thin as you can.
  2. Spread the piece of bread with your chosen fillings. Use the thicker or stickier filling first and then top with the thinner filling.
  3. Roll the bread up tightly and press on the seam to seal.
  4. Cut into sushi pieces.

MONOGRAM SANDWICH DIRECTIONS:

Prep Time: 5 minutes

  1. Place whipped cream cheese and desired amount of food coloring in a bowl and stir to achieve desired color.
  2. Spread one slice of the bread with the whipped cream cheese mixture.
  3. Use favorite letter cookie cutter to punch out shape on second piece of bread and place on top of the whipped cream cheese mixture.
  4. * Alternatively you can use sun butter, nut butter, hummus or other favorite sandwich spread.

SKEWER SANDWICH DIRECTIONS:

Prep Time: 5 minutes

You likely have all of these ingredients in your fridge and pantry already. You can send these to school as is, send a little mustard or mayo for dipping, or even drizzle with a balsamic glaze.

The club - bacon, lettuce, and tomato with your favorite sandwich bread. Then add some fresh avocado and deli turkey. Now you have yourself a club sandwich kabob.

  1. Tear or cut all ingredients into small pieces.
  2. Thread ingredients onto skewer.
  3. Put dipping sauce into little ramekin, serve next to skewer.

WATERMELON FRIES DIRECTION:

Prep Time: 5 minutes

  1. Cut the watermelon in half then into 1-inch half-moons.
  2. Remove the rind and cut into 3-inch sticks.
  3. Sprinkle with tajin if desired.

FOR THE YOGURT SAUCE:

  1. Mix ingredients until combined.

Get more from the episode

DIY Mini Halloween Pinatas
16 of 50
DIY Mini Mummy, Pumpkin & Bat Halloween Pinatas
Level:
Beginner
How-To:
Kids
Seasonal Event:
Halloween

MUMMY PIÑATA MATERIALS:

  • Paper roll/tube
  • White crepe paper streamers
  • White tissue
  • Scissors
  • String/twine
  • Treats/candy
  • Googly eyes
  • Glue
  • Tape

MUMMY PIÑATA INSTRUCTIONS:

  1. Cut cardboard round/disc slightly smaller than the tube opening
  2. Cut slits on the side and wrap string around, knot underneath. Make sure to leave enough string to run down the length of the tube and a little excess to act as the pinata pull
  3. Fill with treats and goodies
  4. Tape tissue paper on bottom of paper tube
  5. Cut hole in the middle and pull string through (make sure the cardboard plug is on top)
  6. Cover the top with tissue paper and secure with tape
  7. Use white crepe paper streamers and wrap around tube to create mummy
  8. Add googly eyes with glue
  9. Pull to release the candy and enjoy!

BAT PIÑATA MATERIALS:

  • Paper roll/tube
  • Scissors
  • String/twine
  • Treats/candy
  • Googly eyes
  • Glue
  • Tape
  • Black cardstock
  • Black paint
  • Paint brush
  • Black paper

BAT PIÑATA INSTRUCTIONS:

  1. Paint tube black, let dry
  2. Cut cardboard round/disc slightly smaller than the tube opening
  3. Cut slits on the side and wrap string around, knot underneath. Make sure to leave enough string to run down the length of the tube and excess to act as the pinata pull
  4. Fill with treats and goodies
  5. Wrap tube with black paper (leave a little extra to cover the edges)
  6. Bend the top to form ears
  7. Add googly eyes with glue
  8. Cut out wings from black cardstock and attach with glue
  9. Pull to release the candy and enjoy!

PUMPKIN PIÑATA MATERIALS:

  • Paper cup
  • String/twine
  • Orange crepe paper streamers
  • Treats/ candy
  • Scissors
  • Glue
  • Tape

PUMPKIN PIÑATA INSTRUCTIONS:

Cut paper cup in half

Cut out bottom of paper cup and to create disc

Cut slits on the side and wrap string around, knot underneath. Make sure to leave enough string to run down the length of the tube and excess to act as the pinata pull

Fill with treats and goodies

Tape tissue paper on both ends of the cup and secure with tape.

Cut 3-4 pieces of crepe paper to cover cup

Lay out in a star pattern with the cup in the center. Cut a hole and pull string through all the layers

Bring all the pieces up to meet at the top, crumple to form stem

Cover stem in twine, leave long to hang

Decorate with face and crepe paper leaf

Pull to release the candy and enjoy!

Get more from the episode

Ken Wingard - Fall Craft Tool Review: Halloween Edition
17 of 50

Pumpkin Punchers: Carving Kit for Kids, available at amazon.com

Pumpkin Masters: Jack-O-Lantern Teeth, available at amazon.com

Dakota Pumpkin Gutter, available at amazon.com

Pumpkin Masters: Pumpkin Carving Tool, available at amazon.com

Chauvet Fog Machine, available at amazon.com

View Sonic Projector, available at viewsonic.com

Get more from the episode

Dr. Maya Warren - No-Churn Unicorn Ice Cream
18 of 50
No-Churn Unicorn Ice Cream
Course:
Dessert
Time:
15 min with 5-6 hrs freezing time
INGREDIENTS:

NO-CHURN UNICORN ICE CREAM:

  • 2 cups of cold heavy whipping cream (1 pint)
  • 1 1/4 cups of sweetened condensed milk (~ 1 – 14 oz can)
  • 1/4 cup of evaporated milk
  • 2 tsp vanilla extract
  • powdered beverage drink (Kool-aid, tang, lemonade, etc)
  • OPTIONAL: food coloring
  • INCLUSIONS: sprinkles, colorful candies, etc

KITCHEN EQUIPMENT:

  • 5-6 mixing bowls (1 large, 1 medium size, 3-4 smaller for coloring and flavoring ice cream base)
  • a mixer/hand mixer
  • a spatula
  • a ladle
  • measuring cups and spoons
  • container with lid (or plastic wrap/parchment paper) for storing
  • room in your freezer

No-Churn Unicorn Ice Cream - Home & Family

DIRECTIONS:

No-churn Ice Cream:

  • In a large mixing bowl, combine sweetened condensed milk, evaporated milk, and vanilla extract
    • Gently mix with a spatula until homogeneous and set aside
  • In a medium mixing bowl, pour 2 cups of cold heavy whipping cream
    • Mix using mixer/hand mixer until whipped cream is formed
      • Start with mixing paddles in liquid cream, turn on lowest setting to prevent splashing and gradually increase to highest speed until whipped cream forms with stiff peaks (3-5 minutes)
      • Be careful not to over churn the cream as butter can form
  • Using a spatula, scoop whipped cream into sweetened condensed milk mixture and gently fold whipped cream into condensed milk mixture. Repeat this until all of the whipped cream is folded into sweetened condensed milk mixture – this now becomes your vanilla ice cream base
  • For powdered beverage drink: measure out ½ - 1 cup of ice cream base per flavor of powdered beverage drink. Take 1/8 of a teaspoon of the powdered beverage drink and mix it into the ice cream base. Taste to determine if more needs to be added. Add more in small increments as you do not want to over flavor. Add food coloring to boost color. The citric acid in the beverage mixes will naturally thicken the ice cream base.
  • Remaining ice cream base: feel free to color the remaining vanilla ice cream base (this is your main base)
  • Grab your storage container and ladle - using your ladle, scoop a layer of your main ice cream base into your storage container…add dollops of your flavored ice cream base(s) as well as sprinkles or other candies…add another layer of main ice cream base followed by dollops of your flavored ice cream base(s) and more candies. Continue doing this until all of your main ice cream base, flavored ice cream base(s), and inclusions are in your container – you want your final layer to be dollops of your flavored ice cream base(s) and inclusions – we eat with our eyes first!
    • Place lid on the container to cover - if no lid, use plastic wrap/parchment paper over your no-churn unicorn ice cream
      • If using parchment paper or plastic wrap, gently press down until slightly touching the ice cream
  • Freeze for 5-6 hrs (or overnight) and enjoy!
    • Take out of freezer and let sit on counter for 5-7 min if ice cream is initially too hard to scoop

Get more from the episode

DIY Dollar Store Challenge Halloween Décor
19 of 50
Dollar Store Challenge Crafts
Level:
Beginner
How-To:
Home Decor

ORLY’S LAWN SPIDER MATERIALS:

  • Clear or black salad bowls 2 large for the body, 1 smaller for the head
  • Large black spiral brushes
  • Faux spiders
  • Bricks
  • Black spray paint
  • Hot glue gun and glue sticks

SHIRLEY’S HALLOWEEN POTS MATERIALS:

  • Terracotta pots
  • Hot glue gun and glue sticks

TO CREATE THE CREEPY CRAWLY POT:

  • Fake bugs
  • White spray paint

TO CREATE THE GOOGLY EYE POT:

  • Googly eyes
  • Black spray paint

TO CREATE THE JACK-O-LANTERN POT:

  • Black felt
  • Orange spray paint
  • Scissors
  • Chalk

MARIA’S HALLOWEEN DESSERT STATION MATERIALS:

  • Halloween road signs
  • Broomstick
  • Wheat
  • Twine
  • Plastic cauldrons
  • Spiderweb cake stands
  • Craft pumpkins
  • Clear plastic plates
  • Halloween napkins
  • Spray paint black, white and fall colors
  • Gold paint pen
  • Mod podge and brush
  • Scissors
  • Wooden board

ORLY’S LAWN SPIDER INSTRUCTIONS:

  1. Spray paint the inside of your salad bowls black if they are clear. Allow to dry.
  2. Bend your brushes into the shape of spider legs. Hold the handle flat and bend the brush up, bend down to create a triangle and then the end of the brush flat. Repeat with all your legs.
  3. Weigh down your legs with bricks. Use some hot glue to attach the handle to the handle of the brush to the bottom of the brick.
  4. Put the legs in place on your lawn so that you have eight, four on each side.
  5. Place the body bowls opening down over the bricks.
  6. Glue the faux spiders onto the front of the small bowl as eyes.
  7. Place the head in front of the body and enjoy!

INSTRUCTIONS FOR SHIRLEY’S HALLOWEEN POTS:

Jack-O-Lantern Pot:

  1. Spray paint your pots orange. Allow to dry before gluing.
  2. Use some chalk to draw the jack-o-lantern face onto some black felt.
  3. Cut out the face with scissors.
  4. Hot glue facial pieces to pot
  5. Place a plant in and enjoy!

Googly Eye Pot:

  1. Spray paint the pot black. Allow to dry.
  2. Hot glue googly eyes on as desired.
  3. Place a plant in and enjoy!

Creepy Crawly Pot:

  1. Use hot-glue to attach fake bugs to the pot.
  2. Spray paint pot white. Allow to dry.
  3. Place a plant in and enjoy!

MARIA’S DESSERT STATION

INSTRUCTIONS:

  1. Spray paint all the elements you need to. Paint the signs and board black, the pumpkins in desired fall colors and the spiderweb trays white. Allow to dry.
  2. While the paint dries, create the Halloween plates. Paint the back of the clear plate with mod podge. Place the napkin face down on top. Trim to edge of the plate with scissors and allow to dry. Repeat with as many plates as desired. Allow to dry.
  3. Use the gold paint pen to draw words and border onto the signs.
  4. Glue the signs onto the board facing outward.
  5. Create the broom, place the wheat around the broomstick and tie to secure with twine. Cut to length of board if necessary.
  6. Hang the cauldrons on the broomstick, place on top of the signs. Glue in place to steady if necessary.
  7. Dress the table with the pumpkins.
  8. Place the candy in the cauldrons, set the plates out and enjoy!

Get more from the episode

DIY Glam Pumpkins
20 of 50
DIY Glam Pumpkins
Level:
Easy
How-To:
Home Decor
Seasonal Event:
Fall

MATERIALS:

  • Faux craft pumpkins in white
  • Spray paint
  • Plastic bin
  • Water
  • Disposable gloves

OPTIONAL:

  • Safety glasses

INSTRUCTIONS:

  1. Fill the plastic bin about 2/3 full of water.
  2. Put on your gloves and lightly mist the water with spray paint. The more color you spray, the more intense the color will be. Adding more than one color will make it mucky looking so stick to one color per bin. PRO TIP: you can wear protective glasses if you are sensitive, but you’re not spraying much it’s not entirely necessary.
  3. Dip the pumpkin into the water and twirl it around.
  4. Pull the pumpkin out and allow to dry, repeat until you have glammed the desired amount of pumpkins.
  5. Decorate with the pumpkins and enjoy!

Get more from the episode

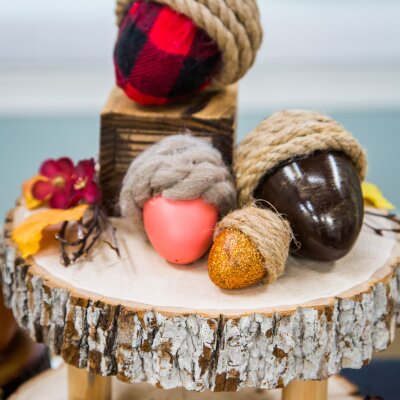
DIY Acorns
21 of 50
DIY Acorns
Level:
Intermediate
How-To:
Decor
Seasonal Event:
Fall

MATERIALS:

  • Plastic easter eggs
  • Low-temperature hot glue gun and glue sticks
  • Jute rope or thick twine or Yarn
  • Twig or pinecone piece

TO CREATE THE PAINTED ACORN

  • Spray paint in desired color

TO CREATE THE GLITTER ACORN:

  • Glitter
  • Mod Podge
  • Paintbrush

TO CREATE THE PLAID ACORN:

  • Plaid fabric
  • Fabric scissors
  • Mod Podge
  • Paintbrush

OPTIONAL:

  • Rubber band or other object to hold fabric in place while drying

INSTRUCTIONS:

To create the painted acorn:

  1. First paint the halves of your eggs the desired color with spray paint in a well-ventilated area. Allow to dry.
  2. Next, secure both halves of the easter eggs together using hot glue.
  3. To create the acorn top, wrap the top with twine or yarn and secure with low temperature hot glue as you wrap. Make sure to leave a small space in the center of the top.
  4. Next, create the stem. Glue a tiny twig or pinecone piece in the center of the top. Repeat to make as many acorns as desired.

To create the glitter acorn:

  1. Paint the egg if desired, allow to dry if so, then glue the egg halves together.
  2. Apply one coat of mod podge first, then add glitter and seal with another coat of mod podge on top. PRO TIP: The mod podge will keep the glitter secure, so it won’t get all over the place!
  3. Glue the yarn or twine and stem on the top portion to complete. Repeat with as many acorns as desired.

To create the plaid acorn:

  1. Glue the egg halves together.
  2. Take some plaid fabric and cut it into a small circle, about double the size of your egg. Check sizing before you glue by wrapping the acorn in the fabric with your hand, cut down if necessary.
  3. Next add mod podge directly to the inside of the fabric, place the egg point side down in the center and wrap the egg in it. Hold until it sticks or place rubber bands around until the glue sets.
  4. Glue twine or yarn and stem on the top, allow the glue to dry and repeat with as many acorns as desired.

Decorate your home with acorns as desired and enjoy!

You may also like these how-tos:

DIY Wheat Decor >>

DIY Squash Hot Air Balloons >>

DIY Personalized Beaded Bracelets >>

Get more from the episode

DIY Scarecrow Wreath
22 of 50
DIY Scarecrow Wreath
Level:
Advanced
How-To:
Home Decor
Seasonal Event:
Fall

DIY SCARECROW WREATH MATERIALS:

  • Fall wreath
  • Children’s jeans
  • Children’s jean shirt
  • Children’s straw hat
  • Pillow stuffing
  • Styrofoam ball at least 6”
  • Canvas or burlap fabric
  • Felt in brown and orange
  • Wire
  • Hay
  • Fabric in fall colors and patterns
  • Fabric scissors
  • Hot glue gun and glue sticks
  • Fabri-tac
  • Zip ties
  • Scissors
  • Wire snips

OPTIONAL:

  • Sewing machine
  • Straight pins

DIY SCARECROW WREATH INSTRUCTIONS:

  1. Make the pants out of a pair of kid’s jeans. Resize them to make them narrower by turning them inside out, cutting the inseam to the size you want and sewing the sides shut again. Resizing isn’t entirely necessary but will save you a lot of stuffing! PRO TIP: If you’re not a sewer, the sides can be seamed with fabric glue. Wait for the glue to thoroughly dry before flipping right-side out thought.
  2. Stuff the pants with pillow stuffing and add wire down the inseam of each leg to give the legs pliability and structure. Glue in place with hot glue if necessary.
  3. Stuff the shirt and add wire down the arms. Hot glue in place if necessary.
  4. Add patches to the clothes if desired. Cut some squares out of your fall fabrics. Glue them to the pants and shirt.
  5. Create boots for the scarecrow out of brown felt. Draw a small boot pattern that will fit into the cuff of the jeans, cut out four felt boot pieces and sew or glue them together. Flip right-side out. Stuff with stuffing. PRO TIP: If you use glue wait for it to thoroughly dry before flipping.
  6. Secure the top of the boots into the cuff of the jeans with hot glue. Leave some room to stuff some hay in if possible.
  7. Create the head of the scarecrow by wrapping the styrofoam ball with a square of fabric that is big enough to have a few inches of excess around the bottom. Shove a piece of wire into the bottom of the ball to create a “neck” that will go into the shirt to secure the head to the body of the scarecrow.
  8. Secure the fabric around the head by tying a bandana or cut piece of fall fabric around the excess on the bottom where the wire is protruding from.
  9. Add a nose to the scarecrow face by cutting a small triangle of orange felt and gluing it to the fabric.
  10. Now attach your scarecrow parts to the wreath using zip ties. First attach the shirt, then the pants and finally the head by shoving the wire “neck” into the shirt. Cut into the fabric where necessary for the zip-ties to attach to the wreath structure without being seen.
  11. Position the hat on the head and adhere it with hot glue.
  12. Stuff some hay into the cuffs of the shirt and sticking out of the bottom of the pants around the boots. Secure with hot glue where necessary.
  13. Hang the wreath as desired and enjoy!

Get more from the episode

More DIY Fall Wreaths ideas!

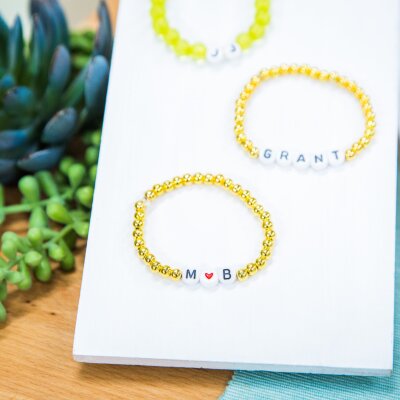
DIY Personalized Beaded Bracelets
23 of 50
DIY Personalized Beaded Bracelets
How-To:
Fashion

MATERIALS:

  • Elastic cording
  • Beads
  • Superglue
  • Scissors

INSTRUCTIONS:

  1. First, determine the sizing, wrap the cording around wrist to measure. Leave a little extra length to account for knot tying.
  2. Tie knot at the end of the bracelet cord.
  3. String beads onto the cord, add personalized numbers or letters the center so they’re visible.
  4. Continue beading and knot at the end.
  5. Secure with knot with superglue if desired.
  6. Wear and enjoy!

You may also like these how-tos:

DIY Squash Hot Air Balloons >>

DIY Wheat Decor >>

Get more from the episode

At Home With Our Family - Debbie Shares her #TrueSelfie
24 of 50

Debbie and Alexandra are creating their #TrueSelfies with the new Colors of the World crayons from our friends at Crayola!

At Home With Our Family - Debbie Shares her #TrueSelfie

Determine your skin tone color following the steps found here, then draw your self-portrait OR use the free Crayola Color Camera App to turn your picture in to a coloring page: https://www.crayola.com/worldcolors

Once you have colored your True Selfie share it by posting on Instagram using the hashtag #TrueSelfie or you can upload and customize your selfie even further in Crayola’s True Selfie gallery on Crayola.com.

To explore more ways to create together at home, visit: https://www.crayola.com/athome

25 of 50
At Home With Our Family - Debbie & Alexandra make Crayola’s CIY Paper Plate Sloth & Llama - Home & Family

Our friends at Crayola have so many wonderful crafts on their website that can spark creativity and provide great activities to do with your kids at home. Debbie & Alexandra are creating their own Paper Plate Sloths & Llamas.


For step-by-step instructions visit:

SLOTH: https://www.crayola.com/crafts/sloth-paper-plate-animal-craft/

LLAMA: https://www.crayola.com/crafts/paper-plate-llama-craft/


For more wonderful craft ideas visit Crayola.com/athome

DIY Elastic Bookmarks
26 of 50

Materials

  • Various fabrics
  • Accoutrements for details
  • Cardstock
  • Elastic
  • Fabri-Tac
  • Fray Check
  • Tacky spray
  • Fabric scissors
  • Paper scissors

Instructions:

1. Use your paper scissors to cut shapes out of cardstock.

2. Spray some tacky spray onto the front of your shape and place them face-down onto the back side of desired fabric.

3. Take your fabric scissors and trim around the edge of your cardstock shapes, leaving a ¼”- ½” of fabric seam allowance to wrap around the back of your cardstock.

4. Once your shape is cut out, lift the cardstock shape and secure to fabric with Fabri-Tac.

5. Wrap the edges of your fabric to the backside of your cardstock shape and secure with Fabri-Tac. *Cut slits where necessary for good fit. *

6. Use Fabri-Tac to add any detail elements you want.

7. Allow to dry.

8. Cut a length of elastic.

9. Glue each end of the elastic to the back side of your bookmark shape.

10. Allow the glue to set and enjoy!

Get more from the Episode >>

At Home With Our Family - Larissa Shares Crayola Kindness Rocks
27 of 50
At Home With Our Family - Kindness Rocks - Home & Family

Larissa is spreading kindness throughout her neighborhood with these wonderful Kindness Rocks from our friends at Crayola. It’s one of many incredible craft activities for adults (or families) to do at home!

For full instructions, visit: https://www.crayola.com/crafts/kindness-rock-painting-craft/

Explore more craft ideas, visit: https://www.crayola.com/athome

Debbie creates Popsicle Stick Fish & Monsters
28 of 50

Debbie and Alexandra are filling their Summer days with fun and creative crafts from our friends at Crayola. Watch as they share how to take your Popsicle sticks and create Fish & Monsters!

At Home With Our Family - CIY Popsicle Stick Fish & Monsters

Find full instructions for the Popsicle Stick Fish: https://www.crayola.com/crafts/popsicle-stick-fish-craft/ and the Popsicle Stick Monsters: https://www.crayola.com/crafts/popsicle-stick-monster-craft/

Explore more craft ideas to do together at home, visit: https://www.crayola.com/athome

At Home With Our Family - Maria's DIY Handprint Wreath
29 of 50

MATERIALS:

  • Paper plates
  • Paper
  • Scissors
  • X-Acto knife; optional
  • Glue or hot glue gun
  • Additional details like pom-poms, etc.
  • Pencil
At Home With Our Family - Maria Provenzano DIY Handprint Wreath - Home & Family

INSTRUCTIONS:

  • Use either the scissors or the X-Acto knife to cut the center circle out of the paper plate

  • If you used scissors to cut through the paper plate you can reattach it together using a hot glue gun

  • Create your handprints by tracing the hands and cutting them out

  • Repeat until you have enough to go around the wreath

  • Attach the handprints to the paper plate that’s been cut in the center

TIP: Do alternating colors for the handprints to create dimension

  • Once the paper plate has been covered with the paper handprints then add any additional details you like such as pom-poms, etc.

  • Hang the wreath with mounting tape or any way you like depending on where you want to put it in your house

Watch all-new At Home With Our Family videos weekdays at 4pm EST/3pm CST/1pm PST on Facebook, Instagram and Twitter.

Check out all At Home With Our Family videos, recipes and DIYs >>

30 of 50
At Home With Our Family - 4th of July Decorations - Home & Family

Inspired by Crayola, Maria Provenzano and her sons Grant & JJ create patriotic and festive Fourth of July decorations – from American flags to sparklers!

For step-by-step instructions visit:

https://www.crayola.com/crafts/july-4th-decorations-craft/
https://www.crayola.com/crafts/cardboard-tube-fireworks-craft/

For more wonderful craft ideas visit www.crayola.com/athome

Watch all-new At Home With Our Family videos weekdays at 4pm EST/3pm CST/1pm PST on Facebook, Instagram and Twitter.

Check out all At Home With Our Family videos, recipes and DIYs >>

At Home With Our Family - Debbie Creates Paper Bag Stars
31 of 50
At Home With Our Family - CIY Paper Bag Stars - Home & Family

Debbie and Alexandra are enjoying some time together creating these fun and festive Paper Bag Stars from our friends at Crayola. It’s one of many craft activities for families to do at home this Summer!

For full instructions, visit: https://www.crayola.com/crafts/paper-bag-star-craft/

Explore more craft ideas, visit: https://www.crayola.com/athome

Watch all-new At Home With Our Family videos weekdays at 4pm EST/3pm CST/1pm PST on Facebook, Instagram and Twitter.

Check out all At Home With Our Family videos, recipes and DIYs >>

32 of 50
At Home With Our Family - Maria Makes Puffy Paint Ice Cream Cones

Maria Provenzano is combining her love of crafts and dessert with an ice cream cone that doesn't melt! Follow along as she and her sons Grant & JJ make their own Puffy Paint Ice Cream Cones.

This is such a fun way to celebrate the start of Summer from our friends at Crayola. For the step-by-step instructions, visit: https://www.crayola.com/crafts/diy-puffy-paint-ice-cream-craft/

For more wonderful craft ideas visit Crayola.com/athome

33 of 50

Debbie & Alexandra are making a gift for Father’s Day with an idea inspired by our friends at Crayola. Best part, it uses items you already have at home.
 

Watch as they create Father’s Day Scratch-Offs and for the full instructions, visit: https://www.facebook.com/crayola/videos/351765275372201/
 

For even more gifts you can make dad at home, visit: www.crayola.com/athome

Watch all-new At Home With Our Family videos weekdays at 4pm EST/3pm CST/1pm PST on Facebook, Instagram and Twitter.

Check out all At Home With Our Family videos, recipes and DIYs >>

Bolos and Bandanas
34 of 50

MATERIALS

    TO CREATE THE BANDANA:

    • Printed cotton sheeting
    • Rolled hem foot for sewing machine
    • Fabric scissors
    • Ruler or quilting square
    • Fabric marker
    • Sewing machine

    TO CREATE THE BOLO TIE:

    • Braided leather cording
    • Pendant piece like a silver piece, turquoise or bottle cap
    • Locking sliding bolo tie clasp
    • Bolo tips
    • E6000
    • Scissors

    OPTIONAL:

    • Hot glue gun and glue sticks

    INSTRUCTIONS:

    TO CREATE THE BANDANA

    1. Cut a square of fabric to size. For children 16”-17” is a good size. For an average size adult 20” x 20” and if need looser fit 22” x 22”. Add a ½” seam allowance to each edge.

    2. Put the rolled hem foot onto your machine.

    3. Feed the edge of the fabric into the foot so it rolls and hems for you as you sew!

    4. Sew all four edges, trim the threads and enjoy!

    TO CREATE THE BOLO TIE

    1. Cut the leather cording to about 36”, if you’re taller than average add a few inches.

    2. Use e6000 to glue the bolo clasp to the pendant piece. Allow the glue to set.

    PRO TIP: Use hot glue if the pendant is valuable, as long as the material is metal or stone you should be able to remove it if you want later.

    3. Feed the leather cording through the clasp.

    4. Glue the bolo tips on, allow the glue to set and enjoy!

    Get more from this episode >>

    Diana Madison - 4 - Ingredient Peanut Butter Cookies
    35 of 50
    4 - Ingredient Peanut Butter Cookies
    Course:
    Dessert
    Yield:
    24 Cookies (1 Tablespoon Dough Per Cookie)
    Ingredients

    INGREDIENTS:

    • 1 cup creamy peanut butter, no sugar added
    • 1⁄2 cup granulated sugar
    • 1⁄4 cup Brown Sugar
    • 1 egg
    • Flakey sea salt, for sprinkling

    OPTIONAL STIR-INS:

    • Chocolate chips
    • Raisins
    • Honey-roasted peanuts
    • Banana chips

    Diana Madison 4 Ingredient Peanut Butter Cookies - Home and Family

    DIRECTIONS:

    1. Heat oven to 350 ̊. Line two rimmed baking sheets with parchment paper.
    2. Beat egg gently in bowl. Add peanut butter and sugars, then whisk to fully incorporate.
    3. Stir in any additional ingredients if desired (chocolate chips, raisins, etc.).
    4. Scoop mounds of dough with a tablespoon or small cookie scoop and place on prepared sheets 2-inches apart.
    5. Press tops of cookies with a fork in perpendicular pattern, making a crosshatch on top.
    6. Sprinkle with flakey sea salt, then bake until golden brown (10-12 minutes).
    7. Remove from oven, allow to cool on tray for 5 minutes, then remove to wire rack to complete cooling.

    Get more from this episode >>

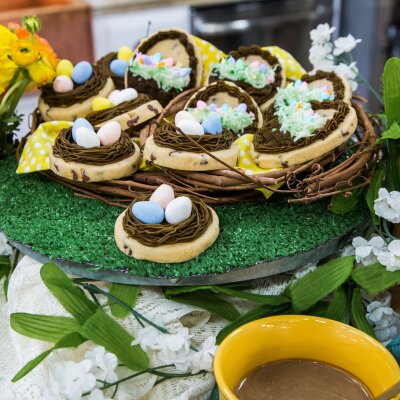
    Chocolate Chip Cut Out Cookies
    36 of 50
    Chocolate Chip Cut out Cookies
    Course:
    Dessert
    Seasonal Event:
    Easter
    Yield:
    24
    Ingredients

    For Cookies (Makes 24)

    • 1 cup packed brown sugar
    • 1 egg
    • 1 cup or 2 sticks salted sweet cream butter
    • 1 ½ tsp vanilla extract
    • A pinch of salt
    • 3 cups flour
    • 1 ½ tsp aluminum free baking powder
    • ½ cup mini semi-sweet chocolate chips

    For American Crusting Buttercream (Makes 4 1/2 cups)

    • 1 cup salted sweet cream butter
    • 1 cup Crisco shortening
    • 2 tsp vanilla extract
    • 9 cups of confectioners’ powdered sugar (white powdered sugar)
    • 3 Tbsp heavy cream or more as needed

    Ingredients and Materials for Decorating

    • Tips 12, 18, 233 and 47
    • Easter sprinkles
    • Bunny & chick sprinkles
    • Brown, green and white food coloring
    • Large Egg-shaped cookies and round cookies
    • Shredded sweetened coconut
    • Cadbury mini chocolate eggs

    Directions for Cookies

    1. Cream butter, brown sugar, vanilla, pinch of salt, and egg together in a stand mixer on medium speed for about 30 seconds to one minute.
    2. Mix dry ingredients, flour, baking powder, and salt in separate bowl. I use a whisk to blend the dry ingredients together.
    3. Add dry ingredients to your wet ingredients. Mix until the cookie mix becomes a dough and it pulls away from the sides of the bowl. It will seem a little dry but it will all come together.
    4. Add in mini chocolate chips and mix again.
    5. Remove dough from bowl and wrap in saran plastic, place in fridge for at least 15 minutes. If you flatten the dough it gets colder quickly. Preheat oven to 375 while your dough chills.
    6. Flour your surface and roll dough out to ¼ inch thick. Cut your cookies out into desired shapes.
    7. Place on a baking sheet and bake for 6-7 minutes or just when the cookie puffs up. These will brown faster than your regular sugar cookies.
    8. Once baked, let sit for one minute on the cookie sheet to firm up.
    9. Transfer to a cooling rack so they can cool completely.

    Master Tip- I use salted sweet cream butter from Costco because it has the perfect balance of salt for my cookies. If you don’t have that, use unsalted butter and add ½ tsp to the wet ingredients.

    Directions for American Crusting Buttercream

    1. Cream your butter and shortening until well incorporated. Both must be at room temperature to prevent clumping.
    2. Once creamed, add your vanilla. Mix again for a minute.
    3. Sift your powdered sugar to make sure there are no clumps and add it in.
    4. Place a towel over your mixer to prevent a powdered sugar storm.
    5. Once mixed, slowly add in your heavy cream or milk one Tbsp at a time because you can always add more but you can't take it out. Continue to add more than the recipe states if it's too thick.
    6. Mix until smooth, about 1 minute on medium to high speed. Be sure not to over-whip your buttercream. DON’T panic you won't ruin it if it whips longer. Store unused buttercream in an airtight container in the fridge for up to a week or freeze for up to three months.

    Master Tip- I use salted sweet cream butter from Costco because it has the perfect balance of salt for my cookies. If you don’t have that, use unsalted butter and add ½ tsp to the creamed butter.

    Directions for Decorating

    1. Pipe handle around the top half with tip 18. Pipe basket weave with tip 47. Pipe with buttercream inside the basket with tip 12. Add green coconut (see below) and sprinkles. Add bunny & chick sprinkles
    2. Green coconut- Add green food coloring into plastic bag, add in ½ cup of shredded sweetened coconut. Mix until coated and green.


    Directions for Decorating Bird's Nest

    1. Use tip 233 to pipe blown buttercream. Start in the center of the cookie with piping bag straight up and down. Pipe around in a circle and get wider as you go. Pipe three layers on the outside to build up the nest. Add three mini chocolate Cadbury eggs . Add bunny & chick sprinkles.

    DIY Kids' Easter Tablescape
    37 of 50

    Materials for the Balloons

    • Balloons
    • Gaffers Tape
    • Little colorful eggs
    • Silk flowers

    Materials for the Chair Backs

    • Still felt
    • Rabbit pattern
    • Scissors
    • Pom Pom
    • Iron on letters
    • Ribbon
    • Velcro
    DIY Kid's Easter Tablescape - Home & Family

    Directions for Balloons

    1. Blow up your balloons all different sizes/colors & tie them up
    2. Them the down to the table with gaffers’ tape
    3. Fill in open spaces with little colorful eggs or silk flowers
    4. Ta-da!

    Directions for Chair Backs

    1. Take your felt & draw your rabbit pattern onto the felt then cut it out using scissors
    2. You can cut a bow tie with extra felt for the bunny & glue on
    3. Take a pom pom & glue on for a rabbit tail
    4. Using iron on letters place the kids name onto the bunny
    5. To not damage the chairs, glue a piece of ribbon from one side of the bunny to the other
    6. Add double sided Velcro to the ribbon & attach!

    Get more information about this episode >>

    DIY Paper Flowers
    38 of 50

    Materials

    • Craft Paper
    • Tape
    • Hot Glue
    • Scissors
    • Pencil
    • Pom Poms

    Directions

    1. The first thing you want to do is make a flower petal template. Make all different kinds of sizing for layering.
    2. Use that template & start tracing your flowers onto craft paper or card stock. Make as many as you desire
    3. Then cut them out using your xacto knife
    4. Using a ruler, fold down the middle of petal to give it some dimension
    5. Take the bottom of your petal and create a slit at the bottom, then overlap your paper where the slit is to give your petal a caving look
    6. Tape the back up to hold
    7. Start to attach your petals to another and hot glue to one another
    8. For the last petal, don't tape the back up. Just of finagle your last petal in and thne glue to other.
    9. Then just start layering your new sizes.
    10. Give your flowers a center by gluing pom poms together.
    11. Time to hang! (To hang, hot glue a little paper tab to the back and then hang with push pin!)

    Get more information about this episode >>

    DIY No Dye Easter Eggs
    39 of 50

    Materials for No Dye Easter Eggs

    • Plastic egg mold; I like using the ones that are for candy making
    • 3 1/2 cups white sugar
    • 1/2 cup powdered sugar
    • Spatula
    • Food coloring
    • 1 egg white
    • Large bowl
    • Baking sheet
    • Parchment paper
    • Spoon
    • Royal icing
    • Piping bag
    • Easter decorations to fill the eggs, optional to use candy as well

    Materials for Silk Tie Dyed Eggs

    • Eggs
    • 100% Silk Ties
    • White Cloth
    • Zip ties or rubber band
    • Water
    • ¼ c Vinegar

    Directions for No Dye Eggs

    1. Mix the sugars together in a large bowl
    2. Whisk the egg in a separate bowl, mix until slightly foamy; if you want to color the large sugar egg, add some food coloring to the egg white before mixing it with the sugar
    3. Use the spatula or your hands to mix everything together
    4. It should feel like wet sand and be able to hold its shape when squeezed; if it still isn't packing well, you can add a little bit of water to the mix
    5. Pour the sugar into the mold and use your hand to press the sugar into the hold until it is packed firmly
    6. Place the baking sheet covered with parchment paper over the egg and flip it over so that the egg shape in on the baking sheet without the mold
    7. Allow the egg to set up for a few hours
    8. Scoop out some of the front of the egg; only one side
    9. Let set overnight to harden completely; the timing will vary based on how large your egg is; you can also place this in a 200 degree Fahrenheit oven for about 15 minutes to expedite the process
    10. Once the egg is hardened completely, mix up the royal icing and use it as the glue to attach the two egg shapes together
    11. Use the royal icing to decorate the egg
    12. Add additional candy or Easter decorations.

    Directions for Silk Tie Dyed Eggs

    1. Deconstruct tie by removing lining, leaving just the silk.
    2. Cut a piece big enough to wrap around egg and wrap around egg making sure the print side is against egg.
    3. Tie in place
    4. Cut a piece of white cloth big enough to wrap around egg, wrap over silk and tie in place.
    5. Repeat above steps for additional eggs.
    6. Once eggs are wrapped, place them in a pot and cover with water. Add ¼ c of vinegar. Bring to a boil and let simmer for about 20 mins.
    7. After 20 mins, remove from water with tongs and let cool
    8. Last but not least, remove material from egg and enjoy all the beautiful designs!

    Get more information about this episode >>

    DIY Clay Kindness Pins
    40 of 50

    MATERIALS:

    • Oven-bake clay
    • Card stock, free template (thinkmakeshareblog.com)
    • Paintbrushes
    • Acrylic Craft paint
    • Paint pens
    • Rolling pin
    • Craft knife
    • Scissors
    • Toothpicks
    • Hot glue/glue gun
    • 1” brooch pin backs
    • Twine
    DIY Clay Kindness Pins - Home & Family

    Download the free template from Think.Make.Share here.

    INSTRUCTIONS:

    1. Download and print templates onto card stock or use your own design.

    2. Preheat the oven to the temperature suggested on the label of your clay.

    3. Knead the clay as directed to get it ready, then roll it out on a clean surface, 1/4″ thick.

    4. Place your card stock designs on the clay to use as a template, cut out with a craft knife.

    5. Follow package instructions for baking the clay.

    6. If you’re going to tie your designs with string, make holes with a toothpick before baking.

    7. Let clay cool completely before painting.

    8. Paint your clay shapes; adding extra flare with paint pens.

    9. Using hot glue, attach a 1” brooch pin to the back of your design. Let dry.

    10. Attach pin to gifts.

    Get more from this episode >>

    Get more Valentine's Day ideas from the Home & Family Love Ever After DIY & Cookbook >>

    DIY Juice Box Puppets
    41 of 50

    Materials

    • Cardboard Juice Boxes
    • Popsicle Sticks
    • Scissors
    • Paint
    • Foam Brushes
    • Hot Glue Gun
    • Egg Carton
    • Craft supplies (OPTIONAL: Beads, Buttons, Paper, Pom-Poms, Googly Eyes, etc.)
    Ask the DIY Experts - Home & Family

    Directions

    1) Cut open the bottom of an empty juice box

    2) Rinse and dry out

    3) Fold edges into box or cut off

    4) Hot glue the popsicle stick to the inside

    5) Paint outside

    6) Stick in egg carton to dry

    7) Decorate !

    Get more information about this episode >>

    Check out more fun DIY projects at the Home & Family Pinterest Page

    DIY Frozen Popsicle Chalk
    42 of 50

    Materials

    • Popsicle molds
    • 1 cup Cornstarch
    • 1 cup Water
    • Washable tempera paint
    Summer Boredom Busters - Home & Family

    Directions

    1. Mix cornstarch and the cold water together until the cornstarch is completely dissolved. This is going to be the base of your ice chalk.

    2. Add a few drops of tempera paint (color of choice).

    3. Pour into popsicle molds.

    Skillshare App available at the App Store & wherever apps are downloaded

    Get more information about this episode >>

    Plushie Pillows
    43 of 50

    Materials

    • 2 yards of tan felt
    • 1 yard pink felt
    • 9x12 various colors of felt
    • Fabric tac glue
    • Stuffing
    • Needle and thread

    Instructions:

    1. Get two rectangle tan pieces together.

    2. Use fabric tac glue and glue edges.

    3. Leave a 2 to 3 inches open.

    4. Let dry & then flip inside out.

    5. Once dry take the pink felt rectangle (which should be ½ inch smaller than tan felt).

    6. Glue pink on top of tan rectangle: that will be the face of the pop tart.

    7. Let dry.

    8. Cut black felt into small eyes, mouth and nose for pop tart face.

    9. Cut different colors into sprinkles.

    10. Glue face and sprinkles on top of the pink felt.

    11. Once dry, insert stuffing.

    12. Glue the open edge of the tan rectangle together once you insert the stuffing.

    13. Let dry.

    DIY Egg Carton Vases
    44 of 50

    MATERIALS:

    • Egg cartons, dozen or flats work, but they all have to be the same brand or style
    • Straight hurricane vase
    • X-Acto knife
    • Hot glue gun and glue sticks

    OPTIONAL:

    • Spray paint
    • E6000 or clear Gorilla Glue

    INSTRUCTIONS:

    1. Cut strips of the desired part of the cartons with an X-Acto knife. Different parts of the carton will give you different looks:

    • The dividing center strip of a dozen carton creates the Vertical Spikey Vase

    • A strip of the bottom of the egg cradles will create the Horizontal Spikey Vase

    • The side of the egg cradle next to the hinge of the dozen carton will create the slide-on temporary version.

    PRO TIP: You can measure the vase and strips to see how many cartons you will need to save up for this!

    2. If you’re creating a permanent option, glue the strips directly onto the vase.

    • To create the vertical spikey vase, glue the strips on with space in between so that you can glue the connecting strip on top. Make sure the space is slightly narrower than the strips, so you don’t see any vase in between.

    • To create the horizontal spikey vase, glue the strips on horizontally by applying a dab of glue to the top of each bump on the strip and holding it on until it sticks, stagger the rows for visual interest.

    • To create the temporary option, wrap the strips around the vase and glue the ends of the strip together.

    PRO TIP: For the permanent versions, adding a bit of E6000 or clear gorilla glue after the hot glue sets will ensure a stronger bond.

    3. Spray paint if desired, allow to dry completely.

    4. Set in your décor, add some flowers and enjoy!

    Get more from this episode >>

    DIY Maze for Kids
    45 of 50

    Materials

    • Large Cardboard Boxes
    • Tape
    • Large Binder Clips
    • Scissors or X-Acto knife
    • Smaller paper boxes (optional for obstacles)

    Directions

    1. The first thing you want to do is map out how you’d like to set up your maze, this way you can figure out where you’d like to cut all your doors in the maze

    2. Next, on your boxes draw a decent size door on the box & cut out with an X-Acto knife

    3. Once you have your doors cut out it’s time to connect them all

    4. Set up your maze in the lay out you prefer & connect them by attaching binder clips to the tops of the boxes

    5. You can add obstacles like creating tunnels with tall/long boxes & cut circles out the tops for a different scenery.

    6. Or you can take smaller cardboard boxes to block some of the doorways, so they have to use another way out!

    7. Create maps inside with a “you are here” mark for an additional fun factor

    DIY Marshmallow Barnyard
    46 of 50
    Ingredients

    Ingredients/Materials

    • Marshmallows (Small, Medium, Large)
    • Candy Melts
    • Food Coloring
    • Color Mist/ Food Coloring Spray
    • Open Box
    • Foil
    • Mini White Picket Fence
    • Hot Glue Gun/Glue
    • Coconut Flakes
    • Chocolate Cookies
    • Sprinkles
    • Small Candy Pieces (for chick)

    Directions

    For Barnyard:

    1. Use a flat platter or wooden box as the base of your barnyard

    2. Lay foil down on the base of the box

    3. Hot glue white picket fence around box

    4. To make the grass, take a bag of coconut flake and mix it in with green food coloring

    5. To make the mud, crush up the chocolate cookies in food processor

    For Marshmallow Pig:

    1. Use marshmallow for body of pig

    2. For the snout, use half of a mini marshmallow

    3. For the ears, snip a large marshmallow diagonally

    4. Use 4 mini marshmallows for the feet

    5. Spray marshmallow with color mist/ food coloring spray

    6. Allow to dry

    1. Draw on face with candy melts

    2. Use toothpick to stand upright in the barnyard

    For Marshmallow Chick:

    1. Use marshmallow for body of chick

    2. Use small candy (red, yellow, orange) to create chick’s features

    3. Draw on eyes with candy melts or small tubed icing

    4. Use toothpick to stand upright in the barnyard

    For Marshmallow Cow:

    1. Use extra large marshmallow for body of cow

    2. Cut ¼ of a marshmallow and connect to extra large marshmallow as head

    3. Attach eats and feet (same as pig)

    4. Use chocolate candy melts to draw the cow’s spots and face

    5. Use toothpick to stand upright in the barnyard

    Get more information about this episode >>

    DIY Nail Art Phone Cases
    47 of 50
    DIY Nail Art Phone Cases
    Level:
    Beginner
    How-To:
    DIY
    Orly Shani shows how to customize your phone with DIY Nail Art Phone Cases.

    MATERIALS:

    • Nail polish in various colors and textures like glitter polish
    • Plain plastic phone case

    OPTIONAL:

      TO CREATE THE DRIP ART PHONE CASE

      • Paper to lay down on work surface

      TO CREATE THE STRIPED PHONE CASE

      • 1/8” or 1/4” wide masking tape

      TO CREATE THE CONFETTI PHONE CASE

      • Confetti in fun shapes like stars or hearts
      DIY Nail Polish Phone Cases - Home & Family

      INSTRUCTIONS:

      TO CREATE THE DRIP ART PHONE CASE

      1. Make sure the phone case is clean and dry then place it in the center of your workspace, back side up.
        1. There are two techniques for this, the drip dots and the drip lines.
      2. To create the dots, open your nail polish and dip the brush so it’s got a lot of paint. As you pull out the brush press it against one side of the bottle to wipe some of the excess off.
        1. Hold the brush directly above where you want to place a dot and let the paint drip onto the spot.
        2. Repeat this process until you’ve added as many dots as you want!
      3. To create the lines, dip the brush into the nail polish to get an excess of paint on the brush.
        1. Start on the paper, off to the side of the phone case to get the drip going then wave it back and forth over the case. Do this in multiple colors if desired.
        2. Allow the paint to dry completely before moving or using the phone case, enjoy!

      TO CREATE THE STRIPED PHONE CASE

      1. Take the tape and create the pattern you want. Make sure it is smoothed down on the case well, so you don’t get paint underneath.
      2. Paint the nail polish in desired places on the phone.
      3. Allow to dry completely before use and enjoy!

      TO CREATE THE CONFETTI PHONE CASE

      1. Place each piece confetti in place.
      2. Hold the confetti in place and paint clear nail polish over it, if you’re using glitter nail polish that works too! Allow it to dry.
      3. Add a layer of nail polish all over the case.
      4. Allow the case to dry completely before use and enjoy!

      Get more from this episode >>

      DIY Paper Chain Wall Hang
      48 of 50

      MATERIALS:

      • Branch, dowel or rod
      • Construction paper in various colors
      • Paper cutter, X-Acto knife and ruler or scissors
      • Hot glue gun and glue sticks
      • Cup hooks large enough for your branch x2

      OPTIONAL:

      • Invisible tape or school glue sticks

      INSTRUCTIONS:

      1. Cut a bunch of strips of paper in various colors to the same dimension. The size of the strips depends on how wide and big you want the rings to be.

      PRO TIP: Make one ring to size that you like first to determine the size.

      2. To start each chain, bring the ends of one strip together and secure with hot glue.

      PRO TIP: If you want to get the kids involved use invisible tape or school glue sticks instead!

      3. Loop a second strip through the first and secure together at the ends. Repeat adding links to the chain until you have the desired length of your wall hanging.

      PRO TIP: Visualize what you want the pattern to be and add colors in sections down each chain to create solid blobs as you add chains next to one another.

      4. Repeat steps 2-3 until you have as many chains as you need to fill the width of your branch.

      5. Slide the top link of each chain onto the branch.

      6. Use the cup hooks to hang the wall hanging and enjoy!

      Get more from this episode >>

      Dessert Pizza
      49 of 50
      Dessert Pizza
      Course:
      Dessert
      Seasonal Event:
      Valentine's Day
      Yield:
      8 servings
      INGREDIENTS:
      • 1 9-inch round frozen pie dough, thawed
      • 1 egg, beaten lightly
      • ¼ cup sugar
      • 1 tablespoon cinnamon
      • Nutella
      • Various candies, cereals, and sprinkles for decorating
      • 12-inch cardboard circle cutout

      DIRECTIONS:

      1. Heat oven to 350˚f, line sheet tray with parchment paper.
      2. Roll out pie dough until it is roughly 12 inches in diameter.
      3. Brush pie dough with egg wash.
      4. Fold edge of dough over on top of itself all the way around the circle, making a “pizza crust.” Press to adhere to egg wash.
      5. Whisk together sugar and cinnamon. Liberally sprinkle all over pie dough. Avoiding the “pizza crust” edge.
      6. Transfer pie dough to parchment-lined sheet tray.
      7. Poke pie dough all over with fork to prevent bubbles from forming in the oven.
      8. Bake for 15-30 minutes or until golden brown on top
      9. Remove from oven and cool on wire rack.
      10. Smear chocolate-hazelnut spread all over crust, avoiding the “pizza crust” edge.
      11. Cut one triangle wedge out of the cardboard circle, it should be equal to ⅛ of the circle.
      12. Hold the cardboard circle over the pizza. Sprinkle first topping through the cutout wedge to create a perfect “pizza slice” on the chocolate spread.
      13. Rotate the cardboard circle ⅛ and continue adding a new topping, repeat all the way around the pizza until all slices are topped.

      Get more Valentine's Day ideas from the Home & Family Love Ever After DIY & Cookbook >>

      DIY Seed Tape
      50 of 50

      MATERIALS:

      • Roll of toilet paper or paper towel
      • Scissors
      • Ruler
      • Cornstarch
      • Water
      • Bowl
      • Small paint brush
      • Empty toilet paper or paper towel roll
      • Seeds

      INSTRUCTIONS:

      1. Cut strips of toilet paper or paper towel.

      2. Look at seed packaging for the appropriate seed spacing.

      3. Use a ruler to space seeds correctly.

      4. Mix together cornstarch and water to make a “glue”.

      5. With a paintbrush, add a dab of “glue” where each seed should be placed.

      6. Place seed on the dab of “glue” and allow to dry.

      7. Roll up on to an empty toilet paper or paper towel roll.

      8. Unroll and place in the garden when ready to use.

      Get more from this episode >>

      ADVERTISEMENT
      ADVERTISEMENT
      ADVERTISEMENT