Fruit Box, Plastic Milk Crate, or Plastic Storage Bin
Artificial Turf
Hot Glue Gun
Garden Shears or X-Acto Knife
Permanent Marker
Ribbon
Directions
Lay out your artificial turf with the turf side facing down
Place your fruit box or plastic bin on the tuf and trace with permanent marker
Repeat this for all sides. *TIP: For the top of you bin cut true to size. For the sides of the box, give yourself an extra ½ inch at the top
Use garden shears or an X-Acto Knife to cut artificial turf to fit each side of your crate *TIP: If you want a larger hedge gift, combine two milk crates together with hot glue prior to making measurements.
Hot glue each piece on by one, with the turf spears facing up
Use a thick ribbon and wrap gift with a large bow on top
Note: For outdoor hedge gifts make sure the base you use is weatherproof ex. plastic milk crate, wooden crate, plastic bins. For indoor hedge gifts you can use a cardboard box, as long as the artificial turf is lightweight and won’t weigh it down
18x18x36 Cardboard box (or any size rectangular box you have)
10” by 40” Full length sonotube
Corrugated cardboard
Strips of cut of file boxes
Packers tape
Exacto knife
Paint
Foam Core
Vinyl lettering
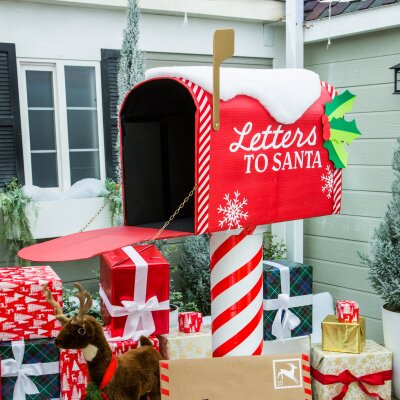
INSTRUCTIONS:
Lay box horizontally with flaps opening up and down.
Cut half of the top of the box off (don’t throw away this piece will create the door to the mailbox).
Cut 6, 2 ½” strips from you bankers’ box horizontally.
Tape first strip in an arch from one side to the other starting at the top of the box. Reinforce strip with a second strip, to make it more sturdy. Repeat this step until you have three arches starting from the beginning of the box and moving to the back.
Cut corrugated cardboard (this will be top of your mailbox) big enough to go from bottom side of the mailbox to the other side of mail box. You may have to do this in two strips to cover entire box.
Take corrugated cardboard strip and tape it to the bottom of the box. Before draping it to the other side of box, spray adhesive to the inside so it will stick straight to the sides of boxes. Drape adhesive onto the other side and secure it with tape at the bottom.
Take previous scrap you put to the side in step 2 and use tape to attach it to the bottom front flap of your box. This will create door.
Fold flap up and trace an arc so your door will fit your mailbox. Cut off excess material.
Take your mailbox and center it onto your sonotube and trace the circle. Cut out circle (save this circle for later use).
Cut out strips of corrugated cardboard, wrap it around tube about 2” from the top a couple of times to create a lip for the mailbox to sit upon. Set your mailbox on tube.
Take your circular cut out and tape it to the top of the sonotube inside mailbox.
Home Decor, Outdoor Decorations, Christmas Decorations
Seasonal Event:
Christmas
MATERIALS:
Food storage tubes
White spray paint
Red taillight tape
Led fairy lights
X-acto knife
Wire
Wire snips
Hot glue gun and glue sticks
INSTRUCTIONS:
Spray paint the inside of each tube white. Allow to dry.
Wrap the tube diagonally with the taillight tape. To create the thinner stripe, use an X-acto knife to cut thin strips and wrap them on in between the large stripes.
Add the wire ties. Cut about 8” lengths of wire and use hot glue to adhere them to the center of the back of each tube.
Embellishments of your choice for eyes, clothing, accessories
DIY Nutcracker Instructions
Create your base by gluing PVC pipe legs to base (14 inch plywood round).
Create the body by gluing 12 inch round to bottom of tube, reinforce with screws.
Glue the body onto the legs.
Take PVC pipe for arms, glue on and reinforce with screws. Place half-way down from top of tube.
Paint the legs white, the body red, the top black. Let dry.
Add embellishments of your choosing. Craft fur for the beard, and hair. Stick-on facial features from print out on transfer/adhesive paper. A template can be downloaded at homeandfamilytv.com
Use rope or fabric to decorate epilates for the jacket. Form epilates with an ornament ball glued to a deli cup, spray-paint gold.