Share

Home & Family 2018 Holiday Workbook

DIY Three Little Angels Decoration
1 of 29

Materials

  • Ready Mix Mortar
  • 1 ½ Wooden Balls
  • Plastic Champagne Glasses
  • Large and Small Feathers
  • Copper Wire
  • Drill and Drill Bit
  • Hot Glue
  • Wire Cutters
DIY Three Little Angels Decoration - Home & Family

Directions

1. Mix mortar mix according to package directions, pour into champagne glasses. Tap on table several times to remove air bubbles. Let harden.

2. Crack glasses and remove from concrete once dry.

3. Glue small feathers onto large feathers (repeat).

4. Glue pair of feathers onto back of concrete.

5. Wrap copper wire around ball. Where copper wire meets, bend 90 degrees.

6. Clip copper wire approximately 1 inch below angle.

7. Drill hole into back of wood ball and insert halo. Secure with glue.

8. Attach head to concrete with hot glue.

Get more information about this episode >>

DIY Snow Globe Party
2 of 29

Materials

  • Cake Stands and Glass Lids (or any glass containers that you think are pretty!)
  • Bottle Brushes
  • Christmas Decorations
  • Figurines
  • Fake Snow
  • Photos (I folded a little piece of paper and glued it to the back to help it stand up)
  • Glue Dots
  • Mod Podge
  • Glitter
  • Paint Brush
  • Scissors

Directions:

1. Lay all your decorations out on a table in "stations" for you guest. If you want to go the extra step, find cute photos of your friends to include in their globes!

2. Have everyone choose their own stand and glass top.

3. Decorate! This is the fun part because everyone can decide exactly how they want their own snow globe to look!

Tip: Place your photographs in first and decorate around them.
Another Tip: Use glue dots underneath your decorations (before you add the fake snow!) to help secure them into place.

4. I like to add a little snowy touch to the top of my glass by painting on mod podge and sprinkling on the glitter!

Get more information about this episode >>

DIY Log Reindeer
3 of 29

Materials

  • Hand Saw Or Miter Saw
  • Wooden Logs (1, 5-8 Inches Diameter)
  • (1, 4-6 Inches In Diameter For Head)
  • (3, 1.5-2 Inches In Diameter For Neck And Legs)
  • Twigs (For Antlers)
  • Screws
  • Drill
  • Hole Saw
  • Paddle Bit
  • Bells (For Nose)
  • Spray Paint
  • Googly Eyes
  • Hot Glue
  • Brown Felt Fabric
  • Wood Glue
  • Scissors
  • Mini Xmas Lights (Optional-They’re Prety Darn Cute Without The Lights)
  • Pruner/Gardening Shears (For Antlers)

Directions

1. Find your base, (check your Christmas tree lot or check with your gardener for logs)

2. Use a saw to cut to desired length

3. Drill 4 holes for the “legs” using the 2-inch hole saw (depth of each hole is up to you)

4. Using a saw, cut a 30 degree angle on the edge of the base (this is where your “head” will go)

5. Dry fit the legs to make sure they’ll fit in the holes and make sure they’re even (cut them down to match if necessary)

6. Take each “leg” out and add wood glue and secure back into hole

7. Let dry 24-48 hours (if you’re usuing glue alone) note: if you don’t have that time you can back up with nail gun to hold into place

8. With a pencil, mark where you want the nose to be (head should be 3-5 inches in diameter and 5-6 inches long)

9. Set the head on the notch you created earlier for neck, mark where you want the nose to go, where screw will go and mark angle of the screw to the back to attach to body

10. Put head into the vice, take a 1 inch paddle bit and drill about ¼ inch into wood, 2 sockets for the eyes, then drill one hole all the way through (that’s a pre-drill) for nose

11. Set head into place, take your 4 inch deck screw, secure with a little wood glue

12. Now, at top of his head, take your ¼ inch drill bit and drill 2 holes for antlers

13. Using hot glue, fill holes and stick in birch twigs (or any twigs) for antlers

14. For the nose, cover the screw with a bell

15. Add googly eyes into eye sockets with hot glue

16. Using brown felt, cut out 2 “ears”, put a slit down the middle of them so it sets one side over the other (this will allow the ear to sit up)

17. Then cut a bushy little tail out of same brown felt and glue onto his backside

18. Wrap in battery pack lights (optional)

Get more information about this episode >>

DIY Oversized Ornaments
4 of 29
DIY Oversized Ornaments
Level:
Beginner
How-To:
Home Decor, Christmas Decor

MATERIALS

  • Plastic Bowls
  • Plastic Margarita Glasses
  • Large Plastic Ball
  • Super-Glue
  • Chrome Spray Paint
  • Anodized Automotive Paint
  • PVC Pipe or Shower Rings
  • Large S-Hooks

INSTRUCTIONS

  1. Layout items to be used to for your ornament. Identify bottom piece.
  2. Work from the bottom up and use superglue to connect elements for your ornament.
  3. Create topper by supergluing ½ inch and ¼ inch pieces of PVC pipe, or plastic shower rings together. Glue topper to ornament. Allow glue to dry for 1- hour.
  4. In a well-ventilated area, spray-paint entire ornament with chrome or silver paint. Allow to dry for 10 minutes.
  5. Spray paint entire ornament (excluding the topper) with 3 to 4 coats of anodized automotive paint in your choice of color. Allow 10 minutes for drying between coats.
  6. Once fully dry, slip S hook or craft-wire through the hole in the topper, and hang your ornament from your porch or your favorite tree!

Click here for more Christmas crafts

DIY Nativity Scene
5 of 29

Materials

  • 8 40” poles
  • 2 58” poles
  • 2 50” poles
  • 4 66” 1x10a
  • Drill
  • 3 ½” screws
  • ⅛” drill bit for pre-drilling
  • Grass skirts
  • Raffia
  • Rope
  • Lanterns
  • Baskets
  • Nativity figurines
  • Puck lights (OPTIONAL)
  • *NOTE: All poles are 2”

Directions

1. Mark 2 40” poles at 9” and 20” from the bottom.
2. Mark 2 50” poles at 9” and 20” from the bottom.
3. Mark 6 40” poles 2” in on both ends.
4. Lay down 2 40” poles vertically and lay across 2 40” poles horizontally at the marks.
5. Pre-drill holes at the marks, and then drill in screws.
6. Repeat steps 4 & 5 with 2 50” poles and 2 40” poles.
7. Add 40” pole horizontally across top of both sides.
8. Repeat step 5.
9. Stand both sides approximately 54” apart and lay across 2 58” poles where the 40” poles stick out on both sides and rest them on top.
10. Repeat step 5.
11. Lay the 4 66” 1x10 boards staggered across the top and repeat step 5.
12. Stain or paint whatever color desired.
13. Tie rope where the horizontal posts connect with the vertical posts for a total of 8.
14. Lay grass skirts across the roof.
15. Add raffia at the base.
16. Hang and place lanterns and baskets inside.
17, Add figurines

OPTIONAL: Add puck lights underneath the roof to light it up at night from above.

*NOTE: Adjust size depending on the size of your figurines.

Get more information about this episode >>

DIY Gingerbreading Your House
6 of 29
DIY Gingerbreading Your House
Level:
Advanced
How-To:
Home Decor, Christmas Decor
Seasonal Event:
Christmas

MATERIALS:

  • Insulation Foam Board
  • Spray Foam
  • Paint
  • Deli Cups
  • Mounting Tape
  • Mounting Tape
  • PVC Pipe
  • Sparkles
  • X-Acto knife
  • Ruler
  • Measuring Tape
  • Paint Brush

INSTRUCTIONS:

  1. The first thing you want to do is measure the space you plan on putting these gingerbread finishing’s on. Measure your doors/windows/arches or wherever you’re putting these
  2. Take your insulation foam board & mark your measurements.
  3. Score the board where your marks are & then just break it off
  4. It’s time to pipe on your frosting. Take spray foam & slowly pipe it on like frosting. A zigzag design looks good
  5. Once your spray foam is dry you can spray paint the “frosting” white
  6. To make the peppermints -you need to take your insulation foam board & cut it into a round.
  7. Paint your round white. Once dry you can draw out outlines of where you want your red stripes to go
  8. Then paint in your red strips. You could also use red craft foam as an alternative
  9. To make the gumdrops -take deli cups & spray paint them all kinds of fun colors of your choice
  10. While the deli cups are still sticky from the spray paint you can sprinkle glitter on top for a sugary finish
  11. Once everything is dry all you need to do it hot glue the candies onto the piping boards
  12. Then to hang use mounting tape & place the piping pieces where needed
  13. Ta-da!

Click here for more Christmas crafts

Get more information about this episode >>

DIY Holiday Hand Towels
7 of 29

Materials

  • Plain Hand Towels
  • Plaid Fabric or Ribbon
  • Fabric Glue
  • Sequin Trim
  • Scissors
  • Fray Check
DIY Christmas Hand Towels - Home & Family

Directions

1. Select word or phrase and write or trace it out onto plaid fabric in block letters - be sure that your block letters are at least ½ inch wider than your sequin trim.

2. Cut out letters with fabric scissors.

3. Treat letters with Fray Check.

4. Use fabric glue to add sequin trim to center of block letters - make sure to leave a border area between the end of the trim, and the end of the plaid fabric.

5. Once letters are dry, use fabric glue to adhere them to hand towels. If hand towels are intended for heavy use - sewing letters onto the towels is advised.

Get more information about this episode >>

DIY State Flower Decor Balls
8 of 29

Materials

  • Craft Box
  • Styrofoam insert
  • Evergreen
  • Styrofoam Balls (various sizes)
  • Velvet fabric and/or wide ribbon
  • Ornate trim
  • Pearl headed push pins
  • Artificial flowers
  • Hot glue
  • Name tag

Directions

1. Prepare Box (Styrofoam, Evergreen – Pre-Done)

2. Wrap Ball in Velvet (Step Out In Stages)

3. Add Trim, Ribbon & Adornments

4. Add State Flower

5. Add Name Tag

Get more information about this episode >>

DIY Illuminated Snowflakes
9 of 29

Materials

  • 1/4” Wood Lathe Strips (To Desired Length)
  • Four 24” Pieces, Four 5” Pieces, Eight 6” Pieces With One Edge Cut At 45 Degree Angle.
  • White Paint & Brush (Use Dry Brush Technique For Whitewash Effect)
  • Drill (For Light Holes -Paddle Bit To Size Of Your Lights)
  • String Lights (Globe Bulbs Or Christmas Bulbs – Use Clear Colored)
  • Glue (For Wood Strips) (Hot Glue Or Wood Glue)
  • Staple Gun (To Attach String Lights To Back - May Also Use Hot Glue.)
  • 50lb Test Clear Monofilament (For Hanging)

Directions

1. Measure & cut wood to length

2. White wash paint (dry brush effect)

3. Assemble and glue star shape

4. Measure and mark for light bulb holes

5. Drill holes (large enough for bulbs)

6. Push bulbs through and fasten on back side

7. Drill hole for hanging

Get more information about this episode >>

DIY Gift Wrap Caddy
10 of 29

Materials

  • 2-ft high wooden storage cabinet
  • 5-7, 2-inch wide PVC pipes (around 5-7 needed)
  • PVC plastic rain gutters
  • Plastic gutter caps
  • Planter pot dolly
  • 1-inch screws
  • Screw Gun
  • Hand saw to cut PVC pipe (you can also get cut at hardware store)
DIY Gift Wrap Caddy - Home & Family

Directions

1. Start with a 2 ft high cabinet (any storage cabinet you can find that has drawers.

2. Use your screws and screw gun to attach 2 wooden planter pot dollies to the base of the cabinet.

3. Attach 2-inch wide PVC pipes on the side of the cabinet vertically with your screw gun. These will serve as the “racks” holding the actual wrapping paper.

4. Attach PVC end caps to the bottoms of the PVC pipes. NOTE: you can get these cut at the hardware store or use a handsaw to cut them at home.

5. Next, cut PVC plastic rain gutters to match the sides of your cabinet (horizontally).
- Use screws and a screw gun to mount your plastic PVC rain gutters on the sides of your cabinet (these will hold your ribbons).

6. Use the gutter caps to seal the ends. Existing drawers are for storing scissors, tape and any other materials.

Get more information about this episode >>

DIY Children's Christmas Tree
11 of 29

Materials

  • Pattern
  • Upholstery foam
  • Upholstery foam
  • Spray adhesive
  • Scissors or electric carving knife
DIY Children’s Christmas Tree - Home & Family

Directions

1. Find a cone pattern online and scale up to the size tree you want to make to use as a pattern.

2. Lay it on the foam and trace it out.

3. Cut it out with an electric carving knife. You can use scissors but the electric carving knife will cut through like butter.

4. Lay the felt out on the table and using the upholstery foam cut out as a guide, trace the pattern onto the foam.

5. Cut out the pattern on the felt but leave about 2 inches on one side as a tab because we’re going to use that to secure the cone.

6. Cut off any excess felt but leave about ½-1 inch give so that the foam doesn’t pull the felt.

7. Spray the felt with some adhesive spray and let that get a little tacky.

8. Then starting with the bottom edge of the foam, spray the adhesive on the foam and start laying the felt on top of it. You want to spray as you go to get the best adhesion.

9. Roll the foam and use hot glue or fabric tak to secure the 2 inch tab of foam.

10. Wrap felt on top of the cone neatly and secure.

11. Using a stencil, cut out shapes for ornaments and stick on tree.

12. Add a felt tree topper.

Get more information about this episode >>

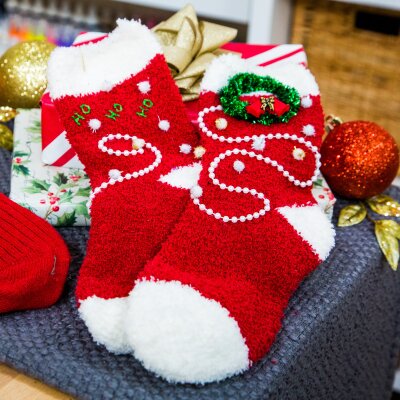
DIY Christmas Socks
12 of 29
DIY Christmas Socks
Level:
Easy
How-To:
Fashion
Seasonal Event:
Christmas

Materials

  • Red, green, or gray socks
  • Foamcore
  • Fabric glue or hot glue (fabric glue suggested)
  • Green + silver pipe cleaners
  • Mini bows
  • Decorative embellishments of your choice

Directions

  1. Cut a piece of foamcore (should be around the length from your ankle to knee
  2. Slide foamcore into sock
  3. To make “wreath” twist green and silver pipe cleaners together, once twisted wrap into the shape of a wreath, secure with fabric glue
  4. Glue mini bows to the top of the “wreath
  5. Use fabric glue to glue on any other embellishments you please (you can look up classic “ugly Christmas sweaters” for inspiration!)

Get more information about this episode >>

DIY Sweater Mittens and Leg Warmers
13 of 29

Materials for Mittens

  • Sweater
  • Scissors
  • Chalk
  • Needle and Thread

Materials for Leg Warmers

  • Old sweater
  • Scissors
  • Needle and thread

Directions for Mittens

1. Trace shape of hands with chalk,, giving about an half inch more
2. Cut out tracing
3. Line two pieces up and sew together
4. Turn inside out

Directions for Leg Warmers

1. Cut arms off of sweater
2. Fold seams in and sew in place to keep from fraying

DIY Cookie Sheet Menu Board
14 of 29

Materials

  • Cookie Sheets w/ non-stick coating
  • Chalk Paint (preferably spray version)
  • 2x2 66” Wood Pole
  • Flush mounts
  • Plywood Round
  • Glue
  • Chalk Markers
  • Red Scrapbook Paper

DIrections For Menu Board

1. Take plywood round

2. Attach a 2x2 66” long in center with 2” inch screw

3. Paint to desired finish

Directions For Cookie Sheets

1. Paint to your desired color

2. Add chalkboard paint for menu

3. Mark it up on pole where to hang (evenly spaced)

4. Attach flush mount to pole

5. Glue other half of flush mount to cookie sheet

Directions For Peppermint:

1. Spray paint it white

2. Use Acryllic paint with brush for red detail

Get more information about this episode >>

DIY Melted Snowman
15 of 29

Materials

  • Jigsaw
  • Plywood (4x4)
  • Lights
  • Red Gloves or Mittens
  • Buttons
  • Top Hat
  • Scarf
  • Fake Carrot
  • Paint
  • Foam Ball
  • Sandpaper
  • Felt

Directions

1. Trace out your melted snowman design with a sharpie

2. Using a jigsaw, cut your traced plywood

3. Paint your plywood white

4. Drill holes for your lights, about a foot apart

5. Attach your lights from the bottom of the wood

6. Drill a dowel into your plywood (anywhere you want the head!)

7. Attach your foam ball to the dowel

8. Add your fake carrot nose, felt ears, eyes, scarf, mittens and top hat! Use whatever materials you like, get creative!

Get more information about this episode >>

DIY Double Duty Holiday Headbands
16 of 29

Materials

  • Trim or Ribbon
  • Appliques
  • Scissors
  • Hot glue or E6000
  • Liquid seam sealant
  • Sewing Kit (optional)
Double Duty Holiday Headbands - Home & Family

Directions

1. Measure and cut trim/ribbon to desired length.

2. For a belt, measure your waist size and add approximately 12 inches.

3. Using a liquid seam sealant (or needle and thread) create a clean hem/edge for the ribbon ends.

4. Arrange appliques on trim/ribbon.

5. Secure appliques with hot glue, E6000, or needle and thread.

6. Enjoy!

Get more information about this episode >>

DIY Christmas Curtains
17 of 29

Materials

  • Measuring Tape
  • Craft Paper
  • Red Velvet Fabric
  • White Faux Fur
  • Curtain Tassels
  • Elastic
  • Scissors
  • Glue
  • Sewing Machine (Optional)
DIY Christmas Curtains - Home & Family

Directions

1. Measure Window

2. Make A Paper Pattern

3. Cut The Velvet Shape

4. Use Bottom Of Shape To Cut Fur

5. Hem Sides

6. Add Elastic

7. Make Pole Pocket

8. Add Tassels

9. Hang

Get more information about this episode >>

DIY Christmas Drum Table
18 of 29
DIY Christmas Drum Table
Level:
Intermediate
How-To:
Home Decor, Entertaining
Seasonal Event:
Christmas

Materials

  • Half Moon Table
  • Foam Core
  • Washcloth
  • Felt
  • Double Stick Tape
  • Spray Glue
  • Scissors
  • Exacto Knife
  • Gold Ribbon
  • Gold Rope
  • Wooden Drawer Knobs
  • Gold Tassels
  • Hot Glue Gun
  • Decorations

Directions

  1. Wet Foam Core with a wet washcloth, the ends will begin to curl
  2. Using double stick tape, attach bent foam core to table
  3. Cut your felt to fit the attached foam core
  4. Attach felt to foam core with spray glue
  5. Hot glue knobs to felt (evenly spaced to your liking)
  6. Drape tassels over top knobs
  7. String rope around knobs to create desired drum effect

Get more information about this episode >>

DIY Holiday Baskets
19 of 29

Materials for Elf Basket

  • Basket
  • Green Paint
  • Paint brush
  • Green glitter spray
  • Hot Glue
  • Glue sticks
  • Red fabric or Felt
  • Gold jingle bells
  • Optional: Thread and needle

Materials for Santa Basket

  • Basket
  • Red Paint
  • Paint brush
  • Red glitter spray
  • Black scrapbook paper or felt
  • Hot Glue
  • Glue sticks
  • Fur
  • Scissors
  • Gold embellishment for belt buckle

Materials for Snowman Basket

  • Basket
  • White Paint
  • Paint brush
  • White glitter spray
  • Hot Glue
  • Glue sticks
  • Plaid fabric
  • Large black buttons
  • Scissors

Directions for Elf Basket

1. Paint basket green. Make sure to paint the interior of the basket too.
2. Add green glitter with glitter spray
3. Let dry
4. Cut triangle shape trim from fabric or felt
5. Use hot glue and glue around the top of the basket
6. Glue or sew gold bells to the bottom of every triangle tip
7. Fill with flowers, treats, or presents
8. Enjoy!

Directions for Santa Basket

1. Paint basket red. Make sure to paint the interior of the basket too.
2. Add glitter with red glitter spray
3. Let dry
4. Cut and glue fur trim around the top of the basket
5. Using black scrapbook paper or felt, cut out a belt
6. Wrap around middle of the basket and secure with glue
7, Add gold embellishment for belt buckle
8, Fill with flowers, treats, or presents
9. Enjoy!

Directions for Snowman Basket

1. Paint basket white. Make sure to paint the interior of the basket too.
2. Add glitter with white glitter spray
3. Let dry
4. Measure and cut plaid fabric as snowman’s scarf
5. Wrap around the top of the basket and secure with glue
6. Add buttons down the center of the basket (2-3 depending on your basket size)
7. Fill with flowers, treats, or presents
8. Enjoy!

Get more information about this episode >>

DIY Ornament Topiary
20 of 29

Materials

  • Round hat box 14” (be sure to have 2 lids)
  • Dowel (Start with a 36” dowel)
  • Hard foam balls (no floral) - Size: 10” 8” 6"
  • 4 oz aluminum foil ramekins
  • Acrylic Paint
  • Spray Paint
  • Gold Rope, Craft Paper, Stamps (any embellishment you prefer)
  • Hot glue

Directions

1. Once you’ve gathered your material’s you’re going to want to drill your holes into the foam balls. If you have a long drill then drill all the way thorough. If you don’t have a long one then drill as far as you can on the top & bottom & then punch through your dowel to connect the holes.

2. Next, you’re going to paint your foam balls. Paint with whatever colors you’d like. (Just do not spray paint because the foam will eat the paint)

3. Let dry

4. Secure your dowel to the bottom of the drum base

5. Once dry, you will take your dowel & connect all the balls by just stacking them together

6. This is a good time to spray paint your round hat base red to create the drum base

7. Then it’s time to decorate your ornaments. Add a tin ramekin as the top for the ornament & craft paper as other embellishments. You can also use puffy paint for a 3D look

8. Once your drum is dry, you’ll want to add embellishments onto that too! You’re going to take gold rope & hot glue it onto the side of the drum. Just glue on in a zig-zag type design to give it that Christmas drum look!

Get more information about this episode >>

DIY Gift Wrap Jewelry
21 of 29

Materials

  • Tiny bows
  • Glue
  • Charms or Crystals
  • Jewelry Making material (Drop earrings, pendants, rings)
DIY Gift Wrap Jewelry - Home & Family

Directions

1. Pick your bow color

2. Decide on what color stone for center of bow

3. Add drop of glue to center of bow, attach stone

4. Cut off adhesive backing from bow so you don’t see any sticker backing

5. Add glue to desired jewelry

6. Attach bow to jewelry

*Once you trim paper, you can use adhesive backing instead of glue

· Options: Stack together for a drop earring or necklace, just glue it where ever you want it.

Get more information about this episode >>
DIY Sheet Music Christmas Tree
22 of 29

Materials

  • Wood boards (1 large and 1 small)
  • Paint
  • Paint brush
  • Christmas sheet music
  • Hot glue gun
  • Spray glue
  • Glue sticks
  • Wood dowel
  • Glitter
  • Nails
  • Scissors

Directions

1. Paint plywood or small wood board with red paint (or desired paint color).
2. Let dry.
3. Nail the smaller board to the larger board. Make sure to put a nail in each corner so it’s secure.
4. Using the original size of your sheet music, 8 ½ x 11, roll your paper tightly. To create a tight roll, place your dowel in the center on the paper and roll the sheet. Secure with hot glue.
5. Remove dowel (you can use a pencil to poke it out).
6. Cut your next sheet of music ½ inch shorter and repeat until you get down to approximately 2 inches.
7. Continue rolling and securing with hot glue.
8. Cut out a rectangle from sheet music and glue as tree trunk.
9. Begin gluing down each roll creating a tree/triangle shape.
10. Glue wood dowel to top of tree.
11. Cut out a star from sheet music.
12. Use spray glue and add glitter.
13. Hot glue star on top of dowel to create a 3D tree topper.
14. Display and enjoy!

Get more information about this episode >>

DIY Shadow Box Christmas Scene
23 of 29

Materials

  • Shadowbox
  • Christmas scene
  • Copper wire mini lights
  • Card stock
  • Foam Core
  • X-acto knife
  • Awl
  • Glue
  • Tape

Directions

1. Select a Christmas scene photo with one main focal point and print out two copies on card stock

2. Use X-acto knife to cut out main image from Christmas scene, cut foam core to fit

3. Glue cut out image to foam core

4. Glue foam core image on top of original picture, making sure you have about ½ inch of height

5. Tape battery pack to back of original image

6. Use Awl, X-acto knife or other sharp tool to poke holes in the desired location of the lights

7. Poke lights through

8. Place finished Christmas scene inside shadowbox and close

9. Display and enjoy!

Get more information about this episode >>

DIY Christmas Card Tree
24 of 29
DIY Christmas Card Tree
Level:
Easy
How-To:
Storage, Home Decor
Seasonal Event:
Christmas

Materials

  • Table Leg
  • Wire
  • Wire Snips
  • Drill
  • Pliers
  • Hot Glue
  • Hallmark Cards

Directions

  1. Paint table leg red.
  2. Drill holes into the side of table leg using a ¼ inch bit.
  3. Twist wires using a drill. Use a clamp as anchor point, when twisting the wires.
  4. Use pliers to form shapes of branches.
  5. Use hot glue to secure branches.
  6. Add Hallmark cards and adornments to the tree.

Get more information about this episode >>

DIY Gnome Toppers
25 of 29

Materials

  • Wooden Craft ball
  • Fabric
  • Fabric Glue
  • Needle & Thread
  • Merino or Roving Wool
  • Card Stock

Directions

1. Cut your card stock at approximately 45 degree angle.

2. Place your fabric under your card stock

3. Using scissors, cut your fabric into the outline of your card stock

4. Wrap your fabric so that the ends connect and create a cone shape

5. Starting at the top, hot glue the ends of your fabric pieces together (you can also use fabric glue)

6. Once your fabric cone has dried, hot glue your wooden craft ball to the bottom of your cone & let it dry

7. Flip your cone over so the nose is at the bottom, and glue your roving or merino wool just under the nose. Let it dry

8. Enjoy your Gnome Topper!

Get more information about this episode >>

DIY Christmas Serving Trays
26 of 29

Materials for Tile Serving Tray

  • Tile
  • Liquid Nails
  • Tile Spacers
  • Grout
  • Wooden box tray

Materials for Wood Slice/Chalkboard Serving Tray

  • Wood slice
  • Handle pulls
  • Drill
  • Screwdriver
  • Chalkboard paint
  • Mini paint roller
  • Chalk
  • Painter’s Tape
  • Black Marker

Directions for Tile Serving Tray

1. Choose the tile you would like to use for your tray
2. Build a base for your tray with plywood or buy a wood box tray
3. Spread liquid nails inside base/wooden box tray
4. Lay down tiles, then use tile spacers to make sure they are spread out evenly
5. Spread grout on top of tiles
6. Clean and allow to dry for 24 hours

Directions for Wood Slice/Chalkboard Serving Tray

1. Tape the area you will be painting with chalkboard paint
2. Paint half of wood slice with chalkboard paint. Allow to dry for 2 hours.
3. Once you peel the tape off, use a black marker to create more natural line
Optional: Draw a pattern resembling lace with your marker, where the chalkboard paint ends
5. Place handle pulls on both sides of your wood slice. Mark where the handles are parallel.
6. Drill two holes on each side of the wood slice and attach handle pulls with a screwdriver.
7. Write a Christmas greeting on the board, serve your favorite treats on the other side for your guests, and enjoy!

Get more information about this episode >>

DIY Hot Chocolate Gifts
27 of 29

Materials for Snowman Jars

  • 3 Jars
  • Cocoa powder
  • Marshmallows
  • Peppermint, cookies, or other treats
  • Paint Pens
  • Ribbon
  • Hot Glue

Materials for Chocolate Spoons

  • Melting Chocolate
  • Wooden Spoons
  • Crushed Peppermint, Marshmallows, Cookie Crumbs, Sprinkles, etc.

DIY Hot Chocolate Gifts - Home & Family

Directions for Snowman Jars

1. Fill jars with your favorite hot cocoa treats. (Fill one with hot chocolate powder, another with marshmallows, and another with peppermint or other treat.)

2. Hot glue the jars, one on top of the other

3. Paint the snowman’s face on the top jar and buttons on the middle jar

4. Wrap a ribbon around the snowman’s “neck” for a cute scarf look!

Directions for Chocolate Spoons

1. Dip your wooden spoons into the melted chocolate and lay them out on parchment paper to dry

2. Before the chocolate dries, sprinkle your favorite treat over them

Get more information about this episode >>

DIY Holiday Napkin Rings
28 of 29

Materials for Drum Napkin Rings

  • Round gold napkin rings
  • Glitter scrapbook paper
  • Hot glue
  • Chord

Materials for Present Napkin Rings

  • Square Napkin rings
  • Spray paint
  • Thin ribbon
DIY Holiday Napkin Rings - Home & Family

Directions For the Drum Napkin Rings

1. Take your 2 gold round napkins rings & hot glue them together
2. Once dry, Take your glitter scrapbook paper & wrap it around the napkin ring & glue to secure
3. Take your thin cord & cut it into little pieces of the height of your napkin ring .
4. Glue down cord pieces on angles throughout the outside of the drum & other embellishments

Directions For the Present Napkin Rings

1. Hot glue your 2 square napkin rings together
2. Spray paint with your choice of color
3. Once dry take your thin ribbon & thread it over the top & bottom of your ring.
Then, for the horizontal part of the ribbon, just covered it over the crack where you originally glued the 2 napkin rings together & secure on with glue.

Directions For Christmas Tree Napkin Fold

1. Start with your napkin completely open
2. Fold in half & fold in half again
3. Place it in a diamond shape
4. Take just the top layer corner & fold up to the top corner but not completely touching it yet (almost to the point where you just have a border)
5. Do the same for the second layer & repeat for all other layers
6. Once that’s done, flip the napkin over & take bottom left corner & swing it over to where the fold at the top is in a straight line. Do the same for the bottom right corner
7. Flip over & fold up the little corners so they are facing up. After the top one is folded tuck the corners below in
8. Paper clip the back corner to give it a nice hold
9. Glue an ornament to a popsicle stick & once dry stick it in the top!

Get more information about this episode >>

DIY Cookie Tin Christmas Cake
29 of 29

Materials

  • Cookie Tins (can use Paper Mache round boxes too)
  • Hot Glue Gun
  • Dry Erase Marker
  • Spray Paint
  • Ribbon
  • Christmas Decorations
DIY Cookie Tin Christmas Cake - Home & Family

Decorations

1. If tins are not already holiday themed, spray paint them. Make sure no spray paint gets on the inside of the tins.

2. Stack the tins largest to smallest and mark where each tin is placed with a dry erase marker.

3. Unstack tins and add hot glue on each dry erase mark, and then adhere tins together.

4. Wrap ribbon around each tin using hot glue.

5. Add decorations where needed.

Get more information about this episode >>

ADVERTISEMENT
ADVERTISEMENT
ADVERTISEMENT