Share

DIY Holiday Decor | Holiday Guide 2019

DIY Poinsettia Hoop Wreath
1 of 34
DIY Poinsettia Hoop Wreath

MATERIALS:

  • Crepe paper (red, green, gold)
  • Brass hoop
  • Hot glue gun (low temp)
  • Green floral wire
  • Green floral tape
Union Hill Studio Visit & DIY Poinsettia Hoop Wreath - Home & Family

INSTRUCTIONS:

1. Cut petal shapes out of crepe paper.

2. Pro tip: Vary size and shade for more interest!

3. Pro tip: cut lengthwise with grain of crepe paper.

4. Create berry stamen by wrapping a small piece of cotton or tissue paper in gold crepe paper. Glue to floral wire, and secure with floral tape.

5. Wrap petal around floral wire and secure with hot glue.

6. Pro tip: shape petals with your fingers to give them curve.

7. Repeat with rest of petals.

8. Wrap wire around brass hoop and secure flower with hot glue.

9. Add leaves or other flowers to finish.

Get more from this episode >>

Gingerbread House Nightlights
2 of 34
Gingerbread House Nightlights

MATERIALS:

  • Polymer oven bake clay in terra-cotta
  • Cornstarch
  • Rolling pin
  • Craft knife
  • X-acto knife
  • Cutting mat
  • Parchment paper
  • Baking sheet
  • Hot glue gun and glue sticks
  • Puffy paint in white and other decorative colors
  • Clay for details on house like trees, roof and candy
  • Cardboard for the base
  • Battery powered tea lights

INSTRUCTIONS:

1. Work the clay with your hands for a bit to soften it.

2. Roll the clay out on a work-surface covered with parchment paper. Use the rolling pin to get the clay flattened to about a ¼” slab. If the clay isn’t rolling out, use some cornstarch to help loosen the clay.

3. Now it’s time to cut out the pieces for your house. Print a template for the gingerbread house from the internet and use your craft knife to cut the walls and roof out of clay. The doors and windows of the house are where the light will show through so the bigger the openings, the more light will come through.

4. Use cookie cutters to make any décor pieces you want like trees.

5. Place the cut shapes onto a parchment paper covered baking sheet. Bake according to the instructions on package.

6. Decorate your house with puffy paint, add white for frosting details and use any other colors desired to add candy details. You can do this before you assemble and allow it to dry before assembling if that is easier for you.

7. Hot glue the house together.

8. Make sure to fill in the crest of the roof with puffy paint so that it looks like icing and attach any clay details you created.

9. Cut a base out of cardboard that is slightly larger than the footprint of the house. If the door isn’t big enough to fit a tea light in, cut a hole in the center of the base.

10. Attach the house to the base.

11. Place the house, turn the tea light on and enjoy!

Get more from this episode >>

DIY Christmas Present Topiary
3 of 34
DIY Christmas Present Topiary

MATERIALS:

  • Cardboard boxes in consecutive sizes
  • Spray paint in Christmas color
  • Acrylic paint in different Christmas color than the spray paint
  • Round sponge brush
  • Foam core
  • X-acto knife
  • Metal ruler
  • Cutting mat
  • Wrapping paper
  • Scissors
  • Hot glue gun and glue sticks
  • Wide ribbon
  • Optional: Paper mache gift boxes

INSTRUCTIONS:

1. First you need to create the lids for the boxes. For the bottom box you can just cut strips of foam core that are about 2” tall as wide as the sides of your box. Two of the strips should be slightly longer so you don’t have gaps on the corners. Attach a strip to the top edge to each side of the box with hot glue.

2. To create the lids for the other boxes, trace the top of each box size onto the foam core and cut out. Cut strips to edge the side of each lid like you did on the largest box. About 2” tall with strips two slightly longer than the other so you don’t have gaps on the corners.

3. Glue the strips to the edges of the top to finish your present tops.

4. In a well-ventilated area spray paint some of the boxes and their tops a solid color, metallic is always fun. Allow them to dry.

5. While those dry, wrap the other boxes and tops in various patterns of wrapping paper.

6. With your sponge brush and acrylic paint, paint a polka dot pattern onto the painted presents. Allow the paint to dry.

7. Cut two long lengths of ribbon and crisscross them so they meet in the middle. Secure with hot glue in the center. Place the biggest box on top and secure the ribbon to the bottom of the box with not glue.

8. Stack the boxes from largest to smallest, securing with hot glue in between each one.

9. Once your stack is complete bring the ribbons up to meet in the center of the top box. Trim any excess ribbon necessary and secure with glue in the center of the box.

10. Make a bow out of your ribbon and hot glue it on top.

11. Repeat steps 1-10 to make as many topiaries as you want.

12. Place with the rest of your décor and enjoy!

Get more from this episode >>

Christmas Buffet Tablescapes
4 of 34
Christmas Buffet Tablescapes

MATERIALS:

    TO CREATE ORLY’S PAMPAS TABLESCAPE:

    • Pampas grass
    • Hairspray
    • Palm leaves
    • Magnolia leaves
    • Paint pen in white or another light color
    • Wax seal kit
    • Rectangular metal frame flower vase
    • Wooden boxes for utensils
    • Chunky off-white yarn
    • Gold tablecloth
    • Wooden bowls
    • White ceramic dishware
    • Gold flatware
    • Optional: Wooden candlesticks for levels
    • Optional: Gold ornaments for décor
    • Optional: Eucalyptus leaves for décor

    TO CREATE KEN’S UPSIDE-DOWN CHRISTMAS TREE TABLESCAPE:

    • Upside-down Christmas tree
    • Mica powder
    • Fine glitter
    • Chunky glitter
    • Mod podge
    • Spray adhesive
    • Silver dishware
    • Silverware
    • White ceramic dishware
    • Silver candlesticks
    • Tapered candles
    • Icicle ornaments
    • Silver, blue and green ornaments
    • Fur table throw
    • Blue tablecloth
    • Optional: Eucalyptus leaves for décor
    • Optional: Tree skirt
    • Optional: Sandbags or other weighted objects
    DIY Buffet Table - Home & Family

    INSTRUCTIONS TO CREATE ORLY’S PAMPAS TABLESCAPE:

    1. To create the utensil holders, use your paint pen to write each utensil name on a magnolia leaf. Use the wax seal kit according to the instructions to attach the leaf to the front of the box. You can cut the off stem if desired.

    2. To create the buffet labels, write each food option onto a palm leaf with your paint pen. Allow to dry.

    3. Wrap the bottom of your vases with yarn. Tie off with a knot.

    4. Lay your tablecloth down and arrange all your dishes and centerpiece vases to make sure you like the placement of everything. Use candlesticks to raise things up if necessary.

    5. Drop your pampas grass into the vases.

    6. To shape the grass and prevent shedding, spray it lightly with hairspray and fan it out.

    7. Arrange ornaments and eucalyptus around the table for a decorative element if desired.

    8. Set your food, drop in your utensils and enjoy!

    INSTRUCTIONS TO CREATE KEN’S UPSIDE-DOWN CHRISTMAS TREE TABLESCAPE:

    1. Create your ornaments first, this should be done in advance because the glue can take a while to dry. There are three different ways of doing this:

    • For faceted ornaments use spray adhesive to cover with mica powder.
    • For regular ball ornaments use fine glitter with a mixture of mod podge.
    • For large or oblong ornaments use spray adhesive to cover with chunky glitter.

    2. Set up your Christmas tree on or above your table according to the instructions.

    3. If you’re using a tree that sits on your table, make sure to weight the stand for stability and cover the weights with a tree skirt. If your tree sits on the table put the cloth down first.

    4. Decorate the tree with your ornaments.

    5. Put your tablecloth down, then the faux fur table throw if you haven’t already and arrange your dishes until you like the placement.

    6. Set your candlesticks and place candles in them.

    7. Arrange eucalyptus around the table for a decorative element if desired.

    8. Set your food and utensils, light the candles and enjoy!

    Get more from this episode >>

    DIY Frosted Bottle Silhouettes
    5 of 34
    DIY Frosted Bottle Silhouettes

    MATERIALS:

    • Bottles green, red and clear work
    • Frosted glass spray paint
    • Black acrylic paint
    • Artist fan paintbrush
    • Wine cork LED lights
    • Optional: Snow-Tex or glitter snow

    INSTRUCTIONS:

    1. In a well-ventilated area, spray paint your clean wine bottle with the frosted glass. Set aside to dry. If you want the bottle to be more opaque, you can add layers of the frosted glass spray paint.

    2. Once the bottles are dry, take the fan brush and dab it into the black acrylic paint. Then paint one vertical line that will serve as the trunk of your tree.

    3. To create the branches, use a dabbing technique. Make sure your tree gets narrower towards the top. Set aside to dry.

    4. If you want snowy branches take a clean or new brush and add snow in a dabbing motion on the ends of the branches.

    5. Take the LED wine cork and feed the lights into the bottle. Insert the cork.

    6. Arrange the bottles into your décor as desired, turn on and enjoy!

    Get more from this episode >>

    DIY Hallmark Card Frame
    6 of 34
    DIY Hallmark Card Frame

    MATERIALS:

    • Frame
    • Spray paint in desired color
    • Various ribbons
    • Hot glue gun and glue sticks
    • Cards to display
    Hallmark Holiday Archives & DIY Card Frame - Home & Family

    INSTRUCTIONS:

    1. In a well-ventilated or outdoor area, spray paint your frame. Allow it to dry.

    2. Cut lengths of ribbon and tie them around the frame with a bow at the top. Alternate colors and patterns.

    3. Arrange your cards on the ribbons and make sure you like the placement.

    4. Glue the cards onto the ribbons.

    5. Hang the frame as desired and enjoy!

    Get more from this episode >>

    DIY Flannel Reindeer
    7 of 34
    DIY Flannel Reindeer

    MATERIALS:

    • Flannel fabric in a plaid or gingham pattern
    • Felt
    • Reindeer pattern
    • Fabric scissors
    • Fabri-Tac
    • Scissors
    • Ribbon
    • Twigs for antlers
    • Paint sticks for 5-gallon buckets
    • ½” Wooden dowel
    • Wood stain and white paint
    • Paintbrush
    • Rags
    • Pillow stuffing
    • Hot glue gun and glue sticks
    • Handsaw
    • Pencil
    • Optional: Miter box
    DIY Flannel Reindeer - Home & Family

    INSTRUCTIONS:

    1. Print the reindeer pattern off our site, cut it out and tape it together. Download the pattern here.

    2. Fold your flannel fabric so its doubled and trace the pattern on. Cut the pattern out of the fabric with your fabric scissors.

    3. Glue the edges of the pattern together except along the bottom edge, what would be the belly of the reindeer and about 2” at the top of the head towards the back so you can insert the antlers when finished. Set aside to let the glue dry.

    4. Cut your dowels down the height you want your legs to be. To angle them outward, cut an angle on each end of the legs.

    5. Cut a paint stick in half and glue one half perpendicular to one end of the other so you create a right angle. This is frame for the body and neck of your deer.

    6. Use hot glue to glue the four legs onto the bottom of the body paint stick. Now you have the “skeleton” of your reindeer.

    7. Paint or stain the legs as desired. A dark stain with a white drybrush over the top a nice way to create a rustic effect. Allow them to dry completely before moving on.

    8. Turn the fabric right side out and stuff it with the pillow stuffing.

    9. Slide the stuffed reindeer body onto the “skeleton”.

    10. Turn the deer on its’ side and close up the bottom by folding the fabric up underneath the belly and securing with glue.

    11. Shove the antlers in the opening at the top of the head and secure with hot glue. Hold until secure.

    12. Trace the ear and tail patterns onto the felt and cut them out.

    13. Glue the ears and tail onto the deer.

    14. Repeat steps 1-13 for as many reindeer you want to create.

    15. Arrange into your Christmas décor and enjoy!

    Get more from this episode >>

    DIY Cookie Tray
    8 of 34
    DIY Cookie Tray

    MATERIALS:

    • 1” x 4” Wooden plank cut to 18” x 3
    • 1” x 2” Wooden planks cut to 9”
    • Red acrylic paint
    • Paintbrush
    • White paint pen
    • Hot glue gun and glue sticks
    • Circular objects to trace like a bowls or glasses
    • Optional: Vinyl letters
    • Optional: Saw
    Generations of Hallmark - Home & Family

    INSTRUCTIONS:

    1. Get your wooden planks cut down to size. Cut them yourself if you enjoy woodworking.

    2. Line your three 1” x 4” wooden planks up side by side, this is the surface of your tray.

    3. Place the 1” x 2” planks across surface of your tray and attach them to what will become the underneath of your tray with hot glue.

    4. Paint the tray red. Allow the paint to dry completely.

    5. Trace circles for Santa’s cookies and milk.

    6. Label the placement for the cookies, milk and reindeer treats with the paint pen or some vinyl letters.

    7. Draw an arrow from your label to the corresponding circles. Allow the paint pen to dry.

    8. Place Santa’s treats and enjoy!

    Get more from this episode >>

    Snowmen Bell Choir Display
    9 of 34
    Snowmen Bell Choir Display

    MATERIALS:

    • 12” wooden craft hexagons
    • 5” x 5” wooden squares that are at ¾” thick
    • Snowflake cut out
    • Stencil adhesive
    • White acrylic paint
    • Gray acrylic paint
    • Clear or white glitter
    • Glitter spray in white
    • 2” wood screws
    • Power drill
    • Optional: Smaller hexagons for accent snowflakes
    • Optional: Baking sheet
    • Optional: Smaller
    • Optional: Jigsaw
    • Optional: Sandpaper
    Snowmen Bell Choir - Home & Family

    INSTRUCTIONS:

    1. Paint the hexagons white. These are going to serve as the backboard of your shelves.

    2. If you want to round the platform of your shelves, you can cut curves on the corners of your 5” x 5” wooden squares and sand them with a bit of sandpaper to smooth the edges.

    3. Paint the shelves white. Allow the paint on all your pieces to dry thoroughly. If you are making accent snowflakes paint and glitter them while you do the rest of the pieces!

    4. Paint the platforms gray. Set aside to dry.

    5. Applying the snowflake should be done one at a time, since it is time sensitive. Spray some stencil adhesive onto the snowflake cut out and place the snowflake on a hexagon.

    6. Paint the hexagon gray over the snowflake and while the paint is still wet sprinkle the glitter all over. The paint will seal the glitter as it dries.

    7. Repeat steps 5-6 for as many shelves as you’re making. Allow the paint to dry completely.

    8. If the gray paint on your shelf platforms is dry, coat them with glitter spray so they match the backboards.

    9. Once the paint is dry, remove the snowflake stencil to reveal a crisp, white snowflake on each of your backboards.

    10. Line the platform up so that it sits level about 1/3” of the way from the bottom of the backboard.

    11. Screw two 2” screws through the back of the backboard into the shelf to secure it. Repeat with all of your shelves.

    12. Hang as desired, display and enjoy!

    DIY Christmas Present Topiary
    10 of 34
    DIY Christmas Present Topiary

    MATERIALS:

    • Cardboard boxes in consecutive sizes
    • Spray paint in Christmas color
    • Acrylic paint in different Christmas color than the spray paint
    • Round sponge brush
    • Foam core
    • X-acto knife
    • Metal ruler
    • Cutting mat
    • Wrapping paper
    • Scissors
    • Hot glue gun and glue sticks
    • Wide ribbon
    • Optional: Paper mache gift boxes

    INSTRUCTIONS:

    1. First you need to create the lids for the boxes. For the bottom box you can just cut strips of foam core that are about 2” tall as wide as the sides of your box. Two of the strips should be slightly longer so you don’t have gaps on the corners. Attach a strip to the top edge to each side of the box with hot glue.

    2. To create the lids for the other boxes, trace the top of each box size onto the foam core and cut out. Cut strips to edge the side of each lid like you did on the largest box. About 2” tall with strips two slightly longer than the other so you don’t have gaps on the corners.

    3. Glue the strips to the edges of the top to finish your present tops.

    4. In a well-ventilated area spray paint some of the boxes and their tops a solid color, metallic is always fun. Allow them to dry.

    5. While those dry, wrap the other boxes and tops in various patterns of wrapping paper.

    6. With your sponge brush and acrylic paint, paint a polka dot pattern onto the painted presents. Allow the paint to dry.

    7. Cut two long lengths of ribbon and crisscross them so they meet in the middle. Secure with hot glue in the center. Place the biggest box on top and secure the ribbon to the bottom of the box with not glue.

    8. Stack the boxes from largest to smallest, securing with hot glue in between each one.

    9. Once your stack is complete bring the ribbons up to meet in the center of the top box. Trim any excess ribbon necessary and secure with glue in the center of the box.

    10. Make a bow out of your ribbon and hot glue it on top.

    11. Repeat steps 1-10 to make as many topiaries as you want.

    12. Place with the rest of your décor and enjoy!

    Get more from this episode >>

    Chandelier Centerpiece
    11 of 34
    Chandelier Centerpiece

    MATERIALS:

      TO CREATE THE DECORATED CHANDELIER

      • Chandelier
      • Faux wreath or garland
      • Faux pinecones and fruit
      • Faux gold leaf sprigs
      • Faux gold leaf sprigs
      • Wire cutters
      • Floral wire
      • Hot glue gun and glue sticks

      TO CREATE THE CHANDELIER CENTERPIECE

      • Candle sticks
      • Red tapered candles
      • Gold garland
      • Narrow hurricane vases
      • Red beads

      ASSORTMENT OF DECORATIVE MATERIALS:

      • Ornaments
      • Pinecones

      INSTRUCTIONS:

      TO DECORATE THE CHANDELIER

      1. Snip the wreath at one point so that it opens up.

      2. Place the wreath over the chandelier arms so that it sits on the metal structure. If you prefer, you can use garland for this. Attach with floral wire.

      3. Attach the pinecones, fruit and gold leaves with hot glue for décor. Make sure anything you put on it isn’t too heavy and that the décor has pretty balanced weight on all sides, so the chandelier doesn’t tilt or wobble.

      TO CREATE THE CHANDELIER CENTERPIECE

      1. Place your chandelier in the center of your table.

      2. Arrange the candle sticks and add the candles.

      3. Fill the hurricane vases with the red beads and place them in the arrangement.

      4. Drape garland around the candlesticks and vases.

      5. Set your table and enjoy!

      Get more from this episode >>

      DIY Holiday Napkins
      12 of 34
      DIY Holiday Napkins

      MATERIALS

        TO CREATE THE FELT CHRISTMAS TREE NAPKIN HOLDER:

        • Felt
        • Fabric scissors
        • Paper
        • Chalk or other fabric marking tool
        • Scissors
        • Fabric napkins

        TO CREATE THE ROSEMARY NAPKIN HOLDER:

        • Fresh sprigs of rosemary
        • Grapevine ring
        • Hot glue gun and glue sticks
        • Twine
        • Scissors
        • Fabric napkins

        TO CREATE THE CLOTHESPIN TREE TOPPER NAPKIN HOLDER:

        • Mini clothespins
        • Wooden stars
        • Hot glue gun and glue sticks
        • Gold spray paint
        • Cotton napkins

        INSTRUCTIONS:

        TO CREATE THE FELT CHRISTMAS TREE NAPKIN HOLDER

        1. Print out a Christmas tree silhouette and cut out to create a template. If you’re artistically inclined feel free to draw it!

        2. Use chalk to trace the outline of half of the tree onto the felt. You will cut on the fold to assure that the tree is even on both sides.

        3. Fold your felt in half and use your fabric scissors to cut the tree shape out.

        4. To create a belt for your napkin, cut two slits about 3” from the bottom of the tree that are parallel to each other and about 1” apart.

        5. Fold the napkin into a thin rectangle and feed it through the belt.

        6. Place some cinnamon sticks in with the napkin.

        7. Repeat steps 1-6 for as many place settings as you have.

        8. Set one on each place setting and enjoy!

        TO CREATE THE ROSEMARY NAPKIN HOLDER

        1. Take sprigs of your rosemary and use hot glue to adhere them to the grapevine ring around the outside until the grapevine is pretty much covered.

        2. Cut a length of your twine and tie a bow.

        3. Glue the bow onto the napkin holder. Allow the glue to dry.

        4. Put the napkin into the holder.

        5. Repeat steps 1-3 for as many place settings as you have.

        6. Set one on each place setting.

        TO CREATE THE CLOTHESPIN TREE TOPPER NAPKIN HOLDER

        1. Outside or in a well-ventilated area, spray paint your wooden stars. You can also paint your clothespins if desired. Allow to dry completely.

        2. Hot glue the mini clothespin to the back of the star, make sure the clamping part of the pin is opposite the top point of the star.

        3. To fold your napkin into a Christmas tree shape, begin by folding it in half to create a rectangle.

        4. Fold in the corners on each end so that you have a square shape with a triangle on two opposite sides.

        5. Fold the triangles onto the square so that you have a square with two triangles on top.

        6. Take the square and fold it in half from the center, holding the top of each triangle so they don’t lose their shape.

        7. Take the two right angles that are sticking up on either side and push them down into the tree so all of the angles match from the center point.

        8. While still holding on to the point of the napkin tree, pin the top with the clothespin.

        9. Push all of the folds forward so the back of the tree napkin is flat.

        10. Repeat steps 1-5 for as many place settings as you have.

        11. Set one on each place setting and enjoy!

        DIY Holiday Tablescape
        13 of 34
        DIY Holiday Tablescape

        Materials for Naughty or Nice Scroll

        • Print out names of guests on 8 1/2x 11 computer paper
        • Glue list of names together to make long scroll
        • Fray edges of paper with scissors
        • Stain your scroll with coffee using a small paint brush
        • Let it dry

        Materials for Santa's Bag

        • 20x30 Velvet
        • 20x4 1/2 Fur Trim
        • 2 Pieces Gold Trim
        • Tassels
        • Hot Glue Gun
        DIY Festive Tablescape - Home & Family

        Steps

        1. Cut velvet fabric to recommended measurement

        2. Turn inside out and hot glue edges of both sides

        3. Turn inside out and add fur and gold trim to edges

        4. Use rope or tassel to dress the bag

        Get more information about this episode >>

        DIY Vintage Ornament Wall Decor
        14 of 34
        DIY Vintage Ornament Wall Decor
        DIY Vintage Ornament Wall Decor
        Level:
        Easy
        How-To:
        Home Decor
        Seasonal Event:
        Christmas

        MATERIALS:

        • Window frame or large photo frame
        • Window screen
        • Vintage ornaments
        • Ornament hooks

        INSTRUCTIONS:

        1. Cut screen to fit window frame.
        2. Staple screen to back of frame.
        3. Securely hang frame with screen on the wall.
        4. Hang vintage ornaments on the screen to form the shape of a Christmas tree.

        Get the full instructions for the DIY Christmas Collectible Display >>

        Get the full instructions for the DIY Vintage Spray Snow Shadow Boxes >>

        Get more from this episode >>

        DIY Clay Sweater Coasters - Lynn Lilly
        15 of 34
        DIY Clay Sweater Coasters - Lynn Lilly

        MATERIALS:

        • oven bake polymer clay
        • craft knife
        • silicone craft mat
        • key ring
        • felt or cork sheet
        • pencil or other marking tool
        • hot glue gun and glue
        DIY Clay Sweater Coasters - Home & Family

        INSTRUCTIONS:

        1. Roll out a piece of clay until it is pretty thin, fold it in half and twist.

        2. Repeat step 1 and then twist both twists together to create a double twist.

        3. Repeat steps 1-2 until you have 9 double twists.

        4. Lay 5 of the double twists next to each other and gently push them together to form the body of the sweater.

        5. Add two more double twists on each side of the sweater body to form sleeves, pressing together gently to adhere.

        6. Use a craft knife to cut a straight edge across the bottom of the sweater body and the ends of the sleeves.

        7. Roll out three more pieces of clay to add to the bottom of the body of the sweater and the sleeves. Use your fingers to slightly flatten.

        8. Lightly push the tip of the craft knife into the pieces you added in step 7 to make sweater ribs.

        9. Use a keyring to stamp out the neckline of the sweater. Smooth the neckline with your finger.

        10. Bake according to clay packaging in your home oven.

        11. Lay the sweater on a matching piece of felt or cork and trace. Cut out the outline.

        12. Use a hot glue gun to glue the piece onto the bottom of the sweater so you have an even, smooth coaster with grip.

        13. Allow the glue to set and enjoy!

        Get more from this episode >>

        DIY Snowflake Decor
        16 of 34
        DIY Snowflake Decor

        MATERIALS:

        • Plastic canvas
        • crafting needle & yarn
        • elmer's glue
        • scissors
        • glitter, glass beads, sequin
        "Wrapped Up in Christmas" Author Janice Lynn - Home & Family

        INSTRUCTIONS:

        1. Cut out your plastic canvas in 19x19 squares

        2. Cut out your snowflake pattern five squares down and three squares and three squares in on each side

        3. Use crafting needle, knot one end

        4. Weave the yarn through the snowflake in any way you’d like

        5. Snap the snowflake pieces together using the edges to snap them into place

        6. Decorate with glitter, beads, sequins or whatever you’d like!

        Get more information on “Wrapped Up in Christmas” >>

        Get more from this episode >>

        DIY Burlap Trees
        17 of 34
        DIY Burlap Trees

        MATERIALS:

        • Burlap or burlap ribbon in desired color
        • Chicken wire
        • Scissors
        • Optional: Tree topper like a star or ornament
        • Optional: Hot glue gun and glue sticks
        DIY Burlap Trees - Home & Family

        INSTRUCTIONS:

        1. Take a square of chicken wire and roll it into a cone. Shape it with your fingers, manipulating it into the shape you want. Tuck the wires on the edge and in around each other to secure the structure, then fold up and under any excess you have on the bottom to create a flat bottom.

        2. Cut a bunch of 4-inch squares of burlap.

        3. Starting from the bottom, poke burlap through the holes. For the very bottom row let the squares trail outward to give the tree a pretty finish at the bottom.

        4. Work your way up, continue poking the squares through the holes as you make your way up.

        5. If you prefer to put a topper on, just hot glue a plastic star or a shiny ornament on.

        Get more from this episode >>

        DIY Doily Bowls
        18 of 34
        DIY Doily Bowls

        MATERIALS:

        • Starch
        • Water
        • Bowl
        • Doilies
        • Plastic wrap

        INSTRUCTIONS:

        1. Dissolve ¼ cup of starch in ½ cup of cold water

        2. Bring 1 ¼ cups of water to boil

        3. Add starch solution and cook and stir. Bring to a boil until mixture thickens

        4. Remove from heat, cool to warm

        5. Dip doily into starch

        6. Smooth off excess starch with fingers

        7. Cover inverted bowl with plastic wrap

        8. Drape doily over bowl

        9. Let dry 24 hours

        10. Remove doily from bowl

        11. Enjoy!

        Get more from this episode >>

        Paige Hemmis - DIY Tissue Box Planters
        19 of 34
        Paige Hemmis - DIY Tissue Box Planters

        MATERIALS:

        • Empty tissue box
        • Plastic cups
        • Mod Podge
        • Sponge brush
        • Newspaper or scrapbook paper
        • 2 draw pulls
        • Hot glue gun/glue sticks
        • Leather ribbon (i used ¾” width)
        • Scissors
        • Pencil
        • Ruler
        • Optional: acrylic paint in brown to make this look rustic and made out of leather or wood.
        DIY Tissue Box Planters - Home & Family

        NOTE: I like using the long large family pack boxes so I can fit lots of flowers in mine, but this will work on any size you have…you will just have to adjust the plastic cup size.

        DIRECTIONS:

        1. Make sure your tissue box is clean and empty. You don’t want little tissues hanging out in the bottom.

        2. Take off the plastic part of the top of the tissue box and discard it.

        3. Take your ruler and measure how tall your tissue box is inside (this will be slightly smaller than the outside dimension depending of the thickness of the tissue box).

        4. Take that measurement and cut your plastic cups to 1/8” smaller.

        5. Dry fit the cups inside the tissue box to make sure they fit, and to see how many you need for this project. Make sure that the opening of the box is big enough for the side cups to hold water and flowers. If not, cut a bit of the top of your tissue box to assure that they will all fit.

        6. Remove the cups and set them aside.

        7. Take your newspaper or scrapbook paper and rip it into strips of all shapes and sizes.

        8. Add Mod Podge with your sponge brush to the outside of your tissue box one section at a time. It needs to stay wet, so judge how large of an area you can cover at a time.

        9. Immediately add the strips of paper to the Mod Podge and then cover it with a coat of Mod Podge again. Set aside to dry.

        10. If you would like to change the color of your planter, this is the time to do it. Since we don’t want to cover up the words on the newspaper or the design on the scrap paper, water down your acrylic paint so that it is more of a “wash” than a true paint. Depending on how much you want to see the underneath, add more or less water to the paint.

        11. Once dry, you can add the decorative accents that really make this project seem so high-tone! Using your pencil, mark all the way around the box where you would like your leather ribbon to land. I’m going 1 ¾” up from the bottom.

        12. Attach your leather where your lines are using a hot glue gun. If the corners of the leather ribbon are a bit rigid and don’t want to bed, then dry-fit your ribbon on the box and mark the corners. Then bend them back and forth before you attach them at the corners so they are more pliable.

        13. Using hot glue, add your drawer pulls to the outer edges of your tissue box.

        14. Fill the top of the box with your plastic cups.

        15. Add water and start adding flowers, then set this on your counter, coffee table or mantle and enjoy!

        Get more from this episode >>

        DIY Oversize Mistletoe
        20 of 34
        DIY Oversize Mistletoe
        DIY Oversize Mistletoe
        Level:
        Intermediate
        How-To:
        Christmas Decor
        Seasonal Event:
        Christmas

        MATERIALS:

        • Paper lantern (or styrofoam ball)
        • Large sheets of green paper in two different colors
        • Small white pom poms for the berries
        • Scissors
        • Pencil
        • Ribbon

        INSTRUCTIONS:

        1. Figure out the size of your largest leaves and cut out a handful of the larger size in both colors.
        2. Repeat with a medium-size and a smaller size.
        3. Attach the paper onto the styrofoam ball or paper lantern with hot glue starting with the longer ones at the bottom and working your way to the top with the medium and short making sure to use the different colors for dimension.
        4. Continue until the entire ball is covered.
        5. Add the white pom-poms as the berries with hot glue
        6. Add the ribbon at the top in the shape of a bow.
        7. Hang using yarn.

        Click here for more Christmas crafts

        Lizzy Mathis – DIY Holiday Pillows
        21 of 34
        Lizzy Mathis – DIY Holiday Pillows

        MATERIALS:

        • Fabric
        • Fusible bonding web tape
        • Pillow stuffing
        • Fabric scissors
        • Ruler
        • Chalk
        • Iron on letters
        • Iron
        • Decorative accoutrements

        INSTRUCTIONS:

        1. Use your fabric scissors to cut two pieces of fabric to the size of the pillow you want. Remember to leave a 1” seam allowance for your fusible tape.

        2. Press your fabric with an iron so it’s crisp and neat.

        3. Decorate what will be the front of your pillow with any decorative accoutrements and words desired. *Save any 3-D elements such as jingle bells until after you’ve bonded and turned the pillow inside out.*

        4. Flip the decorated side over onto the other piece of fabric and align them.

        5. Measure out the length of fusible tape you need for each side and cut it. *Make sure to leave an opening on one side for your hand to pull the pillow inside out. *

        6. Use a damp cloth and iron according to the directions of your fusible tape to bond your seams.

        7. Once the seams are secure, pull the pillow inside out.

        8. Fill the pillow generously with pillow stuffing.

        9. Cut a piece of fusible tape to fit the opening of your pillow.

        10. Fuse together the opening.

        11. Add any 3-D decorations you desire and enjoy!

        Get more from this episode >>

        Drip Christmas Tree Art
        22 of 34
        Drip Christmas Tree Art
        Drip Christmas Tree Art
        Level:
        Easy
        How-To:
        Home Decor
        Seasonal Event:
        Christmas

        MATERIALS:

        • Canvases
        • Acrylic paint in various colors
        • Spray paint in background color
        • Thin paint brushes
        • Chalk
        • Small bowls or cups to mix paint in
        • Optional: Copper wire lights
        • Optional: Awl
        • Optional: Duct or gaff tape

        INSTRUCTIONS:

        1. Spray paint your canvases in desired background color. Allow to dry. *make sure to paint the edges as well so it looks clean from all sides. *
        2. Draw your tree shape on with chalk.
        3. Mix some water into your darkest color to make a wash.
        4. Begin dripping your paint in within the lines of your tree shape. Hold your paint brush and cup of paint over the tree shape so you don’t drip all over the canvas. Allow to dry a bit. *a few extra drips outside the lines won’t hurt. *
        5. Mix the dark wash into your lighter color to make a mid-tone. Drip on as much as desired. Allow to drip a bit.
        6. Drip on your lightest color.
        7. Drip on any accent colors you want to use as ornaments or details.

        TO LIGHT THE TREE:

        1. Once all the paint is dry, take your awl and poke holes where you want the lights to be.
        2. Take your copper lights and fold the at light is and stick it through. Secure each light in place with tape as you go.
        3. Tape the control box in the back of the canvas.
        4. Turn the lights on.
        5. Wipe away any leftover chalk.
        6. Hang and enjoy!

        Click here for more Christmas crafts

        Get more from this episode >>

        Paige Hemmis - DIY Candy Cane Candle Holders
        23 of 34
        Paige Hemmis - DIY Candy Cane Candle Holders

        MATERIALS:

        • Candy canes
        • Hot glue gun and glue sticks
        • Scissors
        • Ribbon
        • White card stock
        • Large snowflake hole punch
        • Short tapered candles
        • Glass votive candle holders
        • Battery-operated votive candles
        • Elmer’s glue
        • Mod podge
        • 2 deli cups or shallow bowls
        • Glitter
        • Pencil
        • Scotch tape
        • Optional: Holly or pine sprigs

        INSTRUCTIONS TO CREATE THE TAPERED CANDY CANE CANDLE HOLDER:

        1. Take your tapered candle and roll it in a piece of cardstock. Secure the closure with glue or tape then remove the candle. This shaft serves as the base of your candy cane structure.

        2. Use hot glue to start attaching candy canes parallel to the shaft. The plastic covering will melt a bit, but it’s fine since you will be covering this part with ribbon.

        3. Take a ribbon and wrap it around the candy cane structure. Secure with a bow. *if you are happy with just one then you are done! *

        4. Repeat steps 1-3 to create as many candle holders as there are letters in the word you want to spell out.

        5. Take your card stock and punch out as many large snowflakes as there are letters in your word or phrase.

        6. To create a fancy, glittered letter on each snowflake, first take your pencil and draw a letter on each one. This way, if you aren’t happy with your letters, you can still change them until they are perfect!

        7. Take elmer’s glue and use it like a paint pen and squeeze a bead of glue on top of your penciled letter.

        8. With one piece of cardstock on the table, pour glitter over your glue letter and let the excess fall onto the cardstock so that way you can use the leftovers for the next letters.

        9. Set aside on a flat surface to dry so the glue doesn’t run.

        10. Once dry, add your lettered snowflake on each candle holder by hot gluing it to the ribbon.

        11. Display them with your cheery, christmas message and enjoy!

        INSTRUCTIONS TO CREATE THE VOTIVE CANDY CANE CANDLE HOLDER:

        1. You will be using candy canes, upside down so that they look like hearts when put together. To achieve this look, take two candy canes and turn them upside down so that the curve of the cane is at the bottom. Reverse two of them so they attach at the top of the curve resembling a heart shape.

        2. Take hot glue and just connect the tips of the heart.

        3. Take hot glue and connect the ends together at the top.

        4. Repeat this process as you will need 3 groupings to make one votive holder.

        5. Once you have them made, attach all of them together at the top using hot glue.

        6. Take your votive holder and glue it to the top of your candy cane holder with hot glue. You can be generous here to make sure it holds, plus you will be covering it with ribbon, so it can be a smidge messy.

        7. Take ribbon and tie it around the spot where the votive meets the candy canes.

        8. Don’t stop there! Take any greenery, holly or embellishments and add them to this area.

        9. Drop in a battery-operated votive candle and enjoy your candy cane candle display!

        Get more from this episode >>

        DIY Standing Wreath Hanger
        24 of 34
        DIY Standing Wreath Hanger

        MATERIALS:

        • Ceiling medallion with center dimension of 4”
        • 4” ABS Pipe cut to 5’ length
        • 4” ABS Pipe cut to 40” length
        • 2 toilet flanges that hold a 4” ABS Pipe
        • Self-adhesive hook
        • 2 large round ornaments
        • Hot glue gun and glue sticks
        • Spray paint in Oil-Rubbed Bronze Metallic
        • Gold metallic wax rub
        • Rag
        • Sandpaper
        • 2 Extra-large ornaments at least 6”
        • Optional: Bells, tassels and ribbon for décor
        • Optional: Hand saw to cut materials yourself instead of hardware store

        INSTRUCTIONS:

        1. Clean and dry all of your pieces to ensure the spray paint will stick. If your ABS pipe is a little rough around the edges, take your sandpaper and smooth it out. Be sure to wipe away all dust.

        2. Attach your pipe to your flange. You do not need to add glue or adhesive of any type, it will stay up on its own.

        3. Take your medallion and slide it onto your pipe, all the way down over the flange. This should fit perfectly. For security, you can turn the entire structure over and add hot glue to the bottom of the flange where it hits the medallion.

        4. Attach your self-adhesive hooks to the front of the pipe where you would like to display your wreaths. Wreaths are all shapes and sizes so attach this where it fits your wreath best!

        5. In a well-ventilated area, ideally outside, spray paint the following: ABS pipe, medallion, flange and ornaments. Set aside to dry.

        6. Use hot glue to attach the ornament on top to create the look of a finial.

        7. Add metallic wax with a rag over the raised details of the medallion base.

        8. Take any décor you have and adorn your wreath holder.

        9. Repeat steps 1-8 to make additional wreath holders.

        10. Hang your wreaths and enjoy!

        Get more from this episode >>

        Upcycled Pumpkin Snowman
        25 of 34
        Upcycled Pumpkin Snowman
        DIY Upcycled Pumpkin Snowman
        Level:
        Intermediate
        How-To:
        Home Decor
        Seasonal Event:
        Christmas

        MATERIALS:

        • Faux craft pumpkins in various sizes
        • Serrated knife
        • White spray paint
        • Hot glue gun and glue sticks
        • Black buttons in various sizes
        • Orange felt pom-poms
        • Black felt
        • Black stiff felt
        • Fabric scissors
        • Soft tape measure
        • Chalk
        • Fabric for scarf
        • Optional: Gorilla glue
        • Optional: Quilting square

        INSTRUCTIONS:

        1. About 1” inset from the edge, cut a hole into the bottom of the pumpkins that are getting stacked onto one another. A serrated knife works best. *Stacking the pumpkins largest to smallest will look the most realistic. *
        2. Stack the pumpkins, securing with glue. Allow the glue to set. Use gorilla glue for this part if you plan on putting these outside.
        3. Spray paint the stack white, now you have a snow man! Allow the paint to dry. *Make sure the pumpkins are clean before you paint for best results. *

        TO CREATE THE STOVE PIPE HAT:

        1. Use a soft tape measure to measure the circumference of the head of your snowman.
        2. Add ½" for seam allowance to that measurement and cut a circle to size out of black felt.
        3. Cut a rectangle of black felt to the length of the circumference of your felt circle and to 1” taller than desired height of the hat.
        4. Seam together to short sides of the rectangle to create a cylinder. Allow the glue to dry.
        5. Glue the circle to the top of your cylinder. Now you have a felt bucket. Allow the glue to dry.
        6. Turn the bucket right side out.
        7. To create the brim of the hat, cut two large circles out of black stiff felt with a hole cut out of the center of each. *The hole in the center should be the same size as your snowman’s head. *
        8. Now take your bucket, measure ½” down from the edge and mark. Cut slits all along the open edge, about 1” apart to create tabs.
        9. Feed the felt bucket into the hole of one of the brim pieces you cut and align it with the bottom of the tabs.
        10. Fold the tabs over onto the brim and secure with hot glue all the way around.
        11. Glue the second brim piece you cut onto the bottom of the brim, covering up the tabs.
        12. Trim any uneven parts of the brim with fabric scissors.

        TO DECORATE THE SNOWMAN:

        1. Hot glue the stove pipe hat onto the head. *The hat acts as a hairline and determines how you position the face. *
        2. Glue big buttons on as eyes.
        3. Glue the orange felt pom-pom on for the nose. *Feel free to get creative and make your own! *
        4. Glue small black buttons on as the mouth.
        5. Glue three buttons on the chest to create a “vest” look.
        6. Cut a piece of fabric for the scarf and tie it on around the neck. Glue it on for extra security.
        7. Place and enjoy!

        Get more from this episode >>

        DIY Flannel Coffee Cup Cozies & Coasters
        26 of 34
        DIY Flannel Coffee Cup Cozies & Coasters
        DIY Flannel Cozies & Coasters
        Level:
        Easy
        How-To:
        Fashion
        Seasonal Event:
        Home Decor

        MATERIALS:

        • Long-sleeve flannel shirts
        • Fabric scissors
        • Fray check
        • Elastic hair ties
        • Square cork coasters
        • Fabri-Tac

        INSTRUCTIONS TO CREATE THE COFFEE CUP COZIES:

        1. Cut the cuff of the sleeve off of your shirt just above the seams.
        2. Trim away any excess fabric from the seam.
        3. Seal the cut edge with Fray Check. Allow the glue to dry.
        4. If the cozy is too small for your cup, feed a hair tie through the buttonhole, then feed one loop of itself into the other. Pull taut to create a lark’s head knot. *The elastic hairband allows any size cuff to fit any size cup due to the flexibility. *
        5. Secure the cozy onto your cup using the button and enjoy!

        INSTRUCTIONS TO CREATE THE FLANNEL COASTERS:

        1. Lay your square coaster onto extra flannel fabric from your shirt. Cut the flannel with about a 1” seam allowance around the coaster.
        2. Fold the fabric onto the back of the coaster.
        3. Secure with Fabri-Tac.
        4. Cut a piece of felt slightly smaller than your coaster and glue to the bottom for a sturdy base.
        5. Allow the glue to cure and enjoy!

        Get more from this episode >>

        Christmas Tree Cinnamon Wind Chimes
        27 of 34
        Christmas Tree Cinnamon Wind Chimes

        MATERIALS:

        • Cinnamon sticks 6” long
        • Glitter ribbon ½” wide
        • Twine
        • Yarn needles x2
        • Jingle bells
        • Wooden beads
        • Gardening shears
        • Scissors
        • Hot glue gun and glue sticks
        • Desired hook for hanging

        INSTRUCTIONS:

        1. Lay out your cinnamon sticks and use garden shears or scissors to cut each one slightly shorter than the one before to create a triangular tree shape. If you are making a larger windchime, glue two cinnamon sticks together to elongate the stick then cut it down from there.

        2. Wrap each stick in desired color of ribbon. Place a dab of hot glue where you want the ribbon to start. Press the end of the ribbon onto it and tightly wrap the stick, finish the wrap with another dab of hot glue at the opposite end. Repeat until you’ve wrapped all the sticks.

        3. Cut a long strand of twine and string it through a yarn needle.

        4. Feed three jingle bells onto the twine to the center then fold the strand in half. Tie a knot a few inches above or however far you want the bells to hang.

        5. Thread the other end of the twine into the second yarn needle. Both ends of the twine should have a needle now.

        6. Place the largest stick in between the two sides of twine and feed both of the needles through the hole of a wooden bead. Pull taut. Place the next largest stick in between the twine, then string another bead on. Continue placing the sticks and feeding on the beads as spacers until the tree is complete.

        7. Cross the ends of the twine over and pull taut so the tree is secured together.

        8. Add a jingle bell as the tree topper and tie a knot to secure.

        9. Use the excess twine at the top to hang as desired and enjoy!

        Get more from this episode >>

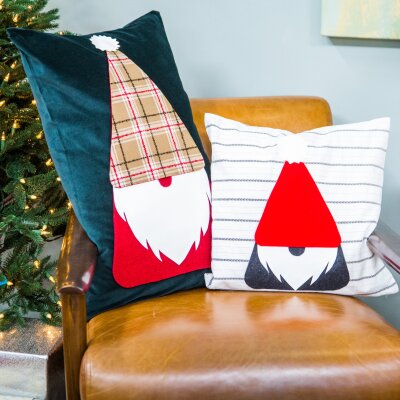
        Gnome Pillow Covers
        28 of 34
        Gnome Pillow Covers
        DIY Gnome Pillow Covers
        Level:
        Easy
        How-To:
        Home Decor
        Seasonal Event:
        Christmas

        MATERIALS:

        • No fray fabric like felt or fleece in Christmas patterns and colors
        • Faux leather in white
        • Pillow cover
        • Fabri-tac
        • Fray check
        • Fabric scissors
        • Chalk
        • Gnome pattern
        • Scissors
        • Poster board or cardboard
        • Iron

        INSTRUCTIONS:

        1. Print the gnome pattern then cut it out. Download the pattern here.
        2. Trace the pieces of the pattern onto the corresponding fabrics you want to use and cut them out with fabric scissors.
        3. To create your pom-pom, trace the bottom of your fabri-tac bottle onto your white fabric then use fabric scissors to cut a squiggly line just outside the circle.
        4. If you’ve used any fabrics that do happen to fray, apply some fray check to the edges.
        5. Press your pillowcase then feed a piece of poster board into the pillowcase to keep from gluing it together.
        6. Arrange the gnome on the pillow to make sure the placement works. Place the body of the gnome first, then layer on the beard, the nose, the hat and place the pom-pom at the tip of the hat last.
        7. Secure everything in with fabri-tac and allow the glue to dry.
        8. Put the pillow inside the cover, set in a cozy spot and enjoy!
        Santa’s Sleigh Bells Door Hanger
        29 of 34
        Santa’s Sleigh Bells Door Hanger

        MATERIALS:

        • Faux leather
        • Fabric scissors
        • Felt in a contrasting color
        • Sewing machine & thread
        • Pinking shears
        • Large jingle bells
        • Wire
        • Wire snips
        • Awl
        • 4” wooden ring
        • Gold spray paint
        • Hot glue gun and glue sticks
        • Adhesive vinyl
        • Cricut machine or x-acto knife
        • Tape
        • Scissors

        INSTRUCTIONS:

        1. Paint the wooden ring gold and set aside to dry.

        2. Print the pattern out on tile setting and piece it together with tape. Cut out. Download pattern here.

        3. Trace the pattern onto your faux leather and cut it out.

        4. Place the pattern onto some felt and cut a rectangle that is big enough to frame your piece of faux leather.

        5. With a contrasting color of thread to your leather, sew the faux leather onto the felt piece.

        6. Use pinking shears to cut the felt around the faux leather leaving around a ¼” border.

        7. To create a design at the top with vinyl, you can out your design with an x-acto knife or if you have a cricut machine feel free to use that! Apply according to instructions.

        8. Now it’s time to add the bells! Starting from the bottom, mark every four inches with two dots next to each other until you reach the top.

        9. Use an awl to poke holes where you’ve marked.

        10. Cut pieces 3” of wire, crease them in half and feed one through the back loop on each jingle bell so that they have two prongs coming off the back.

        11. To secure each bell to the door hanger, feed a prong through each hole and twist in the back. Continue until you’ve added all the bells.

        12. Wrap the tab at the top around the gold ring and secure with hot glue.

        13. Hang as desired and enjoy!

        Get more from this episode >>

        DIY Hot Cocoa to Go
        30 of 34
        DIY Hot Cocoa to Go
        DIY Hot Cocoa to Go
        Level:
        Easy
        How-To:
        Gifts
        Seasonal Event:
        Christmas

        MATERIALS:

        • Metal lunch box
        • Thermos
        • Printable magnetic sheets
        • Scissors
        • Treat bags
        • Thin ribbon or twine
        • To-go cups
        • Flannel fabric
        • Fabric scissors
        • Hot glue gun and glue sticks
        • Saltshaker
        • Colorful sugar
        • Cookie stirrers
        • Small spoons
        • Hot cocoa

        INSTRUCTIONS:

        1. Print designs onto your magnetic sheets. There is a pdf included of our designs, but feel free to make your own or print something off the internet you like.

        2. Cut the shapes out of the magnetic sheets.

        3. Use the magnets to decorate the outside of the box. This is a great activity for kids to do on the road, so save it for the car if desired!

        4. Cut a small piece of flannel fabric to wrap the handle. Use hot glue to attach it.

        5. Pack the hot cocoa, marshmallows, cookie stirrers and spoons in individual treat bags.

        6. Funnel some colorful sugar into a saltshaker.

        7. Fill your thermos with hot water and place it in the lunchbox.

        8. Place the rest of the cocoa supplies into the lunchbox and take that cocoa to go!

        Get more from this episode >>

        DIY Holiday Floral Chandelier
        31 of 34
        DIY Holiday Floral Chandelier

        MATERIALS:

        • Wire Wreath Base
        • Chicken Wire made of uncoated metal
        • Floral Shears
        • Greens & Flowers
        • Hanging Hardware like:
        • “S” hooks
        • Twine or thin chain
        • Cup hook

        INSTRUCTIONS:

        1. Make the wire base for your chandelier. Unroll the chicken wire and cut off a length that is a few feet long. Begin wrapping it around your wire wreath base, taking care to overlap each piece by a few inches. If you run out of chicken wire, just cut another length and continue wrapping. Wrap loosely so that there are a few inches between the inner frame the chicken wire and take care to tuck any cut edges into this negative space to prevent finger pokes! Once you’re finished, your base should look similar to a lopsided donut or life preserver.

        2. Next, attach your hanging materials. Loop your chain or rope around “S” hooks and hook them in at three points, equally distanced from one another on your wreath frame. Leave equal lengths that measure the distance you’d like your fixture to hang from your ceiling or connection point.

        3. Next, it’s time to decorate. Greens first! Resting your chandelier on the ground gently insert greens through the chicken wire until you meet resistance. This should catch the stems and prevent them from falling out.

        Pro Tip: for a slightly more uniform look, insert greens in the same direction. This will create fluid, movement through the design! Continue adding greens until the top portion is covered and the chicken wire is no longer visible.

        4. Next, focus on the bottom. You’ll need to do the same process to the underside of the chandelier. If your piece is smaller, this should be done easily enough holding it in your hand. If it’s larger, you can take this opportunity to hang the piece at half height so you can work sitting, kneeling or standing underneath it to complete the greening. Make sure the chicken wire is completely covered and invisible from all angles.

        5. Finally add all the flowers and bits of greens.

        Pro Tip: Keep the cost down by creating just one large or a few smaller flower accents or “moments” on your chandelier. Pick the “front” of the chandelier and group your accents there.

        6. To create these floral “moments,” create groupings of one or two larger headed blooms surrounded by the smaller bits of greenery and flowers. Once you’ve picked the assortment, gently insert the stems of each flower into the wreath base.

        Pro Tip: To help the flowers feel at home in their bed of greens, sometimes we like to add a few extra stems of greens around the blooms to help them blend!

        7. Once you’re done flowering, hang your chandelier or raise it to desired height. For best results, make your chandelier the day it will be used. This will ensure the best freshness for greens and flowers so they’re ready for your guests!

        Get more from this episode >>

        DIY Santa Pants Foot Stool
        32 of 34
        DIY Santa Pants Foot Stool

        MATERIALS:

        • Short round stool with padded top
        • Red upholstery fabric like velvet
        • Fur ribbon with wired edges
        • Santa boots

        SANTA BELT:

        • 3” wide black elastic
        • Gold foam glitter sheets
        • Staple gun
        • Fabric scissors
        • Ruler or quilting square
        • Chalk

        OPTIONAL:

        • Mrs. Claus shoes
        • Mrs. Claus belt

        INSTRUCTIONS:

        TO CREATE THE SANTA FOOT STOOL:

        1. Cut a circle of fabric that is 2x the diameter of your stool.

        2. Place the fabric wrong side up on your work surface. Place the top of your stool face down onto the fabric.

        3. Use your staple gun to upholster the fabric to the bottom edge of the stool, folding pleats where necessary to fit excess fabric to the stool.

        4. There should be an excess of fabric that will hang from the bottom edge, this is the bottom of Santa’s coat. Hem the edge with the faux fur ribbon, secure with hot glue.

        5. To create the pant legs, cut two rectangles that are a few inches taller than your stool legs. Glue the edges of each cylinder together to create two cylinders. Hem the bottom of the pants with the faux fur, attach with glue.

        6. Flip the stool upside down again and slide the pant legs onto the two front legs, use the staple gun to secure to the bottom of the stool. Make sure the seam is on the inside.

        7. Place the belt around Santa’s “waist” to cover where you’ve stapled.

        8. Set the stool in place with the shoes on and enjoy!


        TO CREATE THE MRS. CLAUS FOOT STOOL:

        1. Cut a circle of fabric that is 3x the diameter of your stool.

        2. Place the fabric wrong side up on your work surface. Place the top of your stool face down onto the fabric.

        3. Use your staple gun to upholster the fabric to the bottom edge of the stool, folding pleats where necessary to fit excess fabric to the stool.

        4. There should be an excess of fabric that will hang from the bottom edge, this is Mrs. Claus’ skirt! Trim as necessary, putting the shoes on can help determine how long you want the skirt.

        5. Hem the bottom edge of the skirt with the faux fur ribbon, secure with hot glue. You can use the wire edged ribbon to mold the skirt into the shape you want.

        6. Take another piece of ribbon, fold the edges to the back and glue it around Mrs. Claus’ “waist” to hide where you stapled.

        7. Put the belt over the faux fur around the waist.

        8. Place the stool with the shoes on and enjoy! You can glue the shoes on if you’ll be moving the stools a lot.

        Get more from this episode >>

        DIY Hallmark Card Frame
        33 of 34
        DIY Hallmark Card Frame

        MATERIALS:

        • Frame
        • Spray paint in desired color
        • Various ribbons
        • Hot glue gun and glue sticks
        • Cards to display
        Hallmark Holiday Archives & DIY Card Frame - Home & Family

        INSTRUCTIONS:

        1. In a well-ventilated or outdoor area, spray paint your frame. Allow it to dry.

        2. Cut lengths of ribbon and tie them around the frame with a bow at the top. Alternate colors and patterns.

        3. Arrange your cards on the ribbons and make sure you like the placement.

        4. Glue the cards onto the ribbons.

        5. Hang the frame as desired and enjoy!

        Get more from this episode >>

        DIY Letter Art
        34 of 34
        DIY Letter Art

        MATERIALS:

        • Oil based paint pens
        • Brown butcher paper
        • Ruler
        • Pencil
        • Scissors
        DIY Letter Art - Home & Family

        INSTRUCTIONS:

        1. In pencil, draw an isosceles triangle with a center line then draw horizontal lines across inside the triangle that are evenly spaced this is the grid for your writing.

        2. Pencil in the desired phrase.

        3. Use paint pens to fill out the lettering and shape of the tree.

        4. Dab a white paint pen repeatedly to create a snowy effect.

        5. Display and enjoy!

        Get more from this episode >>

        ADVERTISEMENT
        ADVERTISEMENT
        ADVERTISEMENT