For American Crusting Buttercream (Makes 4 1/2 cups)
1 cup salted sweet cream butter
1 cup Crisco shortening
2 tsp vanilla extract
9 cups of confectioners’ powdered sugar (white powdered sugar)
3 Tbsp heavy cream or more as needed
Ingredients and Materials for Decorating
Tips 12, 18, 233 and 47
Easter sprinkles
Bunny & chick sprinkles
Brown, green and white food coloring
Large Egg-shaped cookies and round cookies
Shredded sweetened coconut
Cadbury mini chocolate eggs
Directions for Cookies
Cream butter, brown sugar, vanilla, pinch of salt, and egg together in a stand mixer on medium speed for about 30 seconds to one minute.
Mix dry ingredients, flour, baking powder, and salt in separate bowl. I use a whisk to blend the dry ingredients together.
Add dry ingredients to your wet ingredients. Mix until the cookie mix becomes a dough and it pulls away from the sides of the bowl. It will seem a little dry but it will all come together.
Add in mini chocolate chips and mix again.
Remove dough from bowl and wrap in saran plastic, place in fridge for at least 15 minutes. If you flatten the dough it gets colder quickly. Preheat oven to 375 while your dough chills.
Flour your surface and roll dough out to ¼ inch thick. Cut your cookies out into desired shapes.
Place on a baking sheet and bake for 6-7 minutes or just when the cookie puffs up. These will brown faster than your regular sugar cookies.
Once baked, let sit for one minute on the cookie sheet to firm up.
Transfer to a cooling rack so they can cool completely.
Master Tip- I use salted sweet cream butter from Costco because it has the perfect balance of salt for my cookies. If you don’t have that, use unsalted butter and add ½ tsp to the wet ingredients.
Directions for American Crusting Buttercream
Cream your butter and shortening until well incorporated. Both must be at room temperature to prevent clumping.
Once creamed, add your vanilla. Mix again for a minute.
Sift your powdered sugar to make sure there are no clumps and add it in.
Place a towel over your mixer to prevent a powdered sugar storm.
Once mixed, slowly add in your heavy cream or milk one Tbsp at a time because you can always add more but you can't take it out. Continue to add more than the recipe states if it's too thick.
Mix until smooth, about 1 minute on medium to high speed. Be sure not to over-whip your buttercream. DON’T panic you won't ruin it if it whips longer. Store unused buttercream in an airtight container in the fridge for up to a week or freeze for up to three months.
Master Tip- I use salted sweet cream butter from Costco because it has the perfect balance of salt for my cookies. If you don’t have that, use unsalted butter and add ½ tsp to the creamed butter.
Directions for Decorating
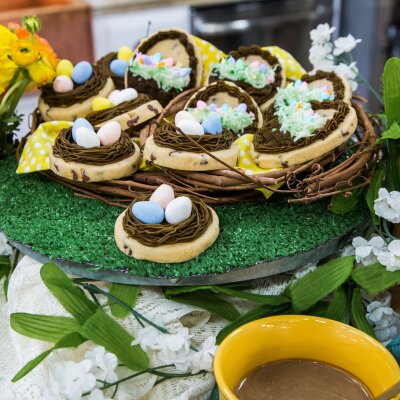
Pipe handle around the top half with tip 18. Pipe basket weave with tip 47. Pipe with buttercream inside the basket with tip 12. Add green coconut (see below) and sprinkles. Add bunny & chick sprinkles
Green coconut- Add green food coloring into plastic bag, add in ½ cup of shredded sweetened coconut. Mix until coated and green.
Directions for Decorating Bird's Nest
Use tip 233 to pipe blown buttercream. Start in the center of the cookie with piping bag straight up and down. Pipe around in a circle and get wider as you go. Pipe three layers on the outside to build up the nest. Add three mini chocolate Cadbury eggs . Add bunny & chick sprinkles.
You may also like these Spring recipes, romance movies, and more!
Small faux flowers; these can be found in the scrapbooking section at the craft supply store
Glue Gun
For Pineapple Eggs
Eggs
Yellow craft paint
Green paper
Glue gun
Directions:
For Cactus Eggs
Paint the eggs, allow to dry, and then paint again until you achieve the desired coverage. I used foam and toothpicks to make a device to dry the paint on eggs without them rolling around and smearing.
Once the eggs are completely dry, draw the spikes onto the egg with permanent marker.
If placing in a flower pot, full the pot with rocks; then apply the hot glue to the top of the rocks, and place the painted egg onto the glue.
To make the flower, cut a small square of pink tissue paper, crumple it up, and then glue it onto the egg wherever you like.
For Unicorn Eggs
Cut the felt or paper into a square; about 2 inches by 2 inches.
Start at one corner, and create a cone shape, and secure it with a hot glue gun.
Cut off excess material or paper from the bottom to create an even bottom for the cone to stand up.
Glue the cone onto the top of the egg.
Use the hot glue to attach the small flowers onto the top and back of the egg.
Use a glue gun to draw the eyes onto the unicorn egg.
For Pineapple Eggs
Paint the eggs, allow to dry and paint again until you achieve the desired coverage.
Cut long leaves that resemble those on a pineapple out of the green paper, and glue them to the top of the dried eggs using a hot glue gun.
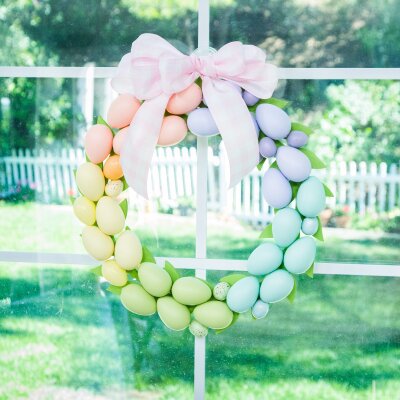
Plastic or Foam Easter Eggs (at least 5-6 different colors, 2 different sizes of eggs)
Hot Glue and Glue Gun
Ribbon (optional)
Directions:
1. Paint wood wreath form. Let dry. 2. Add big eggs to wreath using hot glue. Start with doing 1 color section first, then move to the next until you get all around. 5-6 big eggs per section. 3. After adding all the large eggs, go back and fill the empty spaces with smaller eggs. 4. Once wreath is filled with eggs add a bow as a finishing touch using ribbon (optional).
1. Preheat the oven to 350F. Line an 18” x 13” x 1” sheet tray with parchment paper and lightly coat with non-stick cooking spray.
2. In a bowl of stand mixer fitted with a whisk attachment, whisk the cake flour, sugar, baking powder and salt in a large bowl. Mix in the butter until the consistency becomes an even crumb.
3. Add the egg whites one at a time, beating well after each addition. Mix in the whole egg until combined.
4. Whisk the milk and vanilla paste together in a small bowl. Add the milk mixture to the dry ingredients in 1/3 increments, beating 1-2 minutes after each addition, until fluffy. Scrape down the sides and bottom of the bowl each time as well.
5. Pour the batter into the prepared sheet pan and smooth over with a small offset spatula into an even layer. Bake for 20 minutes or until a toothpick inserted into the center comes out clean. Remove the cake from the sheet tray and cool completely on a wire rack.
6. Once the cake is cooled, use the 5” cookie cutter and cut out 6 large eggs.
7. Using the 3” cookie cutter, cut out the centers of 2 of the 5” eggs.
8. Place ½ cup of the buttercream into a piping bag or plastic bag with the corner snipped off.
9. Use a solid 5” egg cut out for the base. Pipe a thick line of frosting around the surface perimeter. Place a 5” egg with the center cut out over the frosting. Pipe another line of frosting over the top of the next layer and repeat until you have assembled a solid base with two cut out layers.
10. Add a layer of frosting to inside of the cake.
11. Fill the empty cavity with jelly beans. Pipe another line of frosting onto the cake layer and top with solid 5” egg cut out.
12. Place the cake into the refrigerator for at least one hour.
13. Use a serrated knife to bevel the sides creating an “egg like” shape.
14. Coat the entire cake with a thin crumb coat of frosting and set in the refrigerator for 30 minutes.
15. While the crumb coat is setting, mix the colors for your icing with the remaining buttercream.
16. Once the crumb coat is set you can frost and decorate the cakes to your liking.
17. Decorate to your liking – using a star, flower and/or regular tip to create different detailing.
18. Place cakes in sweetened coconut flakes to create a “grass look.”
VANILLA BUTTERCREAM FROSTING Yields: 4 cups
Using the whisk attachment on a stand mixer, or with a hand mixer, mix the butter to break it up a bit.
Slowly add in the powdered sugar.
Once the sugar and butter start to combine well, turn up the speed on the mixer, and pour in the vanilla.
Then, pour in 2 tablespoons of the milk.
Scrape down the sides of the bowl to make sure everything gets mixed in.
Turn the speed up to about medium to mix the frosting.
Add more milk if the frosting is too thick.
If the frosting starts to break up, or is not thick enough add more powdered sugar This frosting can be used to decorate cakes, cookies, and cupcakes; it will hold its shape well with whatever you do.
¼ inch plywood (size of board depends on how big you want décor to be)
Marker
Jigsaw
White and Colorful Paint
Paint brush
L bracket
1x3 wood
Drill & screws
Hot glue gun & glue
Wood glue
Directions:
Draw a carrot or Easter egg on desired size plywood
Use a jigsaw to cut out the shape you drew out
Paint your carrot or Easter egg white and allow to dry
Paint over white paint with colorful paint
For carrot: After painting orange and green, go back in with a brown and add detailing
For Easter egg: Paint entire egg one base color. Go back in and use painter’s tape to create unique patterns. Once paint dries remove tape. Tip: Once you have created your design, remove uneven tape with and X-ACTO knife to create straight lines
Create and “L” shape with two pieces of wood and use and L bracket to secure with screw. Tip: Make sure the height of your wood is half the length of your décor so that it will be able to support it. So if your egg is 48” high, your wood would be 24” high.
Attach décor to stand using wood glue and hot glue
Display décor for an epic scavenger hunt or any Easter occasion!
8 of 11
Materials for DIY Foam Core Picket Fence
30/40 white foam core sheets
Hot glue
X-acto knife
Materials for DIY Plastic Cup Tulips
Pastel colored plastic cups
Hot glue
Green straws
Green foam core
Scissors
Bamboo stakes
DIRECTIONS:
For DIY Foam Core Picket Fence:
Cut vertical strips of foam core- glue together to create picket fence shape. No exact measurements necessary.
For DIY Plastic Cup Tulips:
Cut 3 slits in the top of the plastic cup and then cut out in petal shapes
For the "stem" hot glue green straw to bottom, flat part of the cup
Cut leaves out of green foam core, hot glue "leaf" onto side of green straw
Stick bamboo stake into ground; slide straw through so the "flower" stands up
Pour a single color of paint into a smaller plastic cup. Add white, black or another, complementary color to create new shades. If your paint is too thick, add 1 tsp of water to thin it out.
Protect your work surface with recycled newspaper before placing a small plastic cup in the center. Make sure your cup fits inside the opening of your flowerpot. Place your flower pot on top of your cup, upside down.
Pour paint around the edges of your flowerpot to create a drip dye effect. TIP: Vary the colors to create a marbled effect.
Let dry completely before picking up and removing the cup. Add flowers, stationery or other items for a colorful piece of decor. Enjoy!
Paint in desired colors, craft or exterior depending on use
Paintbrushes
Paperclips in desired color for antennae
Wire snips
X-Acto knife
Hot glue gun and glue sticks
OPTIONAL:
Paint pens
Small craft wood plaque or rectangle
Clear sealant
INSTRUCTIONS:
Cut any pieces needed with an X-Acto knife on a cutting mat. For instance, to create the ladybug wings, cut a second circle the same size as the body in half.
Arrange the wooden pieces to figure out what kind of bug you want to make and what it will look like.
Paint the pieces desired base colors, allow to dry.
Glue the pieces together in desired bug arrangement.
For the antennae, cut the paper clips on the curve with snips.
Glue the antennae on in place.
Add details like dots on the ladybugs with paint and a fine paintbrush or paint pens. Allow to dry.
If you want to use these as plant markers, glue a popsicle stick on to the back of a small wooden craft plaque or rectangle then paint the center with some white paint. Glue the bugs on then write plant names with a permanent marker. PRO TIP: if placing the bugs outside, seal with a clear sealant for longevity. Allow to cure accordingly to instruction’s time.
Cut the wood to size or have it cut to size for you at your local hardware store since they are all straight cuts. Sand any rough edges.
Drill a hole into one of the 6” cut 1” x 6” pieces to create the bird’s front door.
Paint the walls, base and roof to desired colors. Keep in mind that the 1” x 8” cuts are the base and roof and that the 1” x 6” cuts are the walls. Allow set aside to dry.
Cut the trim pieces to 5 ¾”.
Cut the metal grate to 4 ¼” x 5 ½” using tin snips. Measure and mark first.
Paint the cut grate to size, set aside to dry.
Arrange then wood trim slats then use e6000 to adhere. PRO TIP: for even spacing, place the outer two and center slats first.
Place decorative grate pieces then glue in place.
Arrange the wall pieces standing in place on the base creating an “l” step shape. Use wood glue to secure in place. Place the roof with glue to secure.
To create the potted succulents, cut the dowel in to 2” piece for the “plant pots”, drill a hole into the center of each piece. Glue a succulent into each “pot”.
Place the succulent pots, glue to adhere.
Display as desired. Allow the glue to set for 24 hours then attach to post or hang with chain from eyehooks then enjoy!