Share

Home & Family's Halloween Harvest

DIY Beekeeper Family Costume
1 of 24
DIY Beekeeper Family Costume

Materials

  • Pool noodle OR Pipe Insulation Foam Tubes
  • Spray Glue
  • Fabric Glue
  • Hot Glue
  • Tan/Brown Felt
  • Yellow Felt
  • Craft Store Bees
  • Scissors
  • Tape Measure
  • Doweling
  • Duct Tape
  • Floral Wire
DIY Beekeeper Costume - Home & Family

Directions

1. Figure out/measure the area that will be the top of the costume(1st and smallest circle) and where you want it to end on you (this will be the last and widest circle).

2. For the circles at the bottom, you might need to extend the noodle

3. To extend the noodle use a 1 inch dowel cut to 4 inches long to connect the two pieces of
noodle together. Use a low temp hot glue gun to keep dowel in place. TIP: To save time, you
can connect the two noodles with a dowel and then secure with duct tape on the outside
instead of glue.

4. Once you have your length, lay out the tan/brown felt and use spray glue to wrap and
attach it around the noodle. Trim any excess fabric.

5. Use fabric glue to fuse the seam of the felt together

6. Connect the two ends of the noodle with a dowel and low temp hot glue gun to make a

circle (make sure seams are on the inside) TIP: For the smaller circles, place a piece of duct tape around the connection of the two ends of your noodle. This will ensure that the two ends

will fuse together without separating. Remove duct tape once glue has dried.

7. Stack and glue the circles from bottom to top using hot glue

8. Glue on yellow felt to give the appearance of honey drips

9. Use floral wire to attach bees onto the beehive

Get more information about this episode >>

DIY Autumn Leaf Lanterns
2 of 24
DIY Autumn Leaf Lanterns

Materials

  • Scissors
  • Wax paper
  • Iron
  • Ironing board or flat work space to iron on
  • Ironing cloth
  • Leaves; real or artificial
  • Decorative washi tape
  • Votive candles, battery operated

DIY Autumn Leaf Lanterns - Home & Family

Directions

1. Fold wax paper in half and cut out into 8x8” squares or to whatever size you desire your lantern to be.

2. Take your leaves and set them inside the folded wax paper.

3. Cover with the ironing cloth and gently iron over the cloth until the wax paper seals together. Remove cloth. You now have one of the sides completed for your lantern.

4. Repeat steps 1-3 until you have created four wax paper sides for your lantern.

5. Using your washi tape, tape together the sides of your wax paper to create a cube shape. It’s okay for the washi tape to be showing – this is why we shows decorative fall colors!

6. Turn on your votive candles and place inside the lanterns and decorate as desired. Voila!

Get more information about this episode >>

DIY Family Cookies Costume
3 of 24
DIY Family Cookies Costume

Materials

  • Brown Felt
  • Dark Brown Felt
  • Poly-Fil
  • Ribbon or Felt Strips
  • Fabric Glue

Instructions

1) Cut 2 equal circle shapes out of felt (These are the cookie pieces, so hold fabric against body to see what size you want)

2) Put fabric glue around edges of circle and glue them together, leaving about 4 inches of space unglued. Wait for glue to dry.

3) Turn “cookie” inside out to hide the seams

4) Fill “cookie” with stuffing material, and close the remaining gap with fabric glue

5) Cut dark brown felt into chocolate chips (Or make whatever kind of cookie you desire! Rainbow Sprinkles, Macadamia Nuts, Raisins, etc.)

6) Glue ribbon or strips of felt connecting the two pillows. Straps need to be far enough apart to fit over shoulders, but close enough to not fall off

Get more information about this episode >>

DIY Trick or Treat Bags
4 of 24
DIY Trick or Treat Bags
Level:
Easy
How-To:
Kids
Seasonal Event:
Halloween

Materials

  • Old pillow cases
  • Old costume pieces
  • Craft paint

Instructions

  1. Use craft paint to create desired design on fabric.
  2. For spiders: two handprints, wrist side together.
  3. For ghosts: two handprints, side by side, fingers facing bottom edge.
  4. Personalize by adding names with craft paint.

Get more information about this episode >>

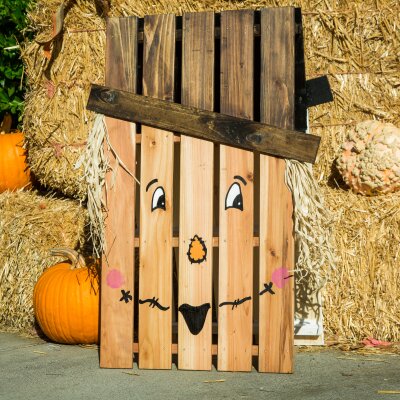
Reversible Scarecrow-Snowman Sign
5 of 24
Reversible Scarecrow-Snowman Sign
DIY Reversible Scarecrow-Snowman Sign
Level:
Intermediate
How-To:
Home Decor
Seasonal Event:
Fall, Christmas

Materials

  • 2 Craft palette boards 24” x 36”
  • 2 Craft boards 4” x 24”
  • Acrylic paint in a variety of colors (or paint pens)
  • Paint brush
  • Hot glue and glue sticks
  • Piano hinge 18”
  • Pencil
  • Tape measure
  • OPTIONAL: Wood stain

Directions

  1. Measure where you would like the brim of the hat to go. I am measuring 10” down at the top of the angle and 12” at the bottom of the angle.
  2. Place the smaller craft board on the palette board at an angle.
  3. You can attach with glue or screws. If you are using paint, apply the paint before attaching to the palette board.
  4. On one side of the board, paint or stain the bottom a light brown color for the scarecrow’s face.
  5. Paint the hat brim and the board above the brim a darker color of brown to serve as the scarecrow’s hat.
  6. Set aside to dry.
  7. While that board is drying, paint the second board white below the brim and black on the brim and on the palette board above the brim. Set aside to dry.
  8. Now you are ready for decorating! Create the scarecrow’s face by using acrylic paints or paint pens
  9. For the snowman, using acrylic paints or paint pens.
  10. Once both palette boards are dry, attach them together at the top with the piano hinge, following the directions from the manufacturer
  11. OPTIONAL: Add a little dry brush on the black top and brim of the hat of the snowman to make it look like a little snow has fallen.
  12. OPTIONAL: You can use the brim to write something like “Happy Fall” and “Let it Snow”. I prefer to keep mine as a hat.

Get more information about this episode >>

DIY Melted Wax Pumpkins
6 of 24
DIY Melted Wax Pumpkins
Level:
Easy
How-To:
Home Decor
Seasonal Event:
Fall, Halloween

Materials

  • Pumpkin
  • Pack of crayons in desired colors
  • Tacky Glue
  • Hair Dryer
  • Optional - Glitter, Googly Eyes, Plastic Spiders
  • Optional - Lighter

Directions

  1. Start with a plain or spray painted pumpkin
  2. Tacky glue across the top of the pumpkin and place crayons (*Make sure they are completely unwrapped from papers)
  3. Use a hair dryer on high heat to melt crayons
  4. While wax begins to melt, sprinkle glitter or fake spiders on top

Optional - When completely dry, turn pumpkin over and repeat all steps to give even wax coverage

(Optional Technique) Use a lighter to melt crayon and press to pumpkin

Get more information about this episode >>

DIY Broomstick Decor
7 of 24
DIY Broomstick Decor
Level:
Intermediate
How-To:
Home Decor
Seasonal Event:
Fall, Halloween

Materials

  • Tree branch
  • Sticks
  • Twine
  • Rope

Directions


  1. Sand down and lacquer tree branch
  2. Attach sticks to branch using twine
  3. Cover twine with rope
  4. OPTIONAL: Drill a hole at the top of the broom and to add a leather strap for extra detail

Get more information about this episode >>

DIY Banana Split Costume
8 of 24
DIY Banana Split Costume

Materials for Top of the Costume

  • Fabric or duty scissors
  • Fabric in the colors that you would like.  We will be using a tan color for caramel, black for chocolate and white for vanilla.
  • Small felt pieces in several colors (these will be used for the sprinkles)
  • White headband
  • Several white loofahs
  • 3 Large red ornaments
  • 3 Mini red ornaments
  • 3 Pieces of ½” flexible PVC pipe 18”
  • Hot glue and glue gun
  • Colored glue sticks – black and red
  • Fabric tape measure
  • Pencil

Materials for the Banana

  • Upholstery foam
  • Electric carving knife
  • Utility knife
  • Grater
  • Optional: Yellow spray paint

Directions for the sauce:
1. Start with your felt fabric. Measure around the person you will be dressing and add a few inches for overlap. Mark with a pencil.
2. Cut out the fabric with fabric scissors, scalloping the bottom of the fabric.
3. OPTIONAL: Add pieces of felt with a glue gun to create sprinkles.
4. OPTIONAL: Add colored glue sticks to drizzle to make it look like syrup dripping.

Directions the head:
1. Take the headband and add one loofah to the top of the middle of the headband with hot glue.
2. Depending on the size of your loofah, add additional loofahs to make it look like whipped cream.
3. Add the ½ flexible PVC pipe to the top of the large ornament and secure with hot glue.
4. Add the mini ornament to the other end of the PVC pipe.
5. Spray paint the entire structure red and set aside to dry.
6. Add the ornament to the top of the loofah and secure with hot glue. You may have to play with the balance a bit here – just add glue to secure it.

Directions for the banana:
1. Cut your upholstery foam into a banana shape using an electric carving knife.
2. Use a grater to soften the edges
3. OPTIONAL: The foam is already the perfect color for a peeled banana, so no need to paint, but you can add accents with yellow spray paint.
4. Use a utility knife to cut two slits into the back of the banana for handles

Get more information about this episode >>

DIY Monster Hand Candy Stand
9 of 24
DIY Monster Hand Candy Stand
DIY Monster hand Candy Stand
Level:
Advance
How-To:
Home Decor
Seasonal Event:
Halloween

Materials

  • Box
  • ¾ in plywood
  • plywood round
  • bowl
  • wood glue
  • L-brackets
  • screws
  • jigsaw
  • paint
  • faux fur
  • candy

Directions

  1. Measure the opening of the box and have your plywood "base" cut to the exact dimensions
  2. On remaining plywood, trace the monster claw first in pencil then with black sharpie
  3. Clamp down wood to secure, then using jigsaw, cut out design
  4. Secure claw to base with L-Brackets
  5. Paint the nails of the claw, paint the plywood round (paint prior to adding to the tips of the
  6. fingers)
  7. Add faux fur
  8. Place bowl of candy on top and enjoy!

Get more information about this episode >>

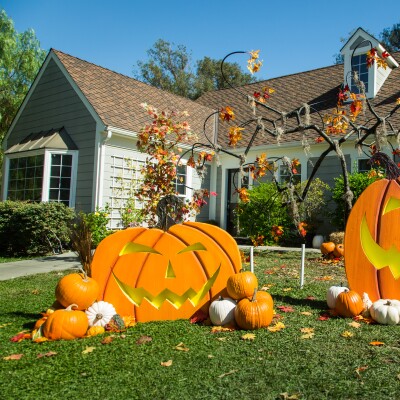
DIY Pumpkin Patch Photo Op
10 of 24
DIY Pumpkin Patch Photo Op
Level:
Advance
How-To:
Home Decor
Seasonal Event:
Fall, Halloween

Materials

  • Carving Knife
  • Rough Grit Sand Paper
  • 2” Insulation Foam (4x8 sheets)
  • Sharpie
  • Box Cutter
  • Dust Mask
  • Yellow felt
  • Acrylic House Paint
  • Gorilla Glue

Directions

  1. Cut out the pumpkin shape (with kitchen carving knife)
  2. Draw mouth and eyes with a sharpie
  3. Cut strips in a “V” shape for the pumpkin grooves
  4. Use a box cutter or smaller kitchen knife to cut mouth, nose and eyes on pumpkin
  5. Carve the pumpkin “grooves” by taking the knife and dragging at an angle to create a “V” shape
  6. Sand paper the edges until smooth (use dust mask when sanding)
  7. Soften all your cut lines with sandpaper
  8. Can make your patch even larger by attaching (with Velcro) 2 sheets of foam
  9. Shade Pumpkin when paint is still wet
  10. Pumpkins aren’t perfect, keep brush strokes going vertically but okay to have imperfection
  11. You can give eyes a spooky “glow” with parchment paper and a yellow light - or glue thin yellow felt to the back

TIP: Slip the PVC pipes into the stakes to prop up the pumpkin patch:
TIP: Check you hardware store for a PVC cut bin- Excess pieces in random sizes are sometimes available

Get more information about this episode >>

DIY Family Crayon Costume
11 of 24
DIY Family Crayon Costume
Level:
Intermediate
How-To:
Fashion, Kids
Seasonal Event:
Halloween

Materials

  • Foam Core
  • Tape
  • Hot Glue
  • Paint
  • Construction Paper
  • Ribbon

Directions:

  1. Measure and cut foam core to make box and lid
  2. Use tape and hot glue to secure foam core in shape of box and lid
  3. Cut triangle shaped foam to reinforce interior of box
  4. Paint entire box yellow. Allow to dry.
  5. Add your name to customize
  6. Use construction paper to add details of design
  7. Add ribbon in color of costume for straps to go over shoulders
DIY Spooky Halloween Tree
12 of 24
DIY Spooky Halloween Tree
Level:
Advanced
How-To:
Home Decor
Seasonal Event:
Fall, Halloween

Materials for Tree

  • PVC Pipe in various sizes (2”, 1 ½”, 1”)
  • Flexible PVC Pipe
  • Plywood for Base
  • Brackets
  • 45 degree connectors
  • 90 degree connectors
  • ¾” plywood square (about 3’ x 3’)

Materials for Create the Bark

  • Water
  • Mod Podge
  • Black Paint
  • Brown Paper (available at any hardware or paint store)

Instructions for the Tree

  1. Attach a 3 foot length of 2” Pipe to plywood base with 3 shelf brackets
  2. Slide a 4-5’ section of 1 ½ “ Pipe into the 2” pipe (by sliding the pipe down in the bigger pipe. You do not need to secure it any more than this.)
  3. Attach a 4-way connector to top of 1 ½” pipe.
  4. From there you can add various lengths of 1 ½” PVC adding connectors as you go to create the tree shape you desire.
  5. Build branches from 1 ½ “ to 1” (you want the branches to thin out). Off of the 1 ½” pipes add 1” 3 way connectors and attach thinner 1’ pipes.
  6. Create spooky curved final branches with flexible PVC pipe and slip into the ends of 1” pipe. (To make extra curly, roll pipe into tight curl and zip tie together letting sit for a few hours to hold shape.)

TIP: Use PVC glue and screws to reinforce the joints if wanted

TIP: If you create longer branches, reinforce them also with glue and screws

Instructions for Tree Bark

  1. Use 1 part water, 1 part Modge Podge and 1 part black paint
  2. Stir together in a bucket
  3. Take a portion of the brown paper (about 3 feet long) and rip it off the roll
  4. Dip brown paper into the solution
  5. Wring out the paper by squeezing it above the bucket
  6. Wrap paper tightly around the pipe (to avoid it from slipping)
  7. Let wet paper drip dry before adding additional paper (to create more texture)
  8. Wrap in sections; go all the way to the main base, then stop so you can disassemble the tree if necessary.

TIP: *Anywhere you see a joint, careful not to cover it in “bark” so you can disassemble the tree for easy storage.

Get more information about this episode >>

DIY Candy Corn Crafts
13 of 24
DIY Candy Corn Crafts
DIY Candy Corn Crafts - Home & Family

Directions for Wine Bottles

1. Clean off any labels of the wine bottles by soaking them in the sink for a couple of
hours. Take a sponge or straight edge to make sure all of the residue is gone off of
the bottle.

2. Outside in a ventilated area, start with your white spray paint. Paint the neck of the
bottle, and continue down about half way.

3. You do not need to wait for the paint to dry.

4. Take the yellow spray paint and spray your bottle, starting at the bottom and
coming up to meet the white, about half way up the bottle.

5. Take the orange spray paint and spray the middle of the bottle. These colors are
supposed to look ombre, so don’t worry about making straight lines. Your bottle
should end up looking like a candy corn standing up.

6. Let dry completely before adding it to your décor in your home.

Directions for Topiaries

1. Take the Styrofoam balls and paint them with the yellow acrylic paint, brushed on. Set aside to dry.

2. Set the ball inside the vase/urn and gauge where you want it to sit. Use a bamboo skewer to prop it up inside.

3. Take each candy corn and place a small amount of hot glue on the base of the corn
and place it on the ball.

4. Continue this process until the entire ball above the urn is covered with candy
corns.

5. Set out and enjoy your candy corn décor!

Get more information about this episode >>

Farmer Frightful's Tricks or Treats Market Stand
14 of 24
Farmer Frightful's Tricks or Treats Market Stand
Level:
Advanced
How-To:
Outdoor Decor
Seasonal Event:
Halloween, Fall

Directions

Main Farm stand Steps:

  1. Start by cutting all your fence panels to the dementions of the included build plan.
  2. Lay the larger back wall flat and attach the two sides walls using shelf brackets at both the top and bottom using screws.
  3. On the front facing inside edges of the bottom of the side panels, screw in two 12" long 2" x 4" boards. Flush with front edge.
  4. Attach the main front board, screwing into the 2"x4" boards. Your stand can now be placed upright
  5. Once upright, place the roof on top (be safe get extra hands if needed). Attach the roof with shelf brackets from underneath to sides and back.

Large sign making steps:

  1. Use a piece of wood, or section of fence panels the size you want for your sign. Ours was 14" x 40"..
  2. Print out our sign image included, or your make your own.
  3. Cut out and glue on with mod podge. For aging effect, mix the mod podge with a bit of brown paint.

Spooky and Fun items for sale:

  • Create the illusion of "full to the brim" baskets and bins for sale with false bottoms. Cut a piece of foamcore to fit inside and attach 3 to 4 inches lower than the lip of the basket or bin, now add material like leaves or hay so looks full.
  • Top off the basket or bin with stacked fun stuff to make "trick or treater's laugh, like plastic rats, spiders or brains.
  • Be traditional with plastic fruit or veggies, but add a Halloween spin making some "poisoned". Spray paint a batch black and drip hot glue blobs all over for creepy effect.
  • An optional tip, hot glue all the stacked items together so your baskets or bins stay looking great all month long.

Get more information about this episode >>

DIY Playing Card Costume
15 of 24
DIY Playing Card Costume

Instructions

1. Print Enlarged Playing Card On 3’x4’ Foam Core Board

2. If Unable To Sent To Print Center:
a. Option 1: Freehand Playing Card Drawing On 3’ X 4’ Foam Core Board
b. Option 2: Enlarge Image To 3’ X 4’, Print Out In Sections And Paste On3’ X 4’ Foam Core Board

3. Cut Out Character Face With Craft Knife

4. Cut Out Playing Card Hand Area With Craft Knife For Handle

5. Take Photo Of Your Face Inside Cut Out Area

6. Print Out Photo To Size Of Actual Cut Out Area And Paste On Lower Face

Get more information about this episode >>

DIY Tandem Skydiver Costume
16 of 24
DIY Tandem Skydiver Costume

Materials

  • Pipe insulation tube
  • Bailing wire
  • eye hooks
  • dowels
  • paint

Directions

1. Remove plastic film from inside tube and seal

2. Dry brush the outside of the tube, set aside to dry

3. Once dried, connect them together using bailing wire

4. Once all tubes have been connected, using pliers cut off excess. Leaving some
to wrap around eye hook

5. Insert eye hook to the tip of the dowel

6. Wrap bailing wire around the eye hook. (make sure it is tightly wound)

7. (optional) Take rope and tie around dowels to connect them on either side.

8. Complete look by wearing a baby carrier and enjoy.

Get more information about this episode >>

DIY Elegant Halloween Tablescape
17 of 24
DIY Elegant Halloween Tablescape
Level:
Easy
How-To:
Home Decor
Seasonal Event:
Halloween, Fall

Materials for No Carve Sequin and Floral Pin Pumpkin

  • Fresh pumpkin or gourd
  • Assortment of sequin colors and sizes  
  • Round pearlized pins 1.5”  in assorted  colors

Materials for No Sew Burlap Placemats

  • 1 - 1/4 yards of 60” wide burlap fabric (Will make 6 placemats with a finished product of 17” x 13” )
  • Scissors

Materials for Pocket Fold Napkin

  • Napkin square

Directions for Pumpkin

  1. To create your sequin and pin pumpkin designs, thread the pin through the sequin hole and gently pierce and press into place on the pumpkin surface.
  2. You can create an all over design, dots, stripes, spirals, even lettering. To keep your pumpkin fresher longer, display away from heat and direct sunlight.

Directions for Placemats

  1. Start with the pre-folded burlap fabric. This will allow you to cut two placemats at a time. Measure the size of your placemat, 18” x 14” and cut.
  2. Once cut, pull a few of the outer threads on all sides to create about a 1/2 inch wide fringe. Trim the edges of the fringe slightly to make your placemat even, all the way around.

Directions for Napkin

  1. Starting with the bottom edge closest to you, fold your napkin upward, in half and crease. The closed edge should be nearest to you. Bring the folded closed edge upward about three inches to create the pocket, crease. Flip the folded napkin over with the closed edge nearest to you. This time fold in half from left to right.
  2. Fold the open edges on the right, under to desired overall napkin width. You can tuck leaves, menu cards and/or treats into the napkin pocket.

Get more information about this episode >>

DIY Candy Corn Soap
18 of 24
DIY Candy Corn Soap
DIY Candy Corn Soap
Level:
Intermediate
How-To:
Health & Beauty
Seasonal Event:
Fall

Materials

  • Silicone Loaf Mold
  • Clear Melt & Pour Soap Base
  • White Melt & Pour Soap Base
  • Perfect Orange Color Block
  • Fizzy Lemonade Color Block
  • Pumpkin Spice Fragrance Oil
  • Vanilla Color Stabilizer
  • Isopropyl Alcohol 

Directions

    1. Chop 32 ounces of Clear Melt & Pour Soap Base into small uniform pieces. Then, chop 16 ounces of White Melt & Pour Soap Base into small uniform pieces. Place the following amounts of soap into three heat-safe containers.
    • Container A: 16 ounces Clear Melt & Pour Soap Base + 0.5 ounces White Melt & Pour Soap Base
    • Container B: 16 ounces Clear Melt & Pour Soap Base + 0.5 ounces White Melt & Pour Soap Base
    • Container C: 15 ounces White Melt & Pour Soap Base
  1. Add a small chunk of Fizzy Lemonade Color Block to container A and melt in the microwave using 30 second bursts. Between each burst, stir the soap to help it melt evenly. If you want the color darker, you can add more of the color block and stir to fully incorporate. Once melted, add 0.2 ounces of Pumpkin Spice Fragrance Oil and 0.2 ounces of Vanilla Color Stabilizer. Stir in completely and pour into the mold. Spritz with alcohol to get rid of bubbles. Allow to fully cool and harden for about 15-20 minutes.
  2. Once the yellow layer has hardened and can support a layer on top, add a chunk of Perfect Orange Color Block to container B. Melt the soap in the microwave using 30 second bursts. Between each burst, stir the soap to help it melt evenly.
  3. Once melted, add 0.2 ounces of Pumpkin Spice Fragrance Oil and 0.2 ounces of Vanilla Color Stabilizer to the orange soap. Stir in completely. Check the temperature of the orange soap. If it’s hotter than 130 degrees F, allow it to cool slightly to prevent melting the layer below. Once it’s the correct temperature, spritz the layer below with alcohol to help the layers stick and pour into the mold. Spritz with alcohol to get rid of bubbles. Allow to fully cool and harden for about 15-20 minutes.
  4. Melt the soap in container C using 30 second bursts. Once melted, add 0.2 ounces of Pumpkin Spice Fragrance Oil and 0.2 ounces of Vanilla Color Stabilizer and stir in completely. Check the temperature of the white soap. If it’s over 130 degrees F, allow it to cool slightly to prevent melting the layer below. Once it’s the correct temperature, spritz the layer below with alcohol to help the layers stick and pour the soap into the mold. Spritz with alcohol to get rid of bubbles.
  5. Allow the soap to fully cool and harden for at least 3 hours or up to overnight. Remove from the mold and cut into bars about 1″ thick. Then cut the bars into a triangle shapes with the white layer at the top. Repeat this process for the entire loaf.
  6. Use the Clean Up Tool to round out the edges of each bar until you’re happy with the look. Enjoy! Wrap them in plastic wrap to avoid glycerin dew.

Get more information about this episode >>

DIY Flower Pot Costume
19 of 24
DIY Flower Pot Costume
DIY Flower Pot Costumer
Level:
Intermediate
How-To:
Fashion
Seasonal Event:
Fall, Halloween

Materials

  • plastic planter pot
  • artificial flowers
  • moss/greenery
  • utility knife
  • wire cutters
  • duct tape
  • ribbon
  • fabric scissors
  • glue gun and glue

Directions

  1. Flip the planter upside down and remove the bottom basin.
  2. Cut out base with utility knife and set aside
  3. Glue flowers to planter and secure with duct tape. TIP: Use wired artificial flowers which
  4. bend as needed and won’t obstruct your view.
  5. Attach a wide colorful ribbon with the same glue and then tape method. You could pre-
  6. measure what length you’d like the straps to be, or tie a knot at the shoulder to make it
  7. adjustable.
  8. Add moss or other greenery as desired.
  9. Step in and have fun!

Get more information about this episode >>

DIY Bat Swarm
20 of 24
DIY Bat Swarm
DIY Bat Swarm
Level:
Easy
How-To:
Home Decor
Seasonal Event:
Halloween

Materials

  • Foam Core
  • Faux Fur
  • Hot Glue Gun
  • Red Beads
  • Fish Wire
  • Dashes/Gel Adhesive

Directions

  1. Cut out bat from foam core (template available as a guide)
  2. Cut faux fur to fit the middle of the bat
  3. Glue faux fur on the front and back of the bat
  4. Glue red eyes/buttons to the front of the bat
  5. Hang your fish wire by tying the two ends to a pole or tree
  6. Attach bats to wire after it is hung using gel adhesive

Get more information about this episode >>

DIY Owl & Cat
21 of 24
DIY Owl & Cat
DIY Owl & Cat
Level:
Intermediate
How-To:
Home Decor
Seasonal Event:
Halloween

Materials

  • Foam Core
  • Black Faux Fur or Feathers
  • Hot Glue Gun
  • Spray Glue
  • Yellow Felt

Directions

  1. Cut out cat or owl from foam core (templates available as a guide)
  2. Use spray glue to attach faux fur (cat) or feathers (owl) to the body
  3. Trim the fur to fit the outline of the cat or owl (cut out the fur where the opening to the eyes are)
  4. For the eyes, hot glue yellow felt on the back side of the foam core where the opening for the eyes are
  5. To hang you can use bailing wire or tape (depending on where it is being hung)

Download the TemplateGet more information about this episode >>

DIY Snow Globe Costume
22 of 24
DIY Snow Globe Costume
Level:
Intermediate
How-To:
Fashion, Kids
Seasonal Event:
Halloween, Christmas

Materials

  • Acetate
  • Brown Paper
  • Packing Tape
  • x-acto knife
  • Blue foam
  • Upholstery foam
  • Glue
  • Scissors

Instructions

  1. Print out the H&F Snow Globe Pattern
  2. Trace the pattern on acetate
  3. Cut the acetate and tape together

To make Base:

  1. Take your waist measurements
  2. Get 2” Blue Foam
  3. Cut out a circle based on dimension of snow globe bottom
  4. Cut out smaller circle in center the diameter of waist dimension
  5. Get 1” upholstery foam
  6. cut to 8” width
  7. cut to length of outer circumference of blue foam circle
  8. spray center line of upholstery foam with Styrostick
  9. also spray edge of blue foam donut
  10. roll on upholstery foam to edge of donut

Get information about this episode >>
DIY Squishy Bags
23 of 24
DIY Squishy Bags

Materials

  • Plastic Bag
  • Flour
  • Water
  • Food Coloring
  • Glitter
  • Fake Leaves
  • Packing Tape

Directions

1) Combine water, flour, and yellow food coloring in a bowl (Use 8 tbsp. water for every 1 cup flour)

2) Repeat with orange and red food coloring

3) Leave one bowl with no food coloring

4) Add orange, white, and yellow dough into plastic bag (for candy corn bag)

5) Add yellow and red dough into plastic bag (for a Fall bag)

*Optional: Mix in glitter and fake leaves*

7) Seal bag with packing tape

Get more information about this episode >>

DIY Boarded Up Doors and Windows
24 of 24
DIY Boarded Up Doors and Windows

Materials

  • Ribbon
  • Foam Board
  • Ruler
  • Brown Spray Paint
  • Gray Paint
  • Water
  • Paint Brush
  • Exterior Heavy Duty Double-Sided Tape
  • X-ACTO Knife
  • Poster Strips
DYI Boarded up Windows and Doors - Home & Family

Directions

1. Cut ribbon to match the length of the window (use a color that matches window trim)

2. Take your foam core and use an X-ACTO knife to cut it into several pieces

3. Use a ruler and smash it into the edges of the foam board to give it a jagged
look

4. Paint the foam board using brown spray paint TIP: Use spray paint because it
will eat away at the foam board and give it a distressed look

5. Once the spray paint dries, coat the brown with a diluted gray paint

6. Lay out your ribbon (use ribbon 2” thick) and use heavy duty exterior double-
sided tape to attach the foam board slabs onto the ribbon

7. Use poster strips to attach the ribbon to with window or door frame

Get more information about this episode >>

ADVERTISEMENT
ADVERTISEMENT
ADVERTISEMENT