Share

Homemade Holiday Hostess Gifts | Holiday Guide 2019

DIY Hot Cocoa to Go
1 of 17
DIY Hot Cocoa to Go
DIY Hot Cocoa to Go
Level:
Easy
How-To:
Gifts
Seasonal Event:
Christmas

MATERIALS:

  • Metal lunch box
  • Thermos
  • Printable magnetic sheets
  • Scissors
  • Treat bags
  • Thin ribbon or twine
  • To-go cups
  • Flannel fabric
  • Fabric scissors
  • Hot glue gun and glue sticks
  • Saltshaker
  • Colorful sugar
  • Cookie stirrers
  • Small spoons
  • Hot cocoa

INSTRUCTIONS:

1. Print designs onto your magnetic sheets. There is a pdf included of our designs, but feel free to make your own or print something off the internet you like.

2. Cut the shapes out of the magnetic sheets.

3. Use the magnets to decorate the outside of the box. This is a great activity for kids to do on the road, so save it for the car if desired!

4. Cut a small piece of flannel fabric to wrap the handle. Use hot glue to attach it.

5. Pack the hot cocoa, marshmallows, cookie stirrers and spoons in individual treat bags.

6. Funnel some colorful sugar into a saltshaker.

7. Fill your thermos with hot water and place it in the lunchbox.

8. Place the rest of the cocoa supplies into the lunchbox and take that cocoa to go!

Get more from this episode >>

DIY Creative Gift Wrapping
2 of 17
DIY Creative Gift Wrapping

MATERIALS:

    TO CREATE THE WATERCOLOR GIFT BAG:

    • Geometric pattern wrapping paper
    • Watercolor paints
    • Paintbrushes
    • Painters tape
    • Scissors
    • Glitter tulle ribbon
    • Tissue paper
    • Optional: Spray sealant

    TO CREATE THE OUTDOOR INSPIRED GIFT WRAP:

    • Cinnamon sticks
    • Pinecones
    • Faux berries
    • Greenery sprigs
    • Twine
    • Ribbon
    • Hot glue gun and glue sticks
    • Wrapping paper in at least two different patterns
    • Outdoor Christmas lights
    • Wooden craft rounds or decorative elements
    • Gift tape
    • Scissors

    INSTRUCTIONS:

    To create the Watercolor Gift Bag

    1. Tape off sections of the geometric pattern on the giftbag. Taping off the lines will create defined border.
    2. Paint in the sections you’ve taped off. Applying your paint from darkest color to lightest will create an ombré effect. Make sure to dip your brush in the water often to spread to color.
    3. While the paint is still wet, tilt the bag around so the paint runs into itself and swirls.
    4. Allow the bag to dry completely while lying flat so the paint doesn’t run through the tape.
    5. If desired, spray with a light spray sealant to ensure the paint stays.
    6. Fill bag with gift, tissue paper and pieces of tulle ribbon.
    7. Gift!

    To create the Outdoor Inspired Gift Wrap

    1. Wrap your gifts with desired wrapping paper.
    2. Cut a wide strip of a different patterned wrapping paper and wrap around the box in the center then secure with tape on the back with tape. Use this paper to cover the taped ends of your gift.
    3. Wrap twine or ribbon around the gift as an accent.
    4. Adorn with pinecones, cinnamon sticks and Christmas light bulbs. Use hot glue to attach. If you are using the Christmas lights, remove the bulbs from the string and glue them on individually however you like!
    5. Gift!
    DIY  Potpourri Envelopes
    3 of 17
    DIY Potpourri Envelopes

    INSTRUCTIONS:

    • Open an envelope you like and make a copy of it on your printer on black and white setting.*

    • A print of the envelope will show the edges as well as the folds. It doesn’t look pretty, but this is the inside.

    • Fold and glue them together to make an envelope

    • Paint and decorate your potpourri envelope with pressed flowers, mod podge beautiful papers onto it, add bling!

    • Add 2 tablespoons of vermiculite and oil mix to each envelope and seal!

    *Use a 140LB paper or slightly heavier if you are doing a lot of painting. The paper store has a list and will help guide you to the right weight!

    Get more from this episode >>

    DIY Elf Brooches
    4 of 17
    DIY Elf Brooches

    MATERIALS:

    • Mini pinecones
    • Wooden beads ½” diameter
    • Brooch pin backs
    • Felt in Christmas colors
    • Baker’s twine
    • Small star beads
    • Fabric scissors
    • Jewelry pliers or tweezers
    • Hot glue gun and glue sticks
    • Optional: E6000

    DIRECTIONS:

    1. Use your jewelry pliers or heavy-duty scissors to remove the stem from the pinecone.

    2. Glue the wooden bead to where the stem used to be, now you have an elf body with a head! Make sure to hide the hole of the bead.

    3. Time to add the scarf! Cut a narrow strip of felt and wrap it around the “neck” of your elf. Secure with glue and cut the ends of the scarf at an angle. This will also cover up any excess glue from attaching the head.

    4. To make the elf hat, cut a triangle shape that is 2” wide and 2” tall with a slight curve at the bottom. Apply glue along one of the straight edges and roll it onto the other edge to create a cone. Hold until secure.

    5. Secure the cone to the head of the elf. Cut a strip of felt and glue it around the bottom of the hat to create a brim.

    6. Decorate the hat with the baker’s twine and strips of felt in other colors.

    7. Glue a star bead to the tip of the hat.

    8. Glue the brooch pin back to the back of the pinecone body. If you want it to be super secure, use E6000 to adhere the backing.

    9. Pin onto desired garment and enjoy!

    DIY Peppermint Candy Bath Bombs
    5 of 17
    DIY Peppermint Candy Bath Bombs

    INGREDIENTS:

    • 7-8 disk mold & packages
    • 16 oz. Sodium bicarbonate (baking soda)
    • 8 oz. Citric acid
    • 1 oz. Cocoa butter
    • 0.5 oz. Sweet almond oil
    • 0.5 oz. Polysorbate 80
    • 0.5 oz. Candy cane fragrance oil
    • 1 tsp. Red mica
    • 1 tsp. Kelly green mica
    • Witch hazel in a spray bottle
    • 2 tbsp. 99% isopropyl alcohol

    INSTRUCTIONS:

    1. In a small heat-safe container, melt 1 ounce of cocoa butter and 0.5 ounces of sweet almond oil in the microwave using 30-60 second bursts. Stir in 0.5 ounces of candy cane fragrance oil and 0.5 ounces of polysorbate 80. Mix well and set aside.

    2. In a large bowl, mix together 16 ounces of baking soda and 8 ounces of citric acid. To get rid of clumps, you can push the powders through a sifter or break them up with your fingers. Citric acid has a tendency to take off nail polish, so wear gloves to protect your manicure.

    3. Add the oil to the powder. Use your hands to mix together.

    4. Test the consistency of the bath bomb mixture. It should feel similar to wet sand and hold its shape when squeezed. If it’s too dry, use one hand to spritz the mixture with witch hazel and one to mix.

    5. Fill the disk mold and packages with the bath bomb mixture. Firmly compact it in to create a solid shape. Only fill each mold to the inner lip, or the lid won't close. Allow the bath bombs to dry and harden for at least 4 hours or up to overnight, and then remove them from the molds.

    6. Mix 1 teaspoon of red mica or kelly green mica with 1 tablespoon of 99% isopropyl alcohol. Use a paint brush to create lines around the outside and down the sides of each bath bomb. If you find the paint is bleeding, add more mica to thicken. If it’s too thick, add a bit more 99% isopropyl alcohol.

    7. Continue this process with each bath bomb. Allow the paint to dry for 1-2 hours. The paint transfers when touched, so handle carefully. To use, place the bath bombs into a hot bath and enjoy!

    Get more from this episode >>

    Cookie Cutter Quick Fudge
    6 of 17
    Cookie Cutter Quick Fudge
    Ingredients

    INGREDIENTS:

    • 3 tablespoons butter, divided
    • 12 ounces milk chocolate chips
    • 6 ounces dark chocolate (chips or chunks)
    • 1 can (14 ounces) sweetened condensed milk
    • 1 teaspoon vanilla extract
    • Crushed candy canes or starlight mints

    Yield: 1 9x9 baking dish

    INSTRUCTIONS:

    1. Line a 9x9 square baking pan with foil, grease foil with 1 tablespoon butter. If using cookie cutters, lightly grease inside of cookie cutters with butter.

    2. In a large glass bowl. Melt chocolate chips and remaining butter in microwave, stirring after every 30 seconds until completely smooth.

    3. Remove glass bowl from microwave and stir in condensed milk and vanilla.

    4. Spread fudge into prepared pan or cookie cutters on parchment-lined sheet tray.

    5. Sprinkle crushed candy canes on top of fudge, pressing lightly into the surface.

    6. Refrigerate fudge until firm.

    7. Wrap cookie cutters in cellophane bags with holiday ribbon.

    Get more from this episode >>

    Shirley Bovshow – DIY Botanical Candles
    7 of 17
    Shirley Bovshow – DIY Botanical Candles

    MATERIALS:

    • Silicone succulent candle molds
    • Wax of choice
    • Colorant of choice
    • Wicks
    • Saute pans or double boiler
    • Thermometer
    • Safety goggles and gloves
    • Scissors

    DIRECTIONS:

    Heat wax up on a double boiler. Place a thermometer in there because wax will flash burn at different temps depending on type of wax! I chose soy wax because it burns cleaner than paraffin. Also I chose to color this wax with pigmented "dye chips” – there are a number of color options but the chips work well with soy/ paraffin.

    Get more from this episode >>

    DIY Honey Face Wash
    8 of 17
    DIY Honey Face Wash

    MATERIALS

    • 4 tbsp water
    • ⅓ honey
    • ⅓ castile soap
    • 1 tsp vitamin E oil
    • container

    DIRECTIONS:

    Mix ingredients together in a container. Apply to face like face wash.

    Get more from this episode >>

    DIY Ginger and Glove Hand and Foot Polish
    9 of 17
    DIY Ginger and Glove Hand and Foot Polish

    MATERIALS:

    • 1 Tbsp Ground Ginger
    • 1 Tbsp Ground Cloves
    • 2 Tbsp Ground Coffee
    • 2 Tbsp Coarse Sea Salt
    • 1 Tbsp Carrier Oil (Like Coconut/Almond/Olive)

    DIRECTIONS:

    Mix ingredients together in a container. Apply to hands, feet and elbows.

    Get more from this episode >>

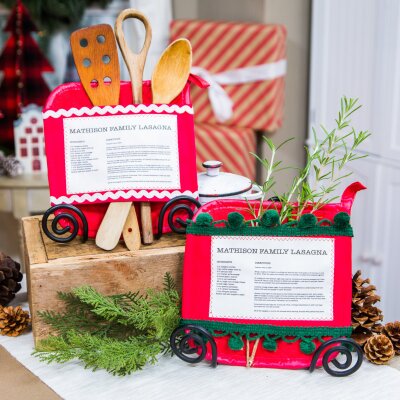
    DIY Recipe Potholder
    10 of 17
    DIY Recipe Potholder
    DiY Recipe Potholder
    Level:
    Intermediate
    How-To:
    Home Decor, Handmade
    Seasonal Event:
    Christmas

    MATERIALS:

    • Sew-in fabric sheets
    • Potholder
    • Sewing machine or needle and thread
    • Scissors
    • Embellishments

    INSTRUCTIONS:

    1. Cut pocket sleeve for potholder (dimensions will vary depending on potholder).
    2. Hem the pocket sleeve.
    3. Double roll edges of the pocket sleeve.
    4. Print out your recipe on sew-in fabric sheets.
    5. Cut out recipe to mimic a recipe card and add to the pocket sleeve.
    6. Add a zigzag stitch around the recipe.
    7. Add the sleeve across the center of the potholder. Roll over the edges of the potholder and stitch to get a clean front.
    8. Add embellishments.

    Make some Pointsetta pillows or Gnomes pillow covers!
    Get more from this episode >>

    DIY Wine Coats
    11 of 17
    DIY Wine Coats

    MATERIALS:

    • Wine bottle
    • Desired fabric
    • Fabric scissors

    DECORATIVE ACCOUTREMENTS LIKE:

    • Broaches
    • Pearls
    • Buttons

    OPTIONAL:

    • Soft tape measure

    INSTRUCTIONS:

    1. Choose fabric and decorative accoutrements that resemble the person you’re gifting this to.

    2. Now you need to create the body of the coat. You can roll the bottle onto the fabric and cut around it or measure the bottle with a soft tape measure and cut to size with a generous overlap. Leave the fabric a few inches taller than the curve of the neck of the bottle for the collar.

    3. Use hot glue to attach the fabric to the bottle with an overlap. The overlap should be centered, not the seam.

    4. Add any decorative elements to the coat you desire, remember to have fun making it resemble the recipient. Use hot glue to secure.

    5. Give to friends, family or coworkers and let them enjoy!

    Get more from this episode >>

    DIY Holiday Hostess Gifts
    12 of 17
    DIY Holiday Hostess Gifts

    KYM’S SUGAR CHRISTMAS COOKIES INGREDIENTS:

    • 2 ¾ cups all-purpose flour
    • 1 tsp baking soda
    • ½ tsp baking powder
    • ½ tsp salt
    • 1 cup unsalted butter, room temperature
    • 1 cup + 2 tbsp (233g) granulated sugar
    • 2 tbsp (28g) brown sugar
    • 1 egg- room temperature
    • 2 tsp vanilla extract

    REED DIFFUSER:

    1. Take empty bottle
    2. Fill ¼ cup of your base oil (baby oil is clear and looks best)
    3. Add 30-50 drops of essential oil
    4. Tie reeds with string, attach with rubber band to bottle

    KYM’S SUGAR CHRISTMAS COOKIES

    INSTRUCTIONS:

    1. Preheat oven to 350°f (180°c)
    2. Combine the flour, baking soda, baking powder and salt in a medium sized bowl and set aside.
    3. Cream the butter and sugars together in a large mixer bowl on medium speed until light in color and fluffy.
    4. Add the egg and mix until well combined.
    5. Add the vanilla extract and mix until well combined.
    6. Add the dry ingredients and mix until the dough is well combined. Use a rubber spatula to help it come together to form a more cohesive ball.
    7. Create 1 ½ tablespoon sized balls of cookie dough. Gently roll into a ball, then roll each ball in the additional sugar to coat. Set the balls on the baking sheet.
    8. Bake cookies for 7-8 minutes. The cookies will spread and the centers will look soft, but should look done. Remove just before the edges begin to turn golden. Don’t over bake.
    9. Remove from the oven and allow to cool on baking sheets for 4-5 minutes before transferring to a wire rack to cool completely.

    GRATITUDE BOX:

    1. Take any box, paint or add embellishments of your choice
    2. Add note cards (card stock - cut in quarters or any recipe cards) and colorful pens
    3. Add the word “gratitude” printed from computer, attached with double stick tape
    4. Enjoy!

    Get more from this episode >>

    Go-To Chunky Cowl
    13 of 17
    Go-To Chunky Cowl

    MATERIALS:

    • 1 hank malabrigo rasta (100% hand-dyed merino wool; 90 yds/150 g) in color: frank ochre —or any super-bulky yarn
    • Size u.s. 13/9mm, 24” circlular needle — or size needed to obtain gauge
    • Stitch marker

    SIZE:
    One size

    FINISHED MEASUREMENTS:
    25” (64 cm) circumference x 10 1/2” (27 cm) tall

    GAUGE:
    11 sts x 8 rows = 4” (10 cm) in spiral rib

    ABBREVIATIONS:
    BEG = BEGINNING
    BO = BIND OFF
    CO = CAST ON
    K = KNIT
    PATT = PATTERN
    P = PURL
    REP = REPEAT
    RND(S) = ROUND(S)
    SL = SLIP
    ST(S) = STITCH(ES)

    INSTRUCTIONS:

    • CO 57 STS; join being careful not to twist STS. Place marker FOR BEG of RND.

    • RND 1: P2, SL 1; REP from * AROUND.

    • RND 2: *P2, K1; REP from * AROUND.

    • RNDS 3-6: REP RNDS 1-2.

    • RND 7: SL 1, *P2, SL 1; REP from * AROUND, end P2.

    • RND 8: K1, *P2, K1; REP from * AROUND, end P2.

    • RNDS 9-12: REP RNDS 7-8.

    • RND 13: P1, *SL 1, P2, REP from * AROUND, end, SL 1, P1.

    • RND 14: P1, *K1, P2; REP from * AROUND, end K1 P1.

    • RNDS 15-18: REP RNDS 13-14.

    • Repeat RNDS 1-18 once more.

    • Repeat RNDS 1-6 once more.

    • BO IN PATT ST.

    FINISHING:

    • Weave in ends.

    Get more from this episode >>

    DIY Christmas Pens
    14 of 17
    DIY Christmas Pens

    MATERIALS:

    • Plastic pens
    • Polymer clay in various colors
    • Pliers
    • Rolling pin
    • X-Acto knife
    • Small piece of glass from a picture frame
    • Toaster oven or conventional oven
    DIY Christmas Pens - Home & Family

    INSTRUCTIONS:

    1. Use your pliers to remove the ink cartridge from the shell of the pen.

    2. Roll out various colors of the clay out into relatively thin pancakes.

    3. Layer your colorful clay pancakes and roll them into a log shape.

    4. Use an X-Acto knife to slice the log into little medallions, just like slice and bake cookie dough!

    5. Next, cover the pen shell with the medallions, squishing them together so there are no gaps.

    6. To smooth the surface of the clay, take your glass piece and roll it back and forth on the pen. The transparency of the glass allows you to see where needs extra smoothing or gaps filled.

    7. Now it’s time to bake! Check the specific brand of clay, but these are typically baked for 15-20 minutes at 275 degrees.

    8. Allow the pen to cool then re-insert the ink cartridge and enjoy!

    Get more from this episode >>

    DIY Ornament Earrings
    15 of 17
    DIY Ornament Earrings
    DIY Ornaments Earrings
    Level:
    Intermediate
    How-To:
    Fashion
    Seasonal Event:
    Christmas

    MATERIALS:

    • White polymer clay
    • Sculpey gloss glaze
    • Clay roller
    • Mini cookie cutters
    • White acrylic paint
    • Folkart color shift paint in desired color
    • Eye pin
    • Ear wire hooks
    • Jump rings
    • Jewelry pliers
    • Straight pins
    • Baking sheet
    • Aluminum foil

    INSTRUCTIONS:

    1. Roll out the clay to about 1/8” thickness.
    2. Then, cut out 2 circles using the 1 ¼” cutter.
    3. Insert an eye pin into each piece of clay at what will become the top of your earrings. Make sure that it doesn’t poke through on the sides.
    4. Next, smooth the edges of the circles making them slightly rounded.
    5. Using the pin head, the rounded end of a paint brush handle or something similar, press small dot indentions into the top half of your clay circles.
    6. On a covered baking sheet, bake your clay according to package instructions. Typical bake time is about 15 minutes at 275°F.
    7. The white clay picks up dust or lint easily, so after it is baked, paint them white to cover up any little imperfections.
    8. Once the white paint is dry, dip the pin head into the color shift paint and apply into the indentions on the clay.
    9. Next, coat your earrings with the scupley gloss glaze. This seals your earrings and helps give them the high quality of appearance of porcelain. Apply 3 coats according to the instructions. Allow the glaze to dry completely.
    10. Attach your ear wire hooks the eye pin with a jump ring in between using your jewelry pliers.
    11. Put on and enjoy!

    Get more from this episode >>

    16 of 17
    Shirley’s Guide to “Holiday Cactus Plants”
    Blooming Holiday Cactuses Plants - Home & Family

    There are Three Varieties of Holiday Cactus:

    The different types of Holiday Cactus plants include: Thanksgiving, Christmas and Spring or Easter. They are often mixed up because Thanksgiving plants are more readily available. The Thanksgiving plant leaf has spikes, the Christmas plant leaf is rounded and smooth.

    The care for each type is approximately the same:

    • Keep in a cooler room
    • A humid environment is best
    • Loose, well-drained soil
    • Water when they start to dry out
    • Fertilize only in the spring/summer and stop in September

    Special Preparations to Coax The Blooms

    • Start 6-8 weeks before flowering. Thanksgiving Cactuses - start by September 1st. Christmas cacti start november 1!
    • Make sure the room is cooler at night (about 55-65 degrees).
    • Completely cover the plant for about 12-14 hours nightly (you will do this every night for 6-8 weeks).
    • Remove cover in the morning and keep in bright indirect sunlight.

    How Long Will Blooms Last?

    In a cool environment - blooms for weeks - up to a month. If hot, flowers die after 1-2 days.

    How Do We Cross-Breed Within Each Variety?

    • Gather pollen on a small paint brush.
    • Paint pollen onto stamin of another plant.
    • Repeat from flower to flower.

    Get more from Gardening Expert Shirley Bovshow at Foodiegardener.com and Edenmakers Blog

    Follow Shirley on Instagram, Youtube, and Twitter.

    Amber Kemp DIY Stamped Chocolate Bars
    17 of 17
    Amber Kemp DIY Stamped Chocolate Bars

    MATERIALS:

    • Ghiradelli melting chocolate
    • Lawn fawn let’s polka paper pad
    • Chocolate bar mold
    • Stamp set
    • Gold foil candy wrappers
    • Craft paper

    null

      DIY Stamped Chocolate Bars - Home & Family

      INSTRUCTIONS:

      1. Melt chocolate in a microwave safe container. I used a Pyrex.

      2. Place the stamps into the mold. Press firmly so that the clear stamp is well adhered to the candy mold. (I would suggest doing this with, new unused stamps …you know…cause this is food and you probably don’t want to ingest any remnants of ink. But that’s up to you. You can always live on the edge. No judgement here. Hell, craft ink can’t be any worse for you than twinkies, right?)

      3. Pour melted chocolate to fill mold and allow to harden in the fridge.

      4. Once hardened, remove the candy from the mold and wrap with gold foil and craft paper.

      Get more from this episode >>

      ADVERTISEMENT
      ADVERTISEMENT
      ADVERTISEMENT