Share

Go Big for Christmas with Oversized Christmas Decor

DIY Life-Size Nutcracker
1 of 9
DIY Life-Size Nutcracker
Level:
Advanced
How-To:
Christmas Decor, Home Decor, Outdoor Decor
Seasonal Event:
Christmas

DIY Nutcracker Materials

  • 1 4ft concrete tube (12 inches around)
  • 12 inch plywood round
  • 14 inch plywood round
  • 4 inch PVC pipe - 8 ft.
  • Styrofoam balls
  • Large round Christmas ornaments
  • Brush-on paint
  • Masking tape
  • Expanding foam glue
  • White craft fur
  • Embellishments of your choice for eyes, clothing, accessories

DIY Nutcracker Instructions

  1. Create your base by gluing PVC pipe legs to base (14 inch plywood round).
  2. Create the body by gluing 12 inch round to bottom of tube, reinforce with screws.
  3. Glue the body onto the legs.
  4. Take PVC pipe for arms, glue on and reinforce with screws. Place half-way down from top of tube.
  5. Paint the legs white, the body red, the top black. Let dry.
  6. Add embellishments of your choosing. Craft fur for the beard, and hair. Stick-on facial features from print out on transfer/adhesive paper. A template can be downloaded at homeandfamilytv.com
  7. Use rope or fabric to decorate epilates for the jacket. Form epilates with an ornament ball glued to a deli cup, spray-paint gold.

Download Nutcracker PDF

Upcycle your fall decor and make snowmen or add some elves!

Click here for more Christmas crafts

Wooden Christmas Lights
2 of 9
Wooden Christmas Lights
Level:
Advanced
How-To:
Home Decor
Seasonal Event:
Christmas

MATERIALS:

  • ¼” Thick wooden ovals
  • Balsa wood
  • Narrow popsicle sticks or wooden stir sticks
  • Spray paint in gold and Christmas bulb colors like green, red, orange, yellow and blue
  • White craft foam
  • X-acto knife
  • Cutting mat
  • Clothespins
  • Existing plain garland
  • Hot glue gun and glue sticks
  • Pencil
  • Ruler
  • Optional to use as lawn décor:
    • Wooden lawn stakes

INSTRUCTIONS:

  1. If you can’t find the right size of rectangular balsa, cut the balsa wood into a rectangle that is a good size to look like the cap of the “Christmas bulb” wooden oval with an x-acto knife. Cut as many caps as needed.
  2. Create the grooves of the bulb cap. Glue three narrow popsicle sticks horizontally and evenly spaced across the balsa wood cap.
  3. Spray paint the caps gold and the wooden ovals in alternating Christmas bulb colors. Allow to dry.
  4. Glue the cap to a narrow end of a painted oval to create each bulb.
  5. Add a highlight to the bulbs to give them dimension. Cut rounded, obtuse triangles or crescent shapes out of white craft foam and glue to each bulb wherever you want it to look like the light is hitting it.
  6. Glue a clothespin vertically to the back of the bulb with the side that opens and clamps facing the bottom point of the bulb, so that when you attach it, the cap is on top. Repeat on each lightbulb. PRO TIP: you can also glue yard stakes to the back of the bulbs and just stick them in the lawn!
  7. Attach the bulbs to the garland using the clothespins and enjoy!

Click here for more Christmas crafts

DIY Front Yard Gingerbread Man
3 of 9
DIY Front Yard Gingerbread Man
Level:
Advanced
How-To:
Outdoor Decor, Christmas Decor
Seasonal Event:
Christmas

Materials

  • 12 x 8 2 inch thick insulation foam
  • X-acto knife/jig saw
  • Brown paint
  • Paintbrush
  • White rope
  • Hot glue
  • Decorations for eyes and buttons: Lids, containers, etc.
  • Colored paint

INSTRUCTIONS:

  1. Draw gingerbread man shape on the 12 x 8 2 inch thick insulation foam
  2. Cut out gingerbread man shape from insulation foam
  3. Paint gingerbread cut out with brown paint
  4. Let dry
  5. Glue white rope around the edges of gingerbread man
  6. Use old lids, containers, and other things lying around the house for face and buttons
  7. Attach PVC pipe to bottom of gingerbread man and slide over stake to display in yard

Click here for more Christmas crafts

Check out more fun DIY projects at the Home & Family Pinterest Page

DIY Oversized Ornaments
4 of 9
DIY Oversized Ornaments
Level:
Beginner
How-To:
Home Decor, Christmas Decor

MATERIALS

  • Plastic Bowls
  • Plastic Margarita Glasses
  • Large Plastic Ball
  • Super-Glue
  • Chrome Spray Paint
  • Anodized Automotive Paint
  • PVC Pipe or Shower Rings
  • Large S-Hooks

INSTRUCTIONS

  1. Layout items to be used to for your ornament. Identify bottom piece.
  2. Work from the bottom up and use superglue to connect elements for your ornament.
  3. Create topper by supergluing ½ inch and ¼ inch pieces of PVC pipe, or plastic shower rings together. Glue topper to ornament. Allow glue to dry for 1- hour.
  4. In a well-ventilated area, spray-paint entire ornament with chrome or silver paint. Allow to dry for 10 minutes.
  5. Spray paint entire ornament (excluding the topper) with 3 to 4 coats of anodized automotive paint in your choice of color. Allow 10 minutes for drying between coats.
  6. Once fully dry, slip S hook or craft-wire through the hole in the topper, and hang your ornament from your porch or your favorite tree!

Click here for more Christmas crafts

DIY Wallpaper Santa’s Village
5 of 9
DIY Wallpaper Santa’s Village
Level:
Beginner
How-To:
Home Decor, Kids
Seasonal Event:
Christmas

DIY WALLPAPER SANTA’S VILLAGE MATERIALS:

  • Peel and stick removable vinyl in various colors and patterns like:
    • Woodgrain
    • White
    • Green
    • Red
    • Yellow
  • Painter’s tape
  • Snowflake paper punches
  • X-Acto knife
  • Cutting mat
  • Marker
  • Wooden Nutrackers

Optional:

  • Cricut or vinyl cutting machine

DIY WALLPAPER SANTA’S VILLAGE INSTRUCTIONS:

  1. Map out your village on the wall in painter’s tape.
  2. Draw out the houses, snow mounds and accent pieces like wreaths and bows onto desired colors of vinyl. The larger parts of the village like the snow, trees and buildings will have to be done in multiple pieces and patched together since the vinyl only comes in certain widths.
  3. Cut out with x-acto knife or vinyl cutting machine. PRO TIP: using a vinyl cutting machine can make this step a lot faster!
  4. Apply the vinyl village to the wall starting with the background first then layer the appropriate elements from background to foreground. For instance, lay all of the snow first, then the buildings, then the trees, then the decorative elements like windows, doors and wreaths on top. PRO TIP: peel the backing off the vinyl in small sections when applying, smooth as you go with your hands or plastic card.
  5. Cut snowflakes out of vinyl with the snowflake punches.
  6. Adhere the snowflakes to the wall as desired.
  7. Set up a fun play area for your child around decorated and enjoy!

Click here for more Christmas crafts

Get more from the episode >>

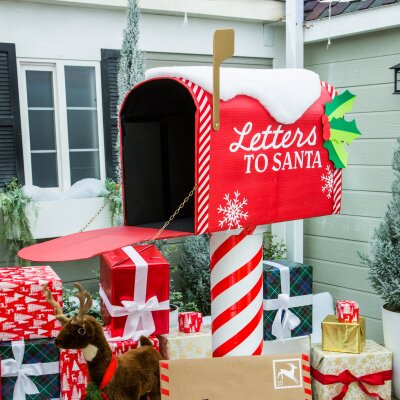
DIY Santa’s Mailboxes
6 of 9
DIY Santa’s Mailboxes
Level:
Intermediate
How-To:
Christmas Decor
Seasonal Event:
Christmas

MATERIALS:

  • 18x18x36 Cardboard box (or any size rectangular box you have)
  • 10” by 40” Full length sonotube
  • Corrugated cardboard
  • Strips of cut of file boxes
  • Packers tape
  • Exacto knife
  • Paint
  • Foam Core
  • Vinyl lettering

INSTRUCTIONS:

  1. Lay box horizontally with flaps opening up and down.
  2. Cut half of the top of the box off (don’t throw away this piece will create the door to the mailbox).
  3. Cut 6, 2 ½” strips from you bankers’ box horizontally.
  4. Tape first strip in an arch from one side to the other starting at the top of the box. Reinforce strip with a second strip, to make it more sturdy. Repeat this step until you have three arches starting from the beginning of the box and moving to the back.
  5. Cut corrugated cardboard (this will be top of your mailbox) big enough to go from bottom side of the mailbox to the other side of mail box. You may have to do this in two strips to cover entire box.
  6. Take corrugated cardboard strip and tape it to the bottom of the box. Before draping it to the other side of box, spray adhesive to the inside so it will stick straight to the sides of boxes. Drape adhesive onto the other side and secure it with tape at the bottom.
  7. Take previous scrap you put to the side in step 2 and use tape to attach it to the bottom front flap of your box. This will create door.
  8. Fold flap up and trace an arc so your door will fit your mailbox. Cut off excess material.
  9. Take your mailbox and center it onto your sonotube and trace the circle. Cut out circle (save this circle for later use).
  10. Cut out strips of corrugated cardboard, wrap it around tube about 2” from the top a couple of times to create a lip for the mailbox to sit upon. Set your mailbox on tube.
  11. Take your circular cut out and tape it to the top of the sonotube inside mailbox.
  12. Paint and decorate to your liking.

Add more to your yard with DIY Signposts or Santa Sleigh

Click here for more Christmas crafts

DIY Giant Candy Cane Picket Fence
7 of 9
DIY Giant Candy Cane Picket Fence
Level:
Advanced
How-To:
Home Decor, Christmas Decor
Seasonal Event:
Christmas

MATERIALS

  • PCV Pipe
  • Red Pipe
  • Red Tape
  • PVC P-trap with union
  • two pieces of 2x4

INSTRUCTIONS:

  1. Use 3 smaller interconnecting "P" pipe joints for the cane curve.
  2. These only come in black so we need to paint them white.
  3. Then you add the tape (2 inch red) to give the stripe effect. You could also add thinner 3/4" green if we wanted to add an extra candy stripe.
  4. Fill bottom of cane with rocks or sand to give it some weight for stability.

Click here for more Christmas crafts

More info from this episode >>

DIY Oversize Mistletoe
8 of 9
DIY Oversize Mistletoe
Level:
Intermediate
How-To:
Christmas Decor
Seasonal Event:
Christmas

MATERIALS:

  • Paper lantern (or styrofoam ball)
  • Large sheets of green paper in two different colors
  • Small white pom poms for the berries
  • Scissors
  • Pencil
  • Ribbon

INSTRUCTIONS:

  1. Figure out the size of your largest leaves and cut out a handful of the larger size in both colors.
  2. Repeat with a medium-size and a smaller size.
  3. Attach the paper onto the styrofoam ball or paper lantern with hot glue starting with the longer ones at the bottom and working your way to the top with the medium and short making sure to use the different colors for dimension.
  4. Continue until the entire ball is covered.
  5. Add the white pom-poms as the berries with hot glue
  6. Add the ribbon at the top in the shape of a bow.
  7. Hang using yarn.

Click here for more Christmas crafts

DIY Oversized Christmas Ornaments
9 of 9
DIY Oversized Christmas Ornaments
Level:
Intermediate
How-To:
Christmas Decor, Outdoor Decor
Seasonal Event:
Christmas

MATERIALS:

  • Floral foam balls in a variety of sizes. (12”, 10”, and 8”)
  • Acrylic paint in fun colors
  • Large paint brush
  • 18 gauge crafting wire in gold
  • PVC end caps 3”
  • 2” deli cups (2” diameter at the opening)
  • Gold spray paint
  • Drill with drill bit
  • Foam glue
  • Wire cutter
  • Hot glue/glue gun
  • Glitter (optional)

INSTRUCTIONS:

  1. Paint your foam balls with your paintbrush and acrylic paint. Set aside to dry. TIP: Spray paint would be a whole lot easier but beware – spray paint actually eats into Styrofoam with will make your ball look like the surface of the moon! So even though it might take longer, the good old-fashioned paint brush and acrylic paint in the way to go! If you want to add glitter to your ornaments, now is the time to do it when the paint is still wet.
  2. For your tops, we are going to be using the PVC end caps and the deli cups.
  3. Take your drill and drill bit and drill two holes into each end cap and deli cup.
  4. Here’s where you get to spray paint! Take your PVC end caps and your deli cups outside and give them a coat of gold spray paint. Make sure you even get the holes that you just drilled. Set aside to dry.
  5. Once everything has dried, add your wire to the holes of your caps to resemble a hook at the top of an ornament. Bend the ends underneath the cap and use hot glue to secure into place.
  6. Take your cap and push it slightly into the Styrofoam ball to create an indent.
  7. You can use hot glue on a low setting or Styrofoam glue to secure the cap to the ornament.
  8. Enjoy your cute oversized ornaments!

Click here for more Christmas crafts

ADVERTISEMENT
ADVERTISEMENT
ADVERTISEMENT