

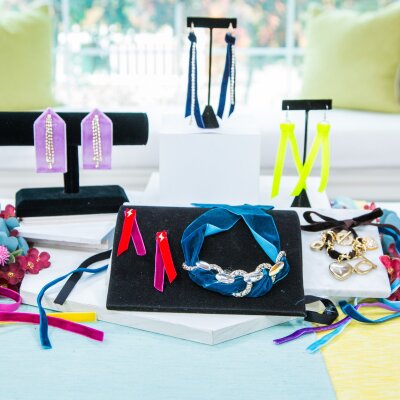
DIY Velvet Accessories
Level:
Intermediate
How-To:
Fashion
Seasonal Event:
Fall
MATERIALS:
For the Wide Velvet Ribbon Dangle Earring:
- At least 1” wide velvet ribbon, double-sided preferably
- Existing dangle earring
- Fabric scissors
- Hot glue gun and glue sticks
- Fray check
For the Velvet Slip Knot Earring:
- Velvet ribbon, double-sided preferably
- Existing hoop earring or jump ring, earring hooks and pliers
- Fabric scissors
- Fray check
For the Velvet Bracelet:
- Velvet ribbon, double-sided preferably
- Existing bracelet, preferably chain or something with an area to weave the velvet through
- Fabric scissors
- Hot glue gun and glue sticks
INSTRUCTIONS:
To Create the Wide Velvet Ribbon Dangle Earring:
- Start by cutting a 3-4” piece of velvet ribbon.
- Next, fold the corners in on the top so it creates a point. Secure the corners in place with hot glue.
- Take your dangling earring and pierce it through the top of the ribbon in the center of the pointed end.
- Finish off the bottom edge. Either use fray check on the raw edge or fold the bottom edge up onto the backside to create a hem and hot glue to secure.
- Allow glue to dry and enjoy!
To Create the Velvet Slip Knot Earring:
- Begin with a hoop earring or make an earring with a jump ring and earring hook using pliers.
- Cut a double long length of ribbon and fold it in half. Create a lark’s head knot around the hoop or ring and tighten by slipping the knot upward until taut. Add glue for extra security if desired, but this should be pretty strong on its own.
- You can keep this simple or add a chain to it! There are two options for adding it, use a little hot glue under the knot after tying and add the chain so it looks like it’s coming from underneath or you can also lay the chain on top of the ribbon before creating the knot and tie it in.
- Seal ends with fray check allow to dry and enjoy!
To Create the Velvet Bracelet:
- Take your velvet and loop it through the chain or around the bracelet.
- To finish it off just tie a bow or create a seam with hot glue depending on what style you want.
- Wear and enjoy!
You may also like these how-tos:
Lawrence Zarian Shows How-to Love Our Leggings >>
