
Materials for DIY Stained Table
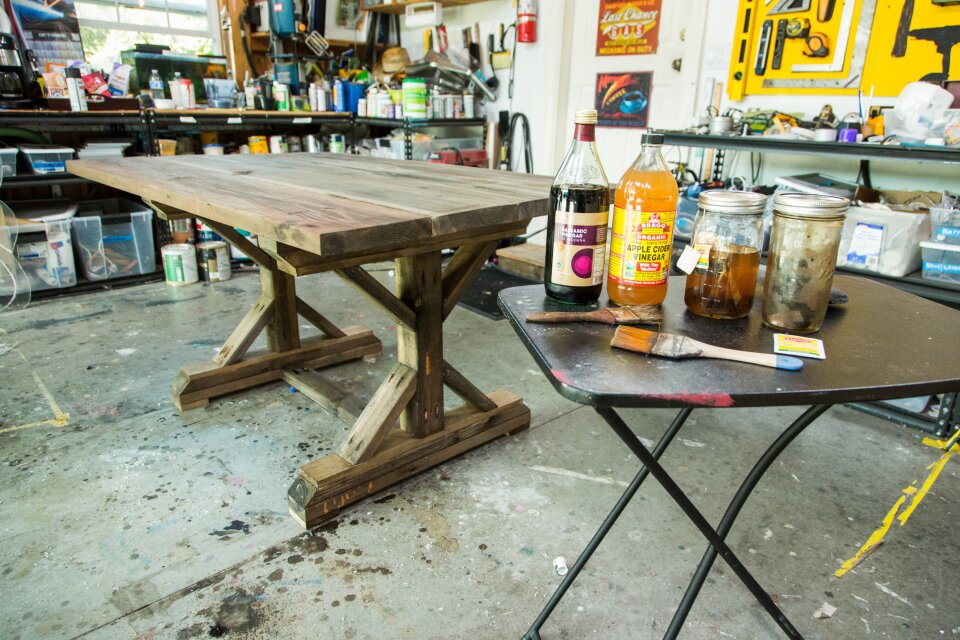
- Steel wool (fine grade)
- Balsamic vinegar
- Apple cider vinegar
- Fresh/clean wood surface (this works best with natural wood, but if you had a project that you wanted to use this method on, you would need to sand down the wood to it’s bare material – I would like to just focus on new wood.)
- 10 black tea bags
Materials for DIY Dining Table
- 4 – 2” x 10” boards 60” long (you may need to buy 8’ long pieces and have them cut to 5’)
- 2 – 4” x 4” boards cut at 20” length (you can get one 8’ piece and cut it)
- 8 – 2” x 4” boards cut at 11 3/8” at a 45 degree angle where 11 3/8” is the longest part (you can get one 8’ board)
- 4 – 1” x 4” boards cut at 28” (you can get one 10’ board)
- 4 – 2” x 4” boards cut at 31” at a 45 degree angle at the longest portion of the board (you will need 2 8’ boards to create these cuts)
- 4 – 2” x 4” boards cut at 31” straight cut (you will need 2 8’ boards to create these cuts)
- 4 – 1” x 4” boards cut at 3 ½” square (you can use this from left over 1” x 4” boards)
- 2 – 2” x 4” boards cut at 29” as your brace supports (these will be longer if you want your table to be more than 5’ long)
- 2 – 1” x 4” boards cut at 31” (you can get one 8’ board)
Tannins:
Tannins are dark pigments that give red wine, cedar wood, and tea their characteristic reddish to brown colors. It is a substance that gives pigment to organic substances.
Step 1: Three (3) days before you start your project, you will want to make your solution. In a large mason jar, take some steel wool and tear into pieces, then fill the jar with balsamic vinegar and apple cider vinegar (I used half of each). Screw the lid onto the mason jar. Let your mixture sit for at least 3 days. (If you have more time, you can just pop a whole piece of steel wool into your solution – it will have the same effect. Separating the wool into tiny pieces merely speeds up the degradation process.)
Many people use white vinegar, but since I wanted to assure a darker finish, I used Balsamic vinegar (it also smells better). Here are the breakdowns of what different vinegar will do to wood:
• Balsamic vinegar gives a darker colored finish with a brownish-green hue
• Apple cider vinegar gives a slate grey finish
• White vinegar gives a lighter finish.
Why this vinegar solution with steel wool?
The wool and the vinegar combined make an acidic mixture that will give the wood a weathered look. When this mixture is added to the wood, it creates a chemical reaction with the tannins. Different types of wood have different levels of tannins.
Step 2: Boil water and add several strong black tea and let steep for at least an hour. I used 10 tea bags and let them steep for a few days.
Why use tea?
Many types of wood have a high tannin concentration, but pine (which is typically the easiest and cheapest) has a really low tannin concentration. I am using pine for this project. We can increase the tannin levels in the wood by adding tea. Tea contains tannins and when applied to the wood, the wood absorbs the tannins. This will aid in the reaction to the vinegar solution.
This technique is awesome! And I didn’t have to wait 50 years for that old world look!
You can do this technique to any wood surface…a dining table, a coffee table, an armoire, a desk, etc….you just need to sand down your wood surface so that it able to absorb the solution. In case you would like to make the table from scratch like I did…then follow the directions below.
Steps for DIY Dining Table
1. Cut all your wood to size and label them according to the letters in the materials section.
2. Assemble your base starting with E on top of F. Hold these pieces together while you pre-drill three entry points. You can secure even stronger by using wood glue. Using 2 ½” wood screws to attach these pieces together.
3. Mark on your wood where you put the three screws so that you do not overlap the screws on the next step.
4. Take D and place on top of your E and F pieces. You can glue D into place. Pre-drill in three places. Use 2 ½” screws to screw into place. Repeat this step three more times for each of the bases.
5. Use your Kreg jig to pre-drill holes in all of the following pieces: 8 C’s, 2 B’s, 2 H’s and in the A’s according to the diagram.
6. Assemble the D’s to each of the base.
7. Attach the C’s to the bases.
8. Attach the top bases to the bottom bases.
9. Attach the H’s to connect the bases to each other.
10. For the top of the table, you will need to lay out the 4 planks on a flat surface next to each other. Mark each piece A1, A2, A3 and A4.
11. Use the Kreg jig to cut holes that will join the boards together, leaving none on the outside of the table.
12. Use 2 ½” screws to attach all of the boards together.
13. Use the remaining two I’s and place them on the bottom side of the table 12” fron the ends of the table, and 3 ¼” inches from either side. Secure with 2 ½” screws to the underside of the table.
14. On the bottom of the two table bases, add your 4 G’s that will act as your feet. You can screw these in or use a nail gun to secure them into place.
15. Turn the entire structure upside down and screw in the bases to the table.
Return to the Episode Guide >>
Check out more fun DIY projects at the Home & Family Pinterest Page
