

DIY Reversible Scarecrow-Snowman Sign
Level:
Intermediate
How-To:
Home Decor
Seasonal Event:
Fall, Christmas
Materials
- 2 Craft palette boards 24” x 36”
- 2 Craft boards 4” x 24”
- Acrylic paint in a variety of colors (or paint pens)
- Paint brush
- Hot glue and glue sticks
- Piano hinge 18”
- Pencil
- Tape measure
- OPTIONAL: Wood stain
Directions
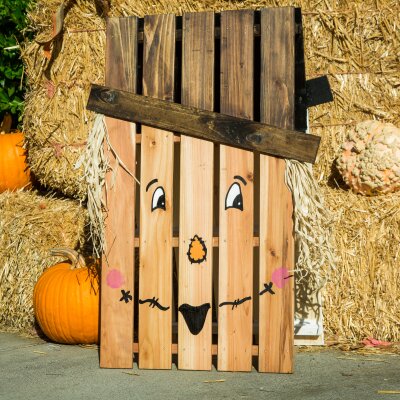
- Measure where you would like the brim of the hat to go. I am measuring 10” down at the top of the angle and 12” at the bottom of the angle.
- Place the smaller craft board on the palette board at an angle.
- You can attach with glue or screws. If you are using paint, apply the paint before attaching to the palette board.
- On one side of the board, paint or stain the bottom a light brown color for the scarecrow’s face.
- Paint the hat brim and the board above the brim a darker color of brown to serve as the scarecrow’s hat.
- Set aside to dry.
- While that board is drying, paint the second board white below the brim and black on the brim and on the palette board above the brim. Set aside to dry.
- Now you are ready for decorating! Create the scarecrow’s face by using acrylic paints or paint pens
- For the snowman, using acrylic paints or paint pens.
- Once both palette boards are dry, attach them together at the top with the piano hinge, following the directions from the manufacturer
- OPTIONAL: Add a little dry brush on the black top and brim of the hat of the snowman to make it look like a little snow has fallen.
- OPTIONAL: You can use the brim to write something like “Happy Fall” and “Let it Snow”. I prefer to keep mine as a hat.
