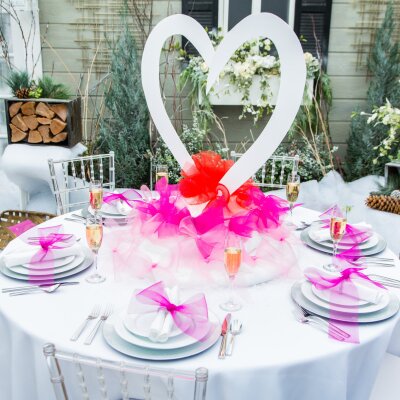
Galentine's Day Tablescape
Level:
Intermediate
How-To:
Home Decor, Party Decor
Seasonal Event:
Valentine's Day, Galentine's Day
MATERIALS:
HEART CENTERPIECE:
- Foam core
- X-acto knife
- Poster board
- Scissors
- Hot glue gun and glue sticks
- Pencil
- Ruler
- Cutting mat
BOWS AND POUFS:
- Horsehair webbing in desired colors
- Fabric scissors
DÉCOR:
- White tablecloth
- Cake stand
- Faux fur throw
- Loose faux snow
- Napkin rings
- Dashes gel adhesive stickers
- Silver chargers
- Flatware
- Champagne glasses
INSTRUCTIONS:
HEART CENTERPIECE
- First you need to create the template. Fold your poster board in half and draw half of a heart. Cut it out then cut the heart in half.
- Use your ruler to measure 3” inset from the edge of the heart all around and draw out the line, connect the point at the top and cut the bottom edge flat. Now you have your template!
- Place the template onto the foam core, trace and cut out two halves of the heart.
- To create the brace for each half of the heart cut a 3” wide foam core rectangle out with a slit cut halfway through the middle that is the width of your foam core. PRO TIP: Cut the top corners off of each rectangle so it’s easier to cover if just using snow.
- Cut a slit out of the flat cut bottom of each heart half that is the width of your foam core and to the height of the slit in the other brace.
- Slide a brace onto the bottom of each half heart and secure the intersection with hot glue.
- Cut a piece of foam core for the base, ours was about 7” x 7”.
- Secure one brace to the base with hot glue, position the other half heart about 2-3” in front of the other facing the opposite direction to create a full heart. Mark it before gluing to assure they line up properly.
- Place in the center of the table.
BOWS AND POUFS
- To create the poufs cut about 20” sections of the webbing and pull the thread in one edge of the webbing to gather one side. Tie a knot to secure. Repeat to create as many as desired.
- To create the bows, tie the webbing into a bow and pull taut, trim the excess. Pull and twist the webbing to add volume.
DÉCOR
- Place tablecloth and put the cake stand in the middle of the table. Place the heart on the cake stand. Secure the heart to the stand with dashes. PRO TIP: dashes are a removable gel adhesive that won’t ruin surfaces they stick to so they’re ideal for temporary set ups!
- Lay the faux fur throw around the stand to create a mound shape.
- Sprinkle the snow around and on the throw, especially where you need to disguise the base.
- Place the bows all around the mound, if you created multiple colors cascade them from dark to light or vice versa to create an ombré effect.
- Attach bows to the napkin rings with a dash or two.
- Set the table.
- Enjoy!


