

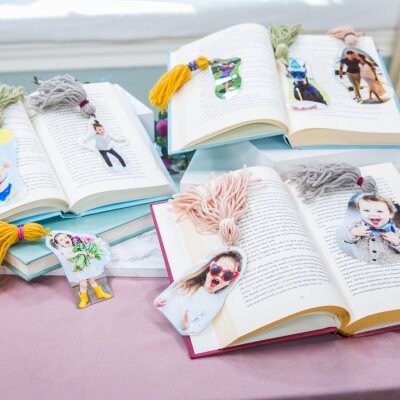
DIY Photo Bookmarks
Level:
Beginner
How-To:
Kids
DIY PHOTO BOOKMARKS MATERIALS:
- Vertical printed photographs
- Laminator
- Laminating pouches
- Yarn in desired colors or existing tassels
- Hemp cord in desired colors or existing tassels
- Scissors
- Hole punch
OPTIONAL:
- Packing tape
- Photo paper
DIY PHOTO BOOKMARKS INSTRUCTIONS:
- Print out desired photos. PRO-TIP: You can use photo paper, but the lamination makes regular printer paper look polished and vibrant just like photo paper.
- Cut around the subject of the photo pretty closely, but not exact so that there is a bit of a border using a pair of scissors.
- Laminate the photograph. If making multiple bookmarks, place several trimmed photos in the pouch and feed through the machine according to instructions. PRO-TIP: If you don’t have a laminator, you can place packing tape on both sides of the photograph to seal it instead.
- Cut away the excess laminate to the shape of the photo with about 1/8” border of around.
- Punch a hole at the top of your bookmark.
TO CREATE THE TASSEL:
- Take the yarn of your choice and wrap it around the four fingers of your non-dominant hand until you have a nice thick amount for a tassel. Cut one end of the wrap.
- Place a strand of hemp cord in the fold of the yarn as the tie, knot in place.
- Wrap around the yarn about a 1” down from the fold with hemp cord to secure the yarn into a tassel.
- Trim the loose bottom pieces of yarn straight with scissors to finish.
TO FINISH THE BOOKMARK:
- Attach the tassel to the bookmark by feeding the hemp tassel tie through the hole of the bookmark, knot to secure and enjoy!
