

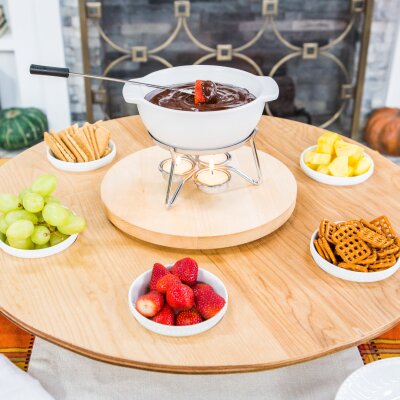
DIY Fondue Station
Level:
Advanced
DIY FONDUE STATION MATERIALS:
- Snack bowls with taper or lip
- Lazy Susan hardware
- 18” wooden round
- 10” wooden rounds 3/4” thick x2
- 24” plywood round 1/2” thick
- 4 1 1/2” screws
- 1/2” screws
- 1” tall spools x6
- Drill
- Forstner bit 3/4”
- Hot glue gun and glue sticks
- Jigsaw
- Sanding block or orbital sander
- Pencil
- Ruler or tape measure
- Construction compass
- Caliper to measure bowls
- Finishing wax
- T-shirt rags
DIY FONDUE STATION INSTRUCTIONS:
- If you cannot purchase one, cut a 24” plywood round yourself out of ¾” plywood with a jigsaw.
- Find the center of each of the rounds. Draw out a cross-section on the top and bottom of each round.
- Map out where you want each of the holes for the dishes and mark. PRO TIP: Make the holes for the bowls slightly smaller than the diameter of the top lip so that they set in without falling through.
- Cut out the holes for the snack bowls by using drilling a starter hole in each one then cut along the line you’ve drawn with a jigsaw.
- Use jigsaw to cut a hole in the center of the 24” round that is slightly smaller than the hole in the center of the lazy susan hardware.
- Place the lazy susan on over the center hole and mark through the small holes on the corners of the lazy susan hardware onto what will become the bottom the 24” round.
- Attach the lazy susan with screws to the 10” round.
- On the 10” round, use a pencil to mark through a hole of the lazy susan hardware then drill hole through with forstner bit. This will allow you to drill and screw through to attach the opposite side of the lazy susan to the 24” round.
- Place the 10” round lazy susan side down onto the 24” round and line up your cross-section lines on each round to assure that they are centered. Screw through the hole in the 10” round to attach the lazy susan to the 24” round.
- Elevate the lazy susan so the bowls have room to sit. Attach the 18” round to the bottom of the 10” round that the lazy susan is attached to, predrill holes to make this easier. PRO TIP: The bottom being bigger not only elevates it so the bowls can sit but weights the lazy susan, so it is sturdy.
- Attach the fondue pedestal. Flip the lazy susan over. Glue the spools on in place evenly spaced. Place some glue on top of the spools, line up the cross-section lines of the top 10” round to the cross-section on the 24” round and place.
- Sand enough to remove pencils and soften edges.
- Apply wax finish. Allow to dry.
- Set your fondue and dippers. Enjoy!
