

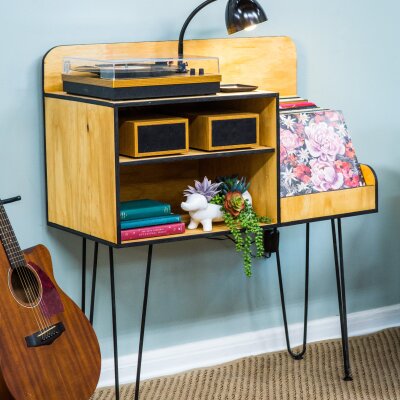
DIY Turntable Display
Level:
Advanced
How-To:
Home Decor
DIY TURNTABLE DISPLAY MATERIALS:
- ½” Plywood cut to:
- 20” x 34 ½” for the backsplash
- 16” x 34 ½” for the base
- 5” x 16” for the side panel of the album storage
- 2 ¾” x 13 3/8” for the front panel of the album storage
- 16” x 19 ¼” for the speaker shelf
- 14” x 16” x2 for the sides of the speaker shelf
- 16” x 20 ½” for the top of the speaker shelf
- Circular object like bowl to use as template for round corners
- Jigsaw
- Pencil
- Tape measure and straight edge
- 20” hairpin legs x4
- Nail gun
- ¾” brad nails
- Wood glue
- ½” screws
- Drill bit to size of shelf pins
- 1 ½” forstner bit
- Drill
- Orbital sander with sanding pads or sanding block
- Stain
- Stain rags
- Paint
- Paintbrushes
- Optional:
- Circular or table saw
DIY TURNTABLE DISPLAY DIRECTIONS:
- Measure and cut all the plywood to size using either a circular or table saw. Pro tip: most hardware stores will do straight cuts for you.
- If you want to round the corners of the back splash and front corner of the album organizer side panel, place a bowl on each corner and trace.
- Cut the corners round with a jigsaw.
- On each of the two 14” x 16” shelf side pieces drill two parallel pilot holes 5” inset from each 14” edge so you can insert the shelf pins later.
- Attach the three vertical pieces of wood to the base, the two shelf sides and the side panel of the album organizer. Apply a line of glue to each edge you’re attaching and use the nail gun to secure in place through the bottom of the base into each edge. Pro tip: mark the spacing of the interior shelf side to make sure it is attached 19 ¼” from the inner edge of the exterior shelf side.
- Attach the top piece of the speaker shelf and the front of the album organizer. Place the pieces, add glue wherever there is a connection. Secure with a brad nail every few inches using the nail gun.
- Now, attach the back piece, run a line of glue along the back edge of wood where the back splash will attach, place the black splash and secure with brad nails.
- Secure the front of the album organizer side of the display. Apply glue to the bottom and side edges of the piece, slide in place and use nail from the outer edge in to secure.
- Drill the holes for the cords. Use the 1 ½” forstner bit to drill a hole into the center back edge of the shelf top, and through the back splash between the top and where the inserted shelf will sit.
- Sand the surface of the wood and any rough edges.
- Paint or stain as desired. Allow to dry.
- Place the shelf pins into the pilot holes you drilled for them earlier, slide the shelf in.
- Screw the hairpin legs onto the bottom with the display on its side.
- Display your albums and turntable as desired, enjoy!
